Steve Sanford
Well-known member
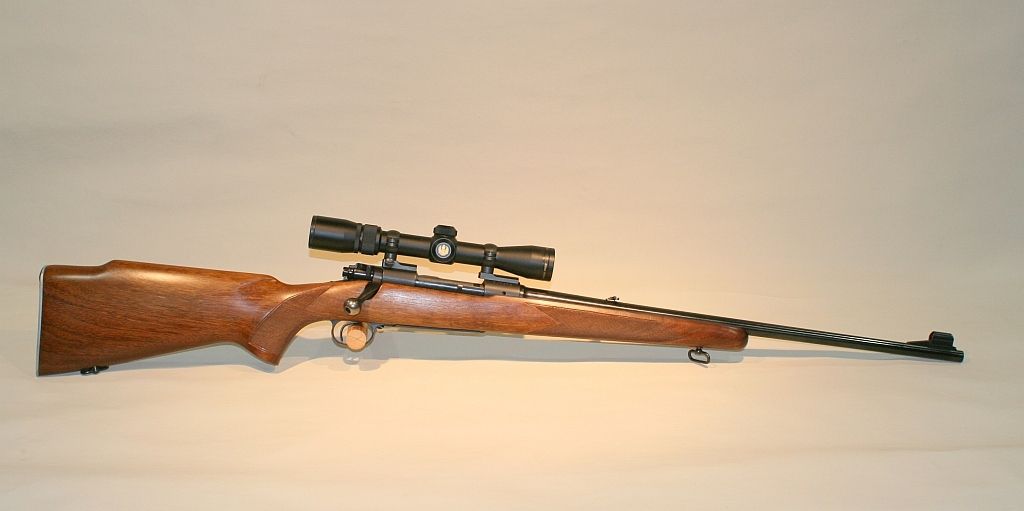
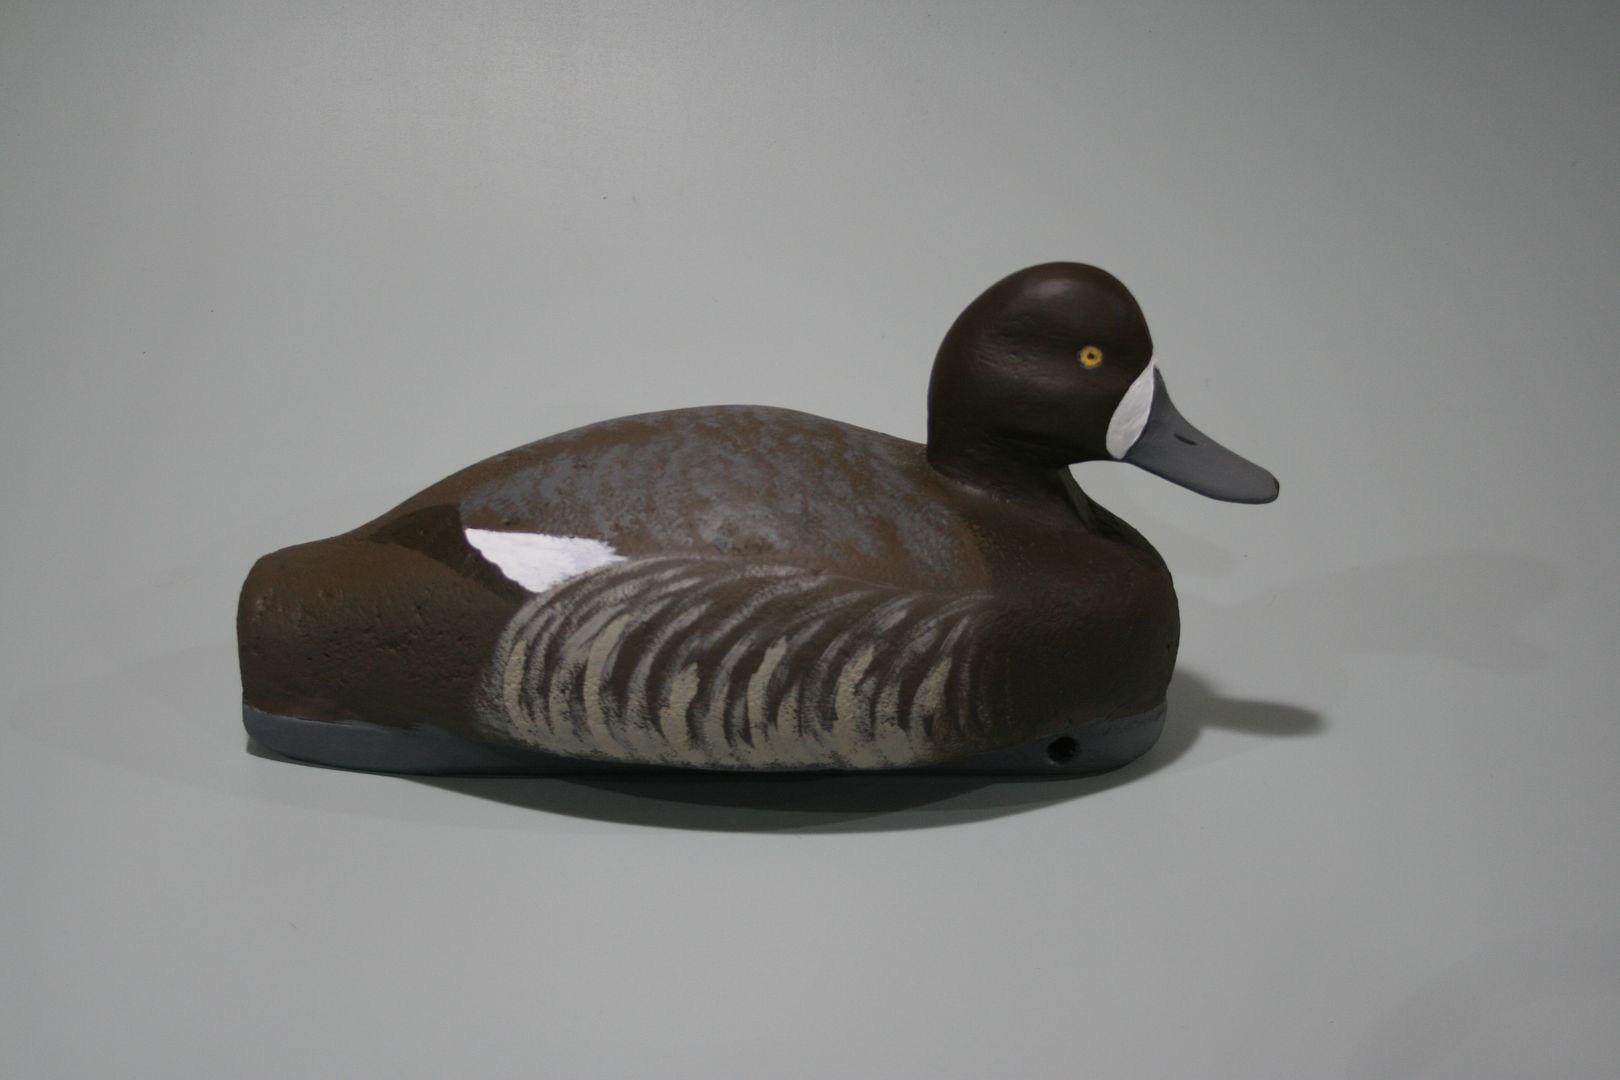
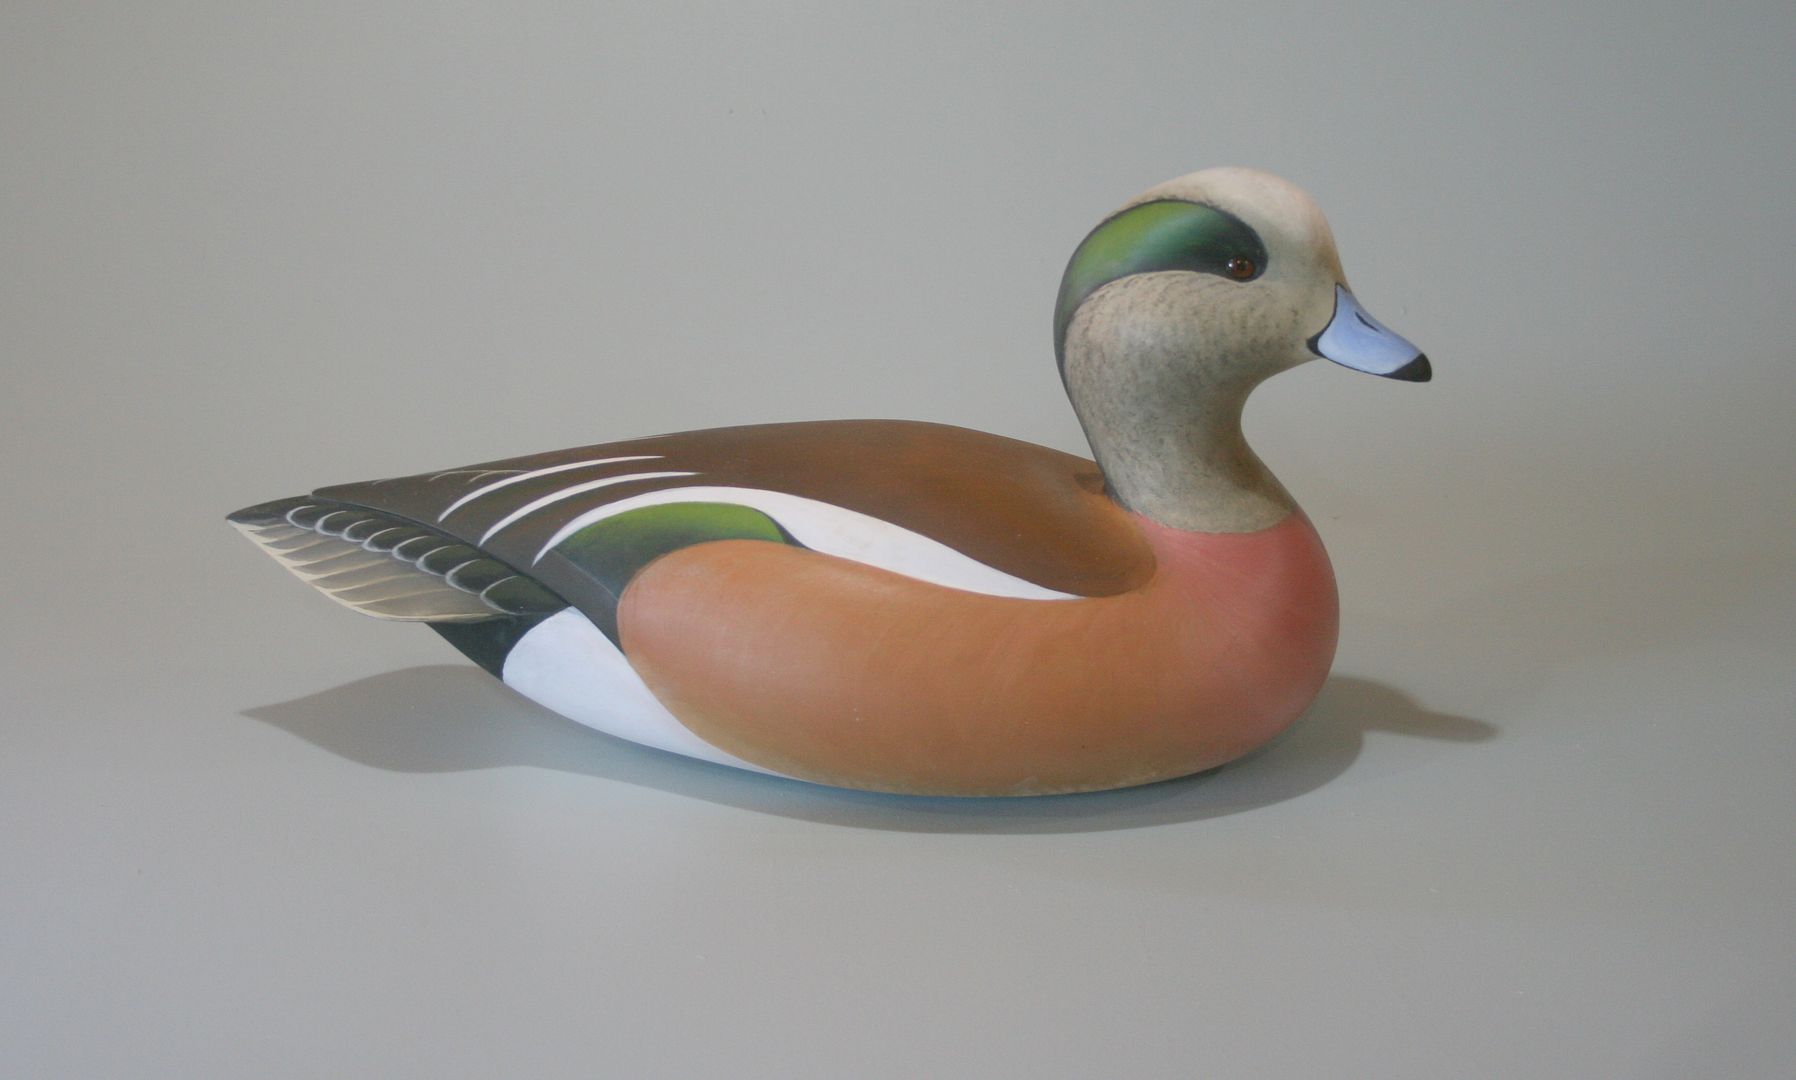
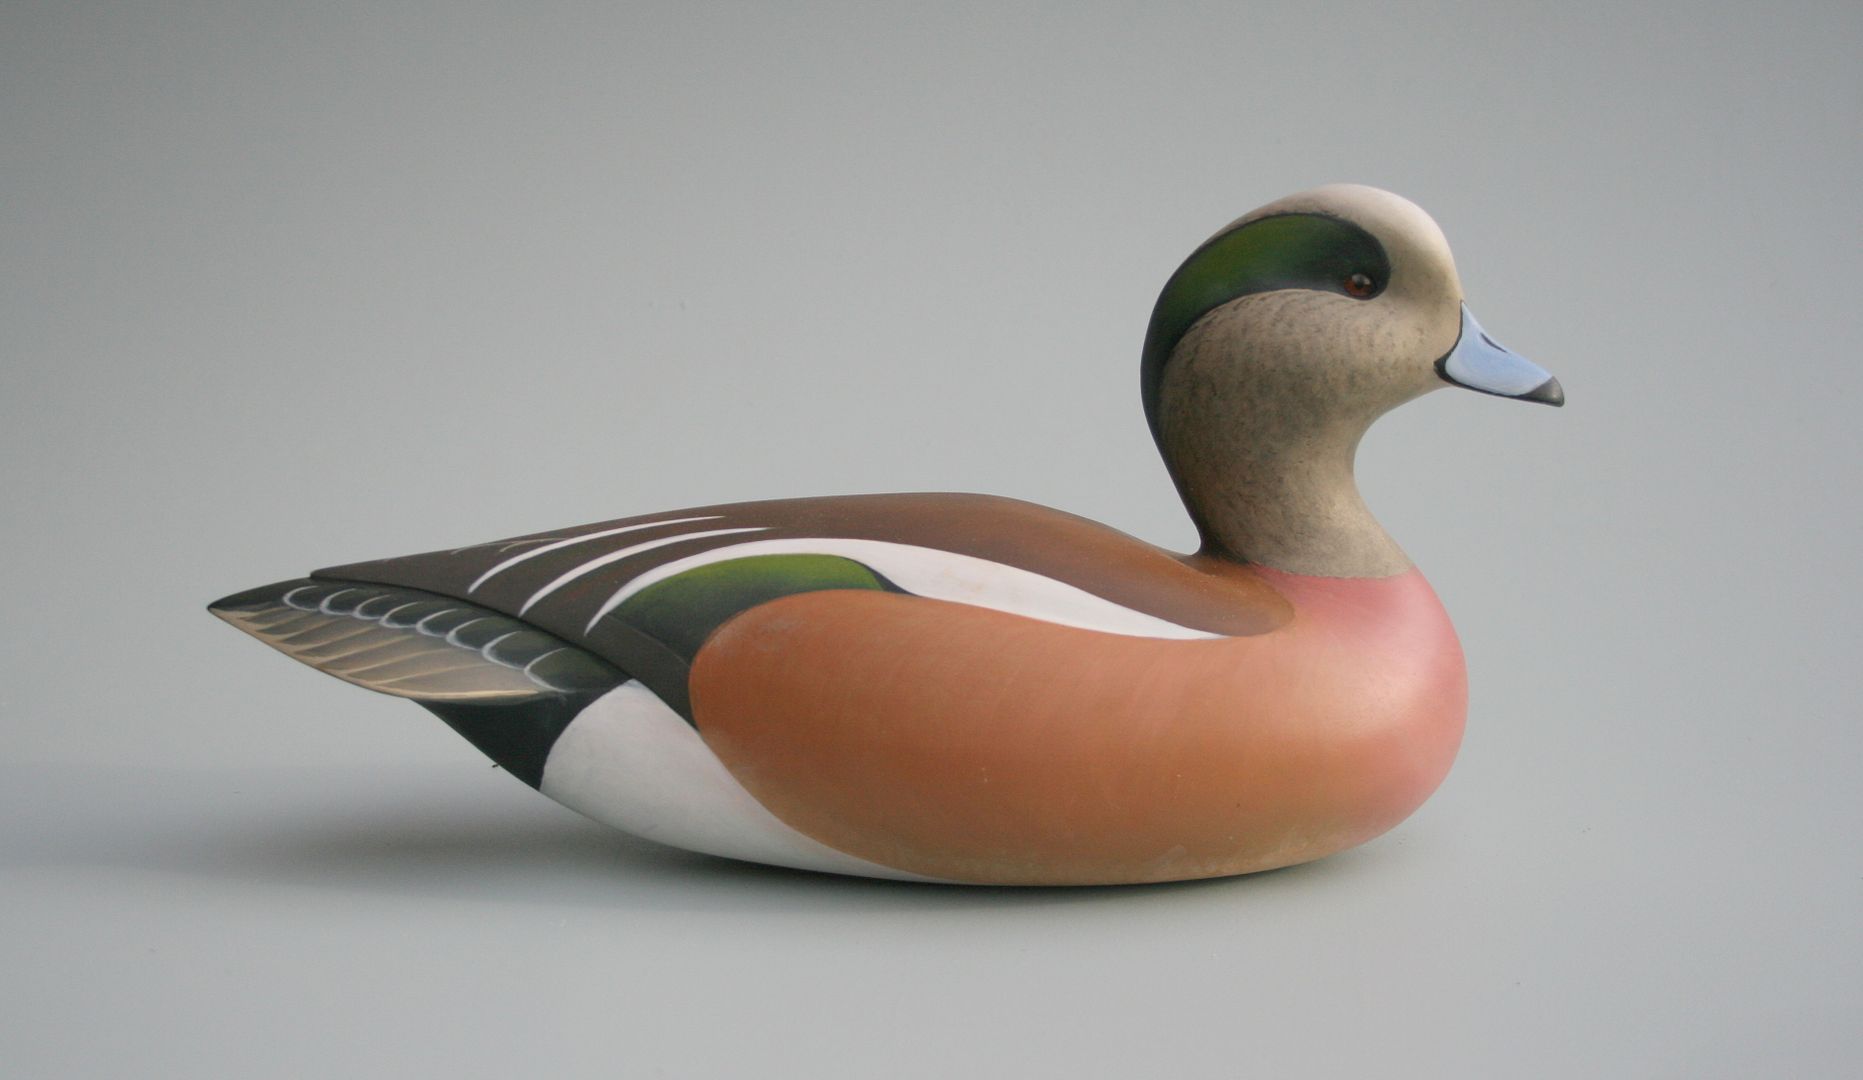
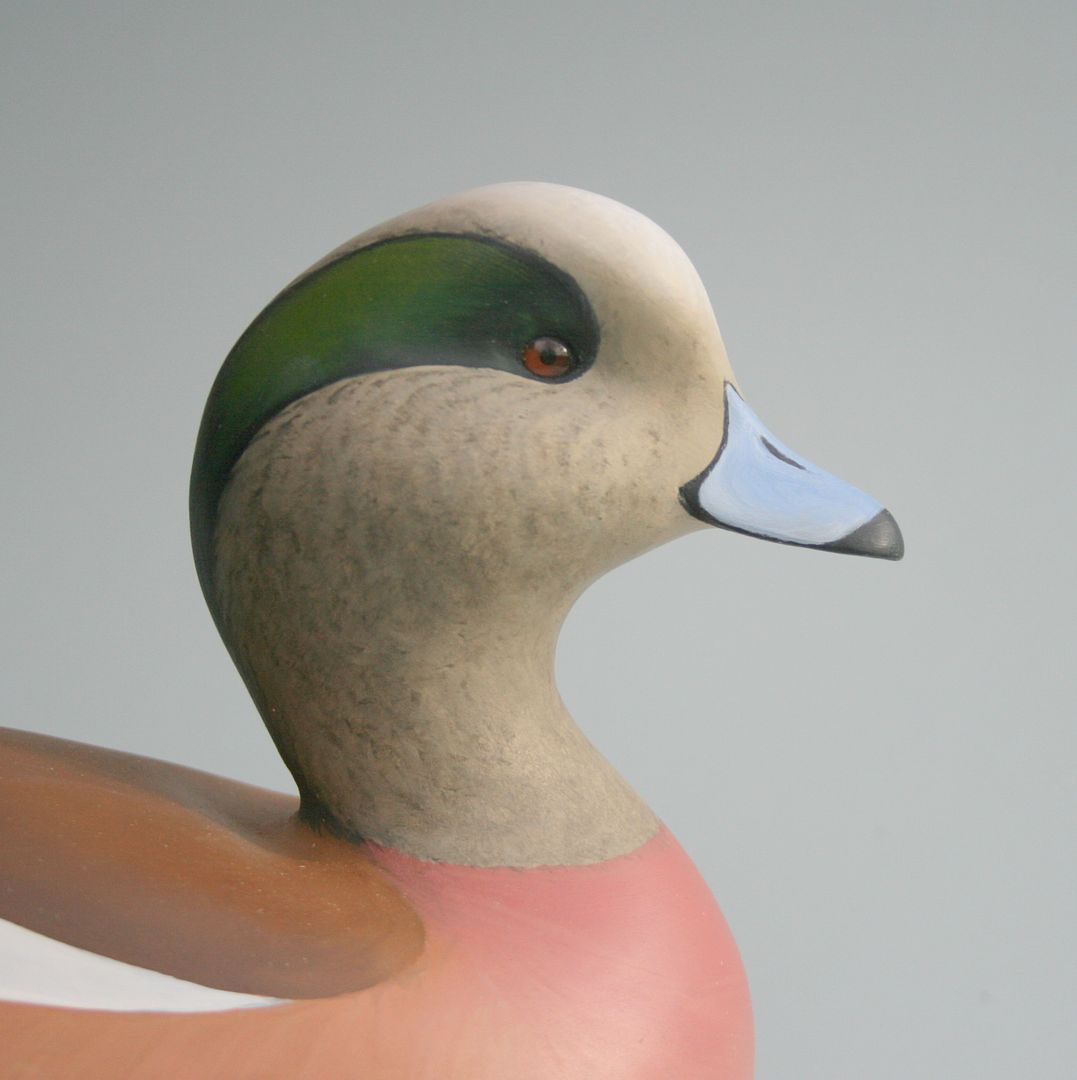
PHOTO BACKDROP ~ A horizonless background for decoys – and other small items
see also on my site at: https://stevenjaysanford.com/a-photo-backdrop-for-decoys/
All~
I built my first curved photo backdrop in the early 80s. I still have it – it has served me well – but is showing its age. More important, the way I built it has caused recurring problems as long as I have had it. My goal with this new one is to minimize the maintenance AND have a way to both use and store it that suits my work habits and my shop.
The idea behind such a backdrop is to provide a background that visually isolates the subject and provides few distractions. Photographers have long used cycloramas – or "cycs" – with curved walls to avoid horizons or corners showing in the finished image. So, I used some 1/8-inch Masonite (tempered hardboard, MDF, et cetera) to give me the curve I needed. The mistake I made was to nail through the Masonite into the frame. Although I have tried a variety if ringed nails and the like – and patched the nail holes repeatedly – the nail heads would make themselves known after the inevitable handling and moving. The new one uses just glue to hold the Masonite to the frame.
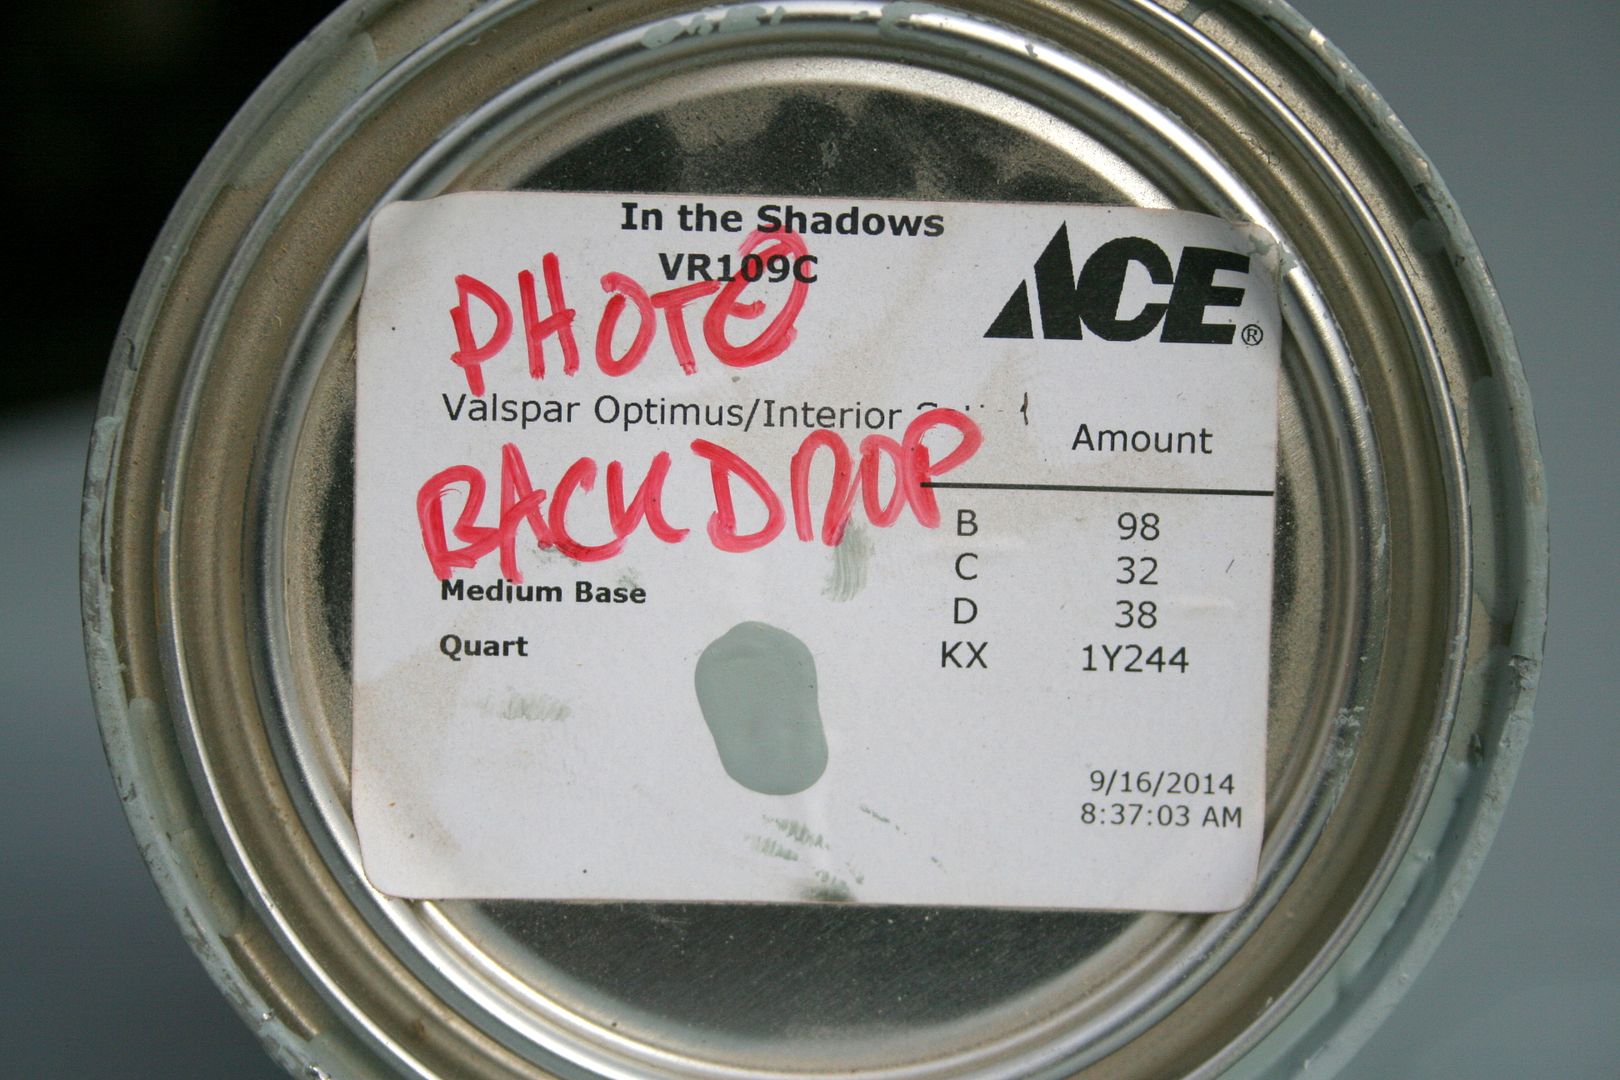
Also, I have tried rolled paper and a variety of fabrics on my old backdrop – but always come back to paint. Dead flat mars very easily – so I am now using satin latex. I have found no objectionable shine and it does wear better than flat. Nevertheless, I assume I will have to roll on a fresh coat of paint once or twice per year. I have also experimented with colors and tones and am now trying a fairly bright, cool grey.
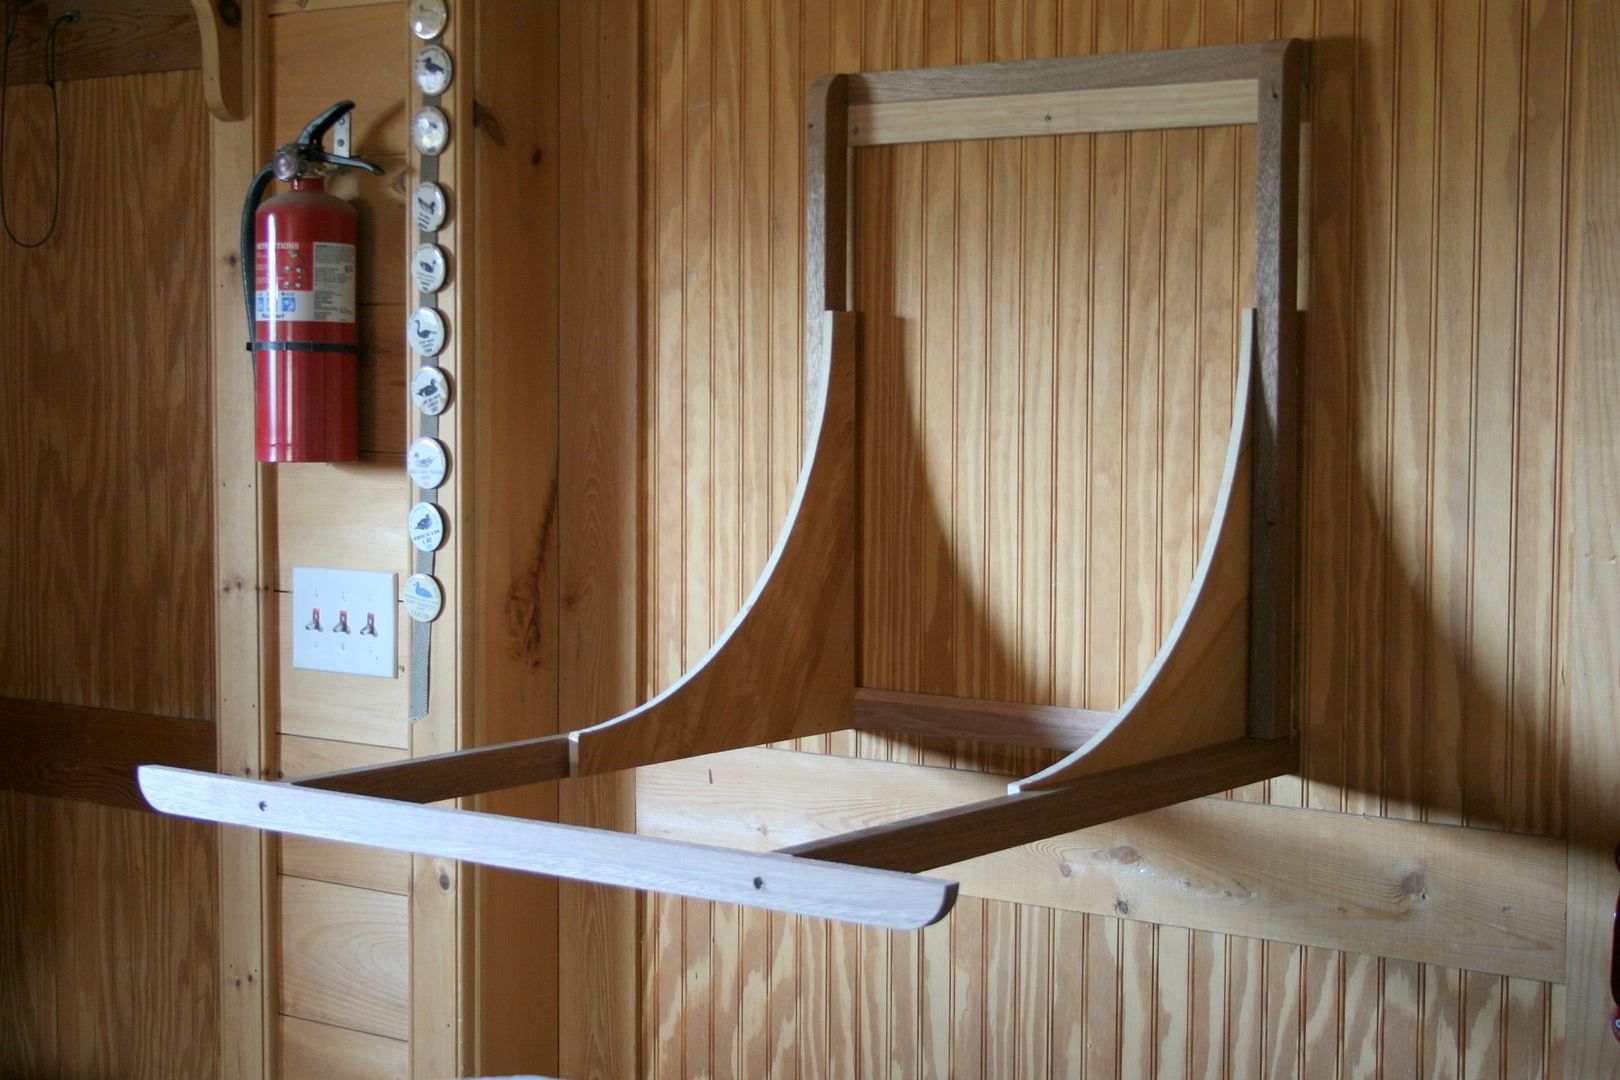
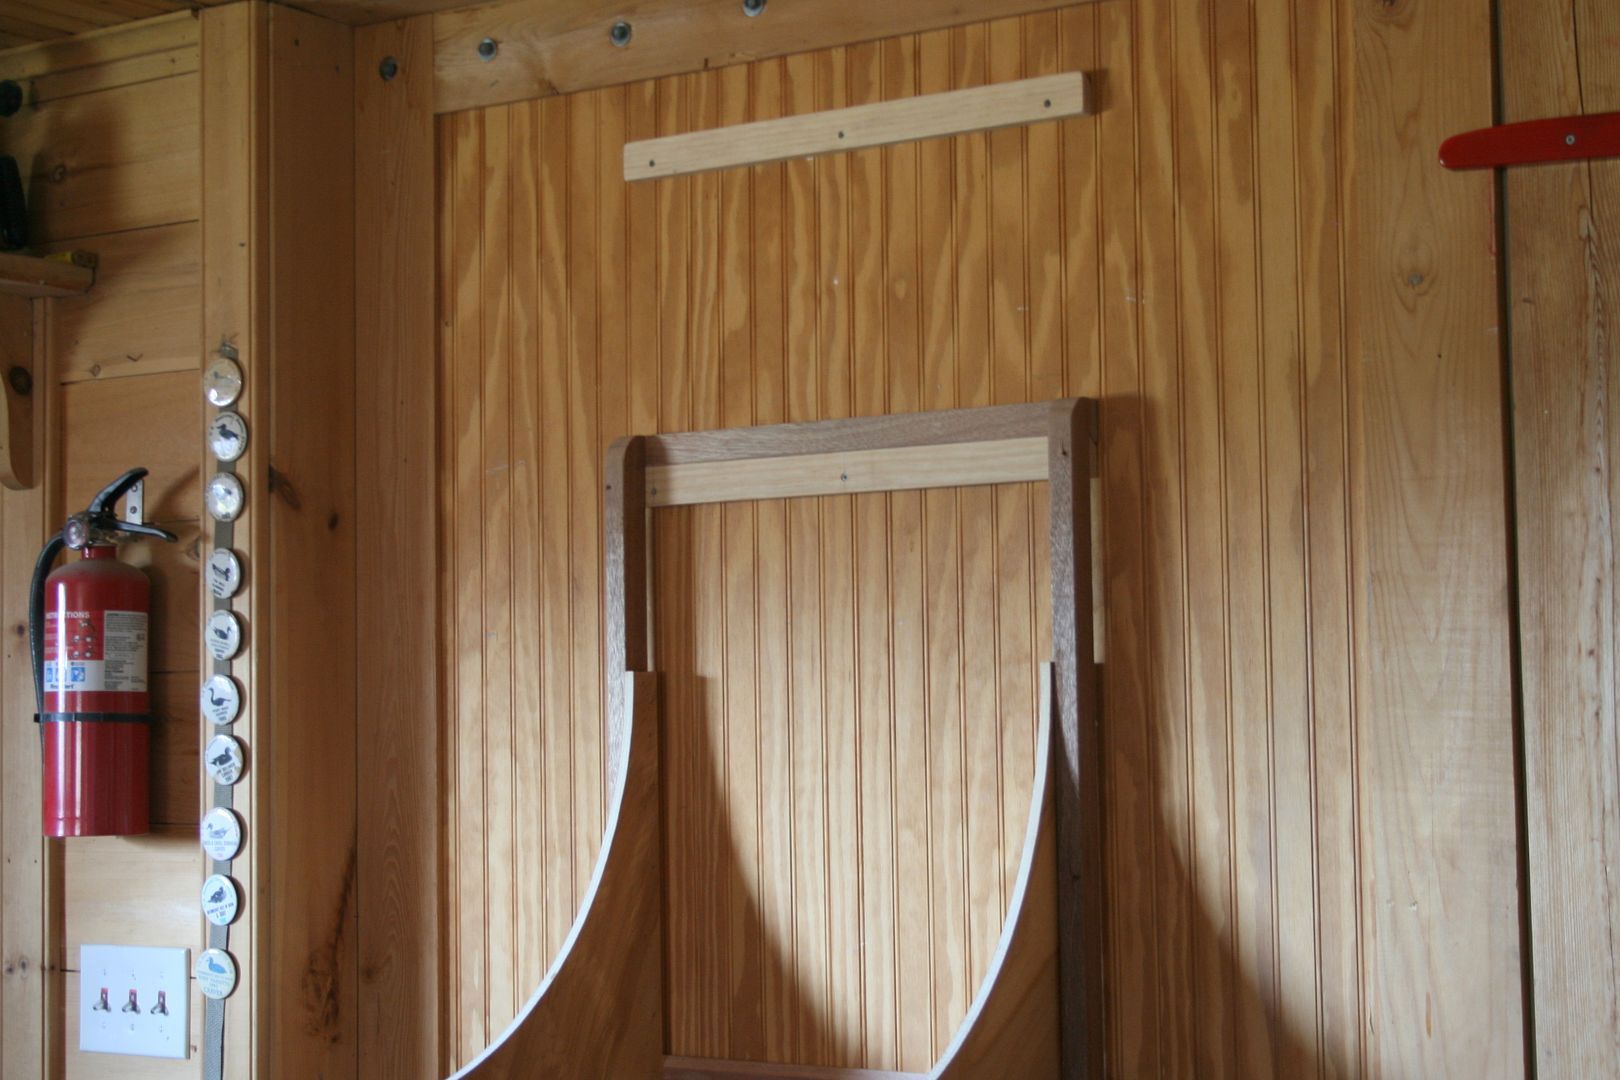
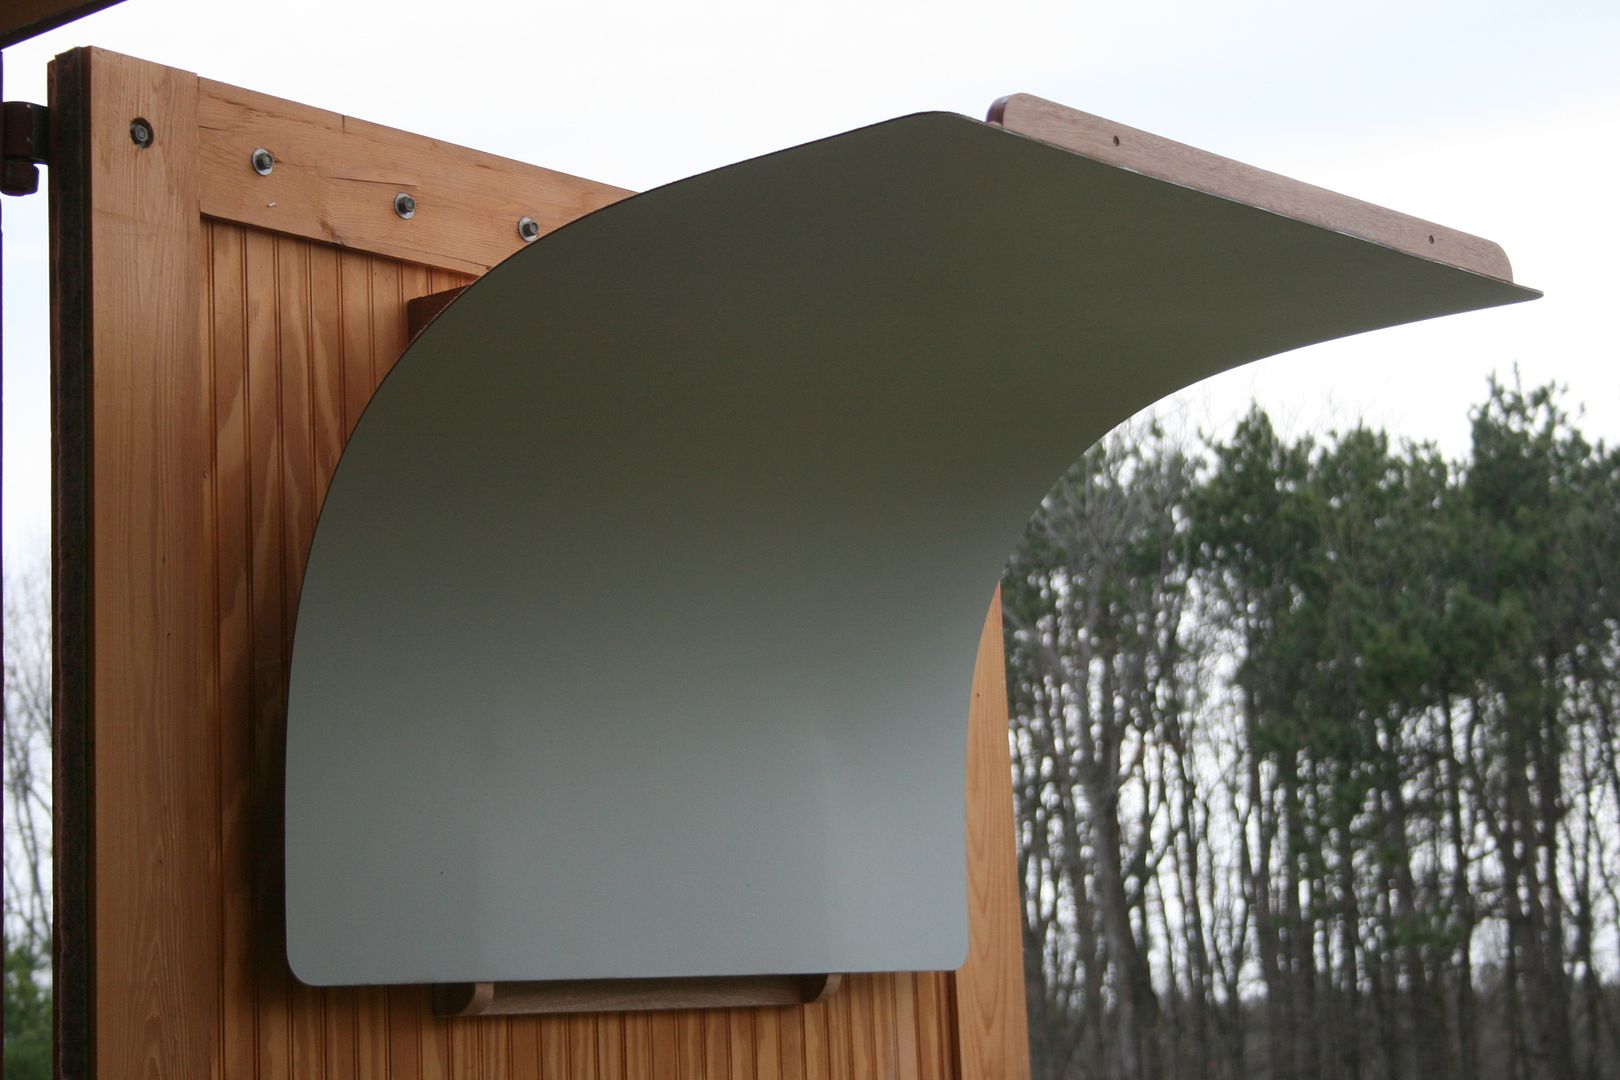
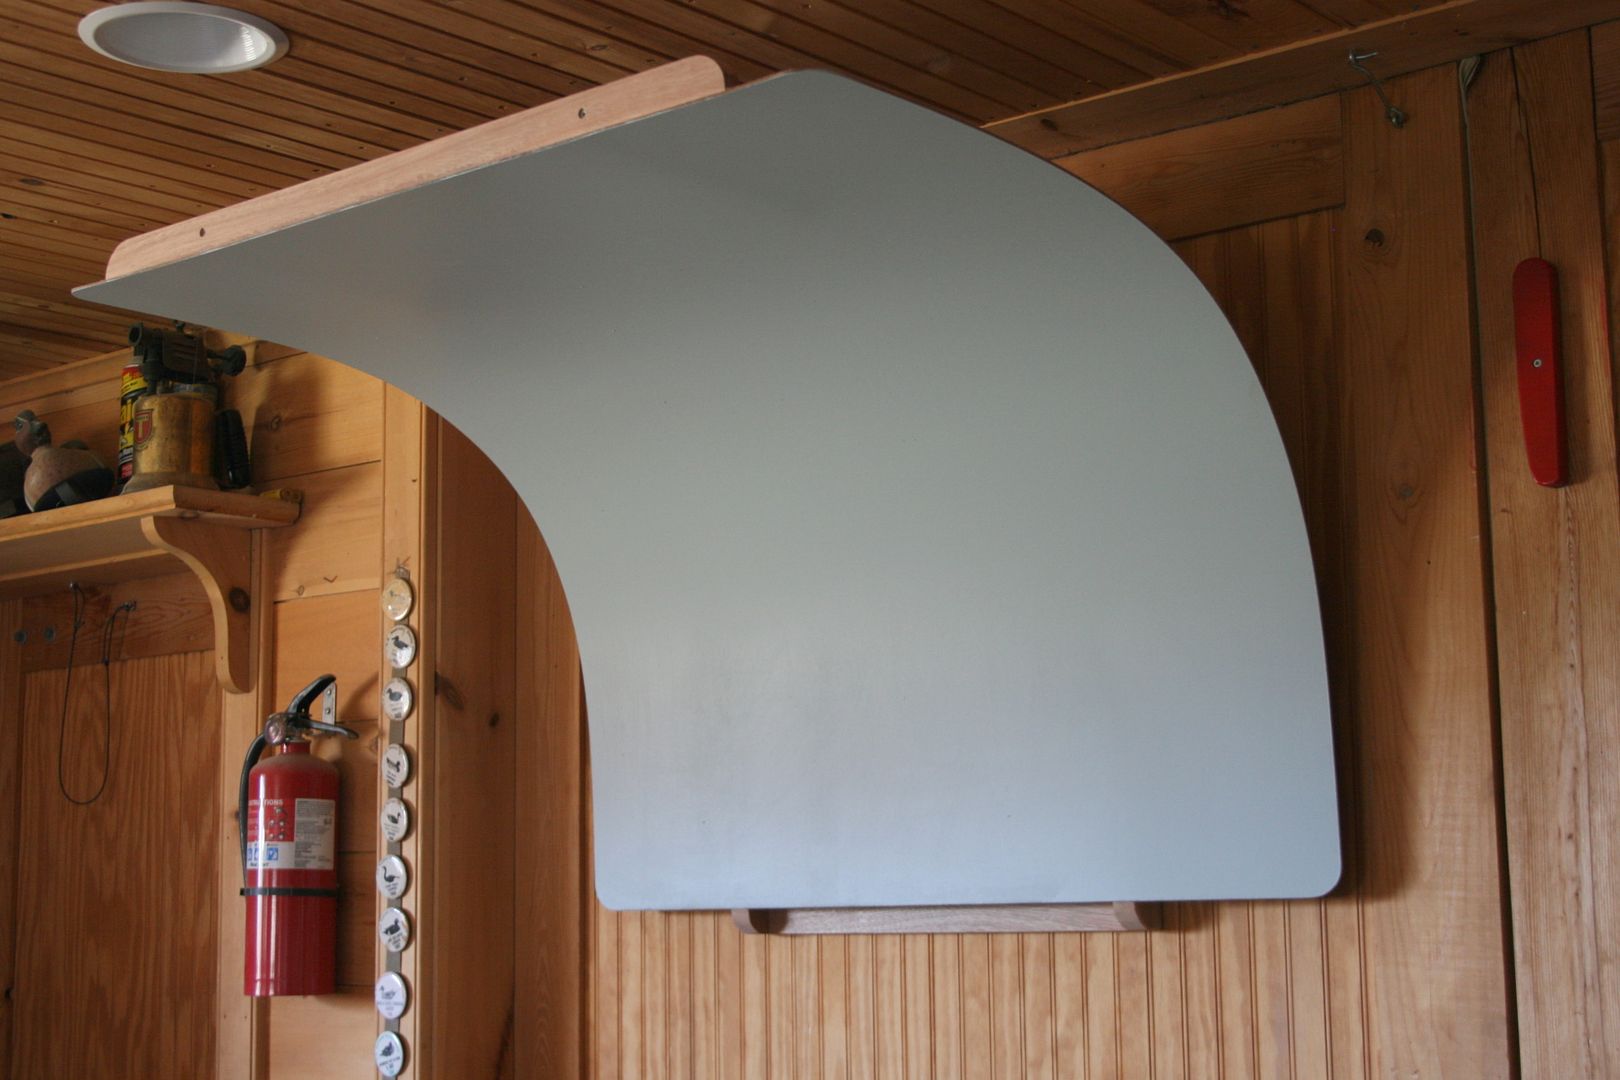
I am mostly excited about the new storage features. With 2 wood cleats on the frame – and 2 corresponding cleats on the big south door of my shop – my backdrop can now be used without additional support and also stores out of the way. I have been propping my old backdrop on saw horses, benches, trash cans and even the tailgate of my Honda Element. Now, I can film in artificial light or natural light with the backdrop mounted on the door – at a very convenient height.
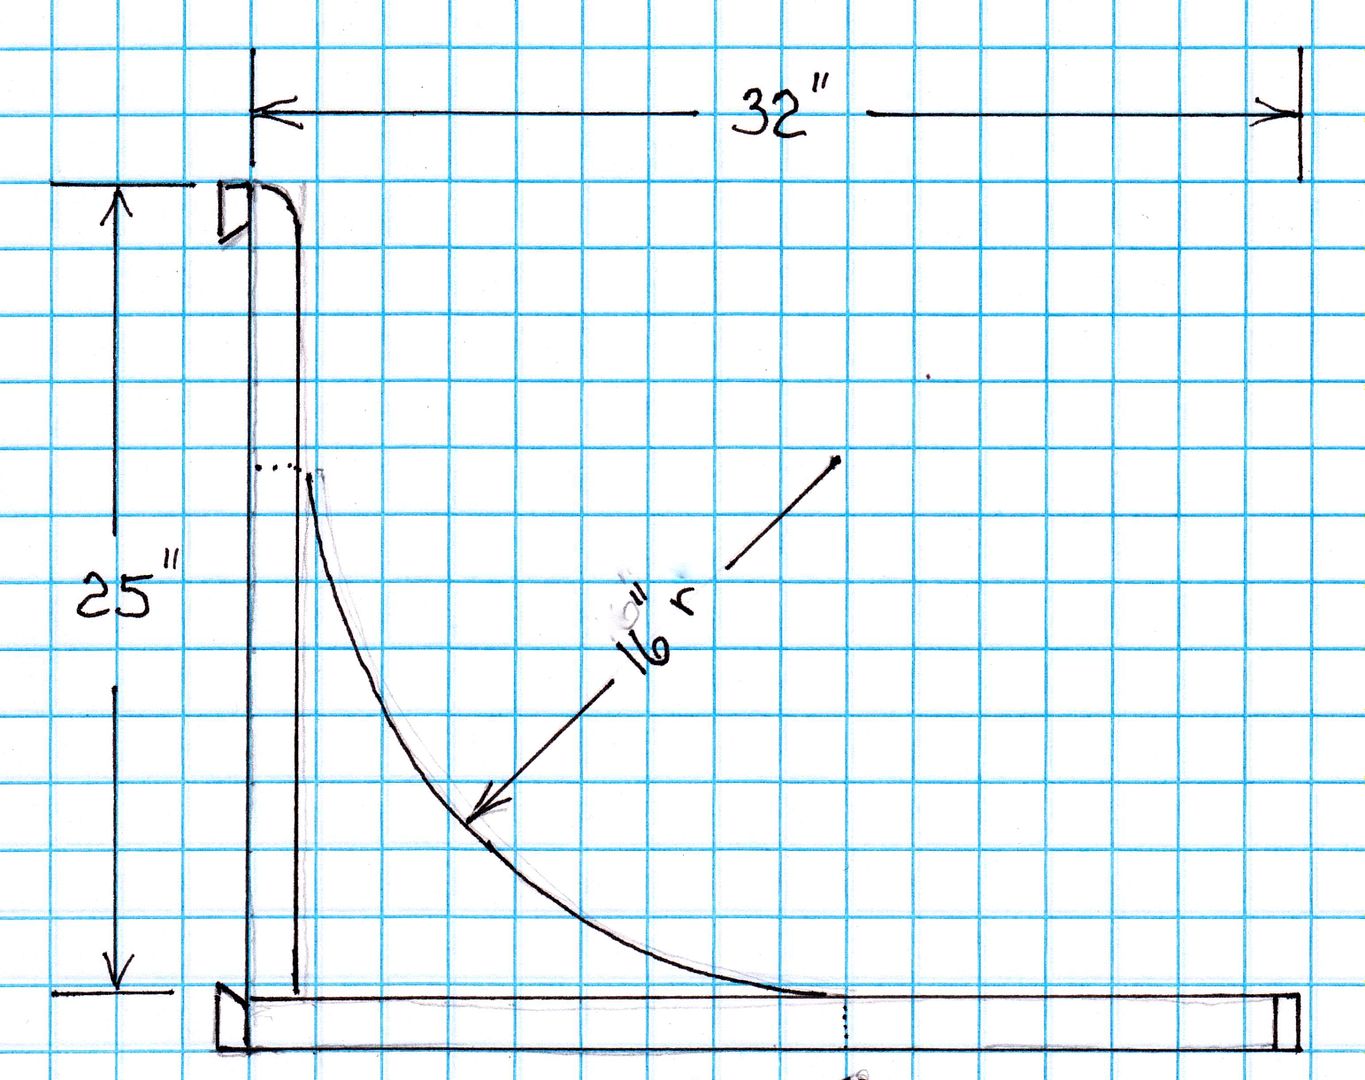
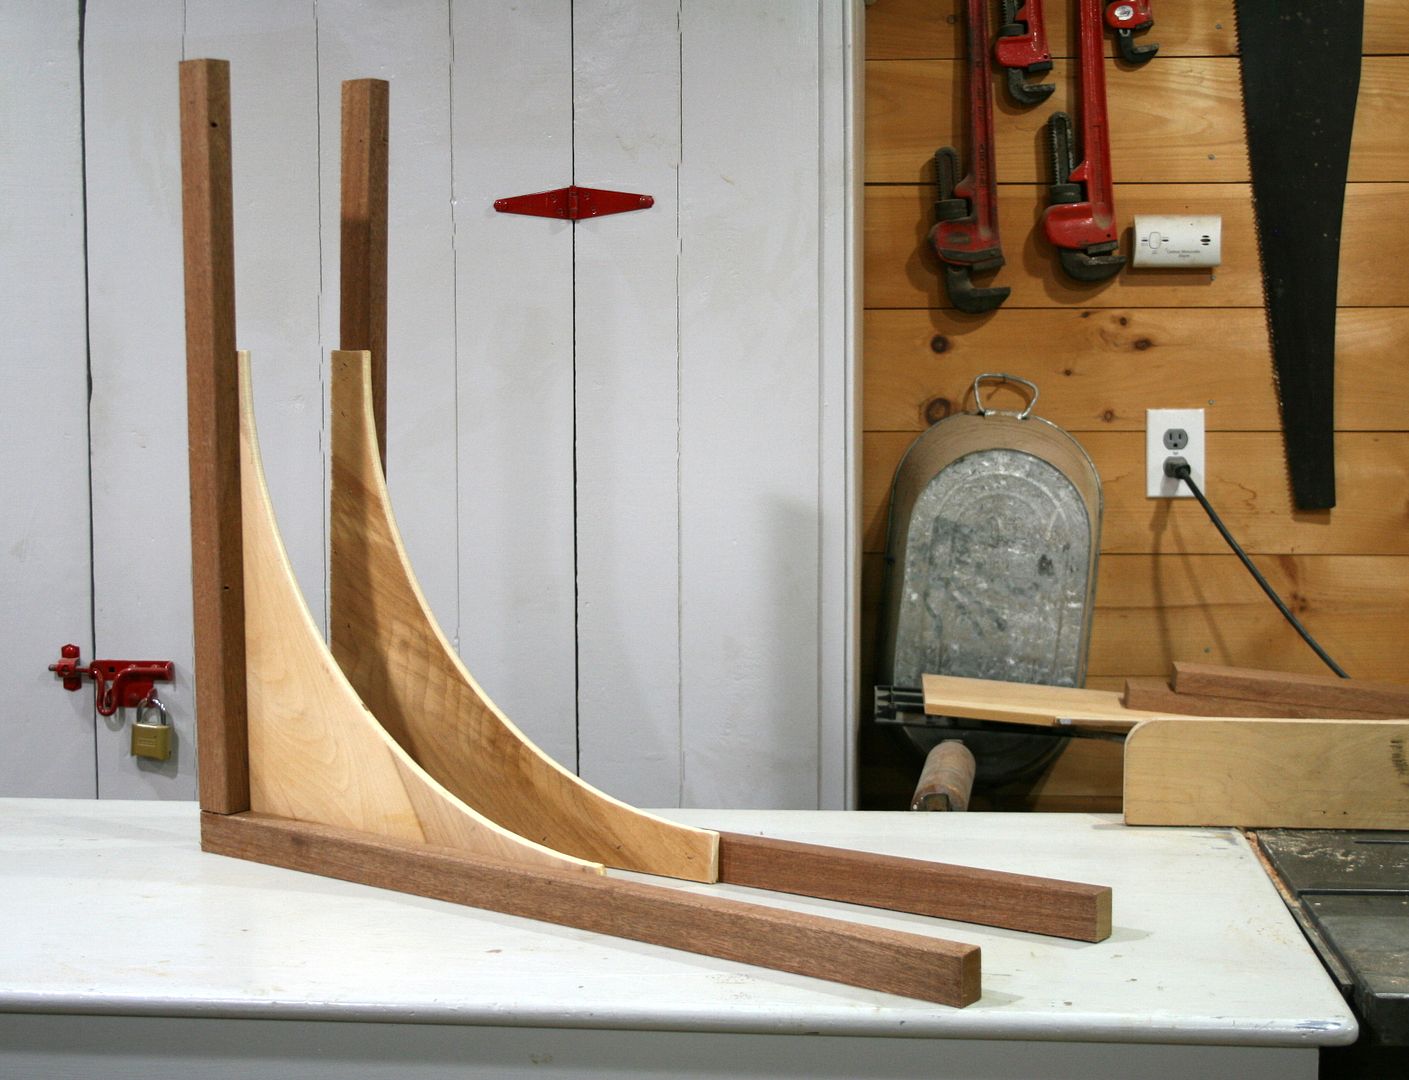
I began making the frames with some 5/4 Mahogany – but any mostly clear wood will do; certainly 1-inch (actually 3/4-inch thick) is sufficient. The "floor" is a bit longer than the "back wall". The 1/8-inch Masonite will take a 16-inch radius bend without breaking. I cut the Masonite 40 inches wide by 48 inches long.
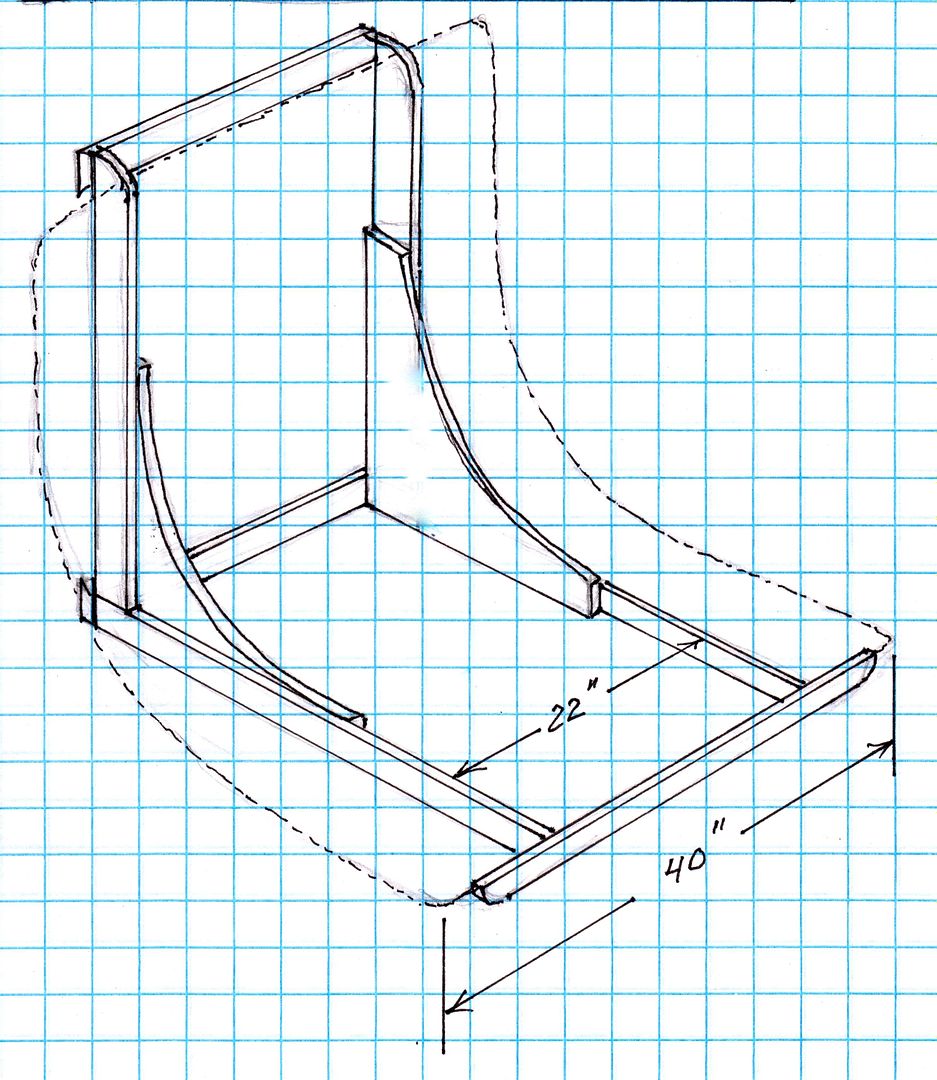
I used 1/2-inch birch plywood for the "knees" that join the floor and back wall frames. I laid out my curved cut by drawing a full-size pattern on paper and then marking it on the plywood. Its best to rough out – cut them oversize - the 2 pieces of plywood with a jig saw and then stack them for the final cuts. I glued them (Titebond II) in 3 spots outside of the cut lines and then sawed them to the final lines on the band saw after the glue set.
I clamped each plywood knee to its 2 frame pieces and fastened them with Titebond and my pneumatic stapler.
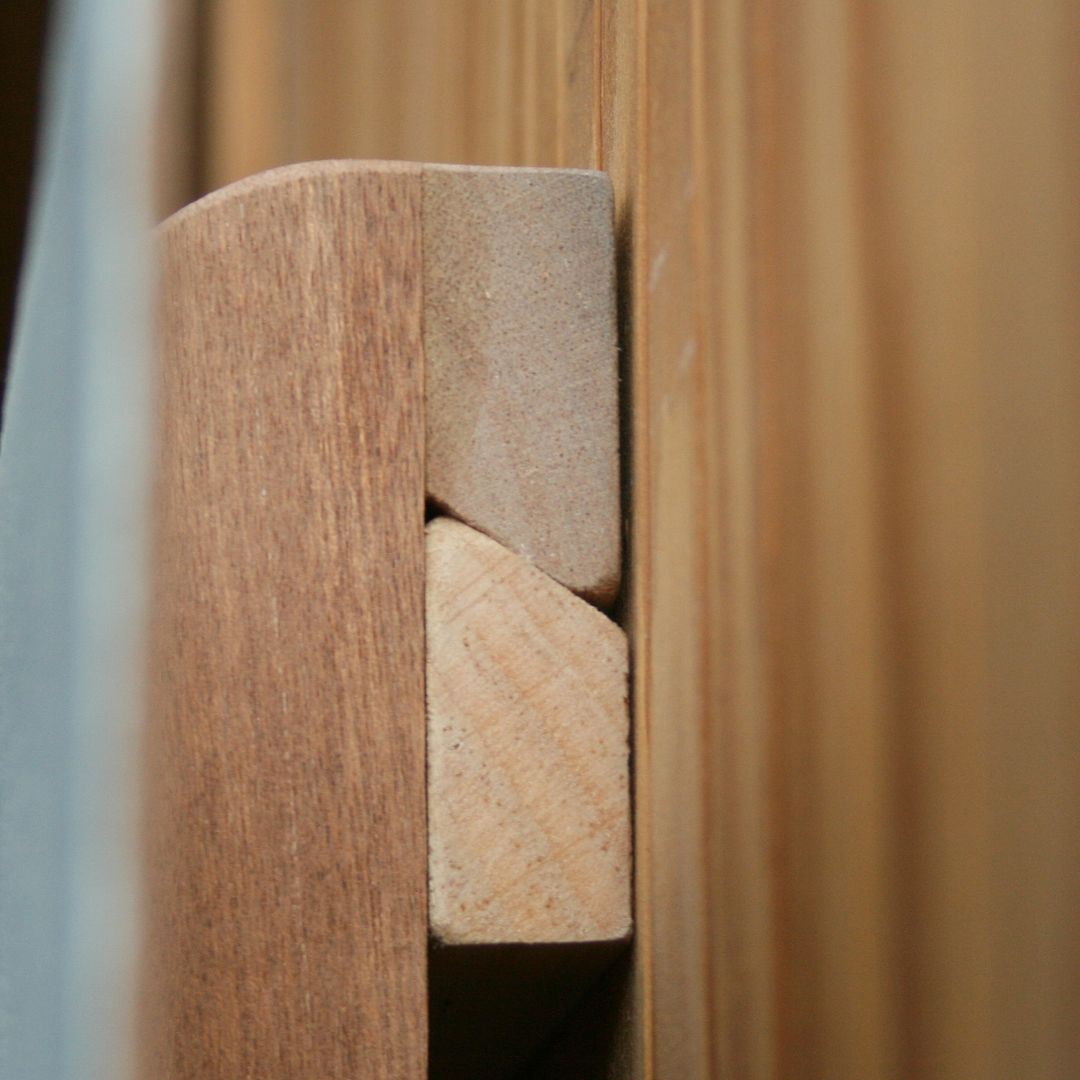
The cleats are all beveled on the table saw – approximately 45 degrees – so they will mate and gravity will hold the backdrop to the wall.
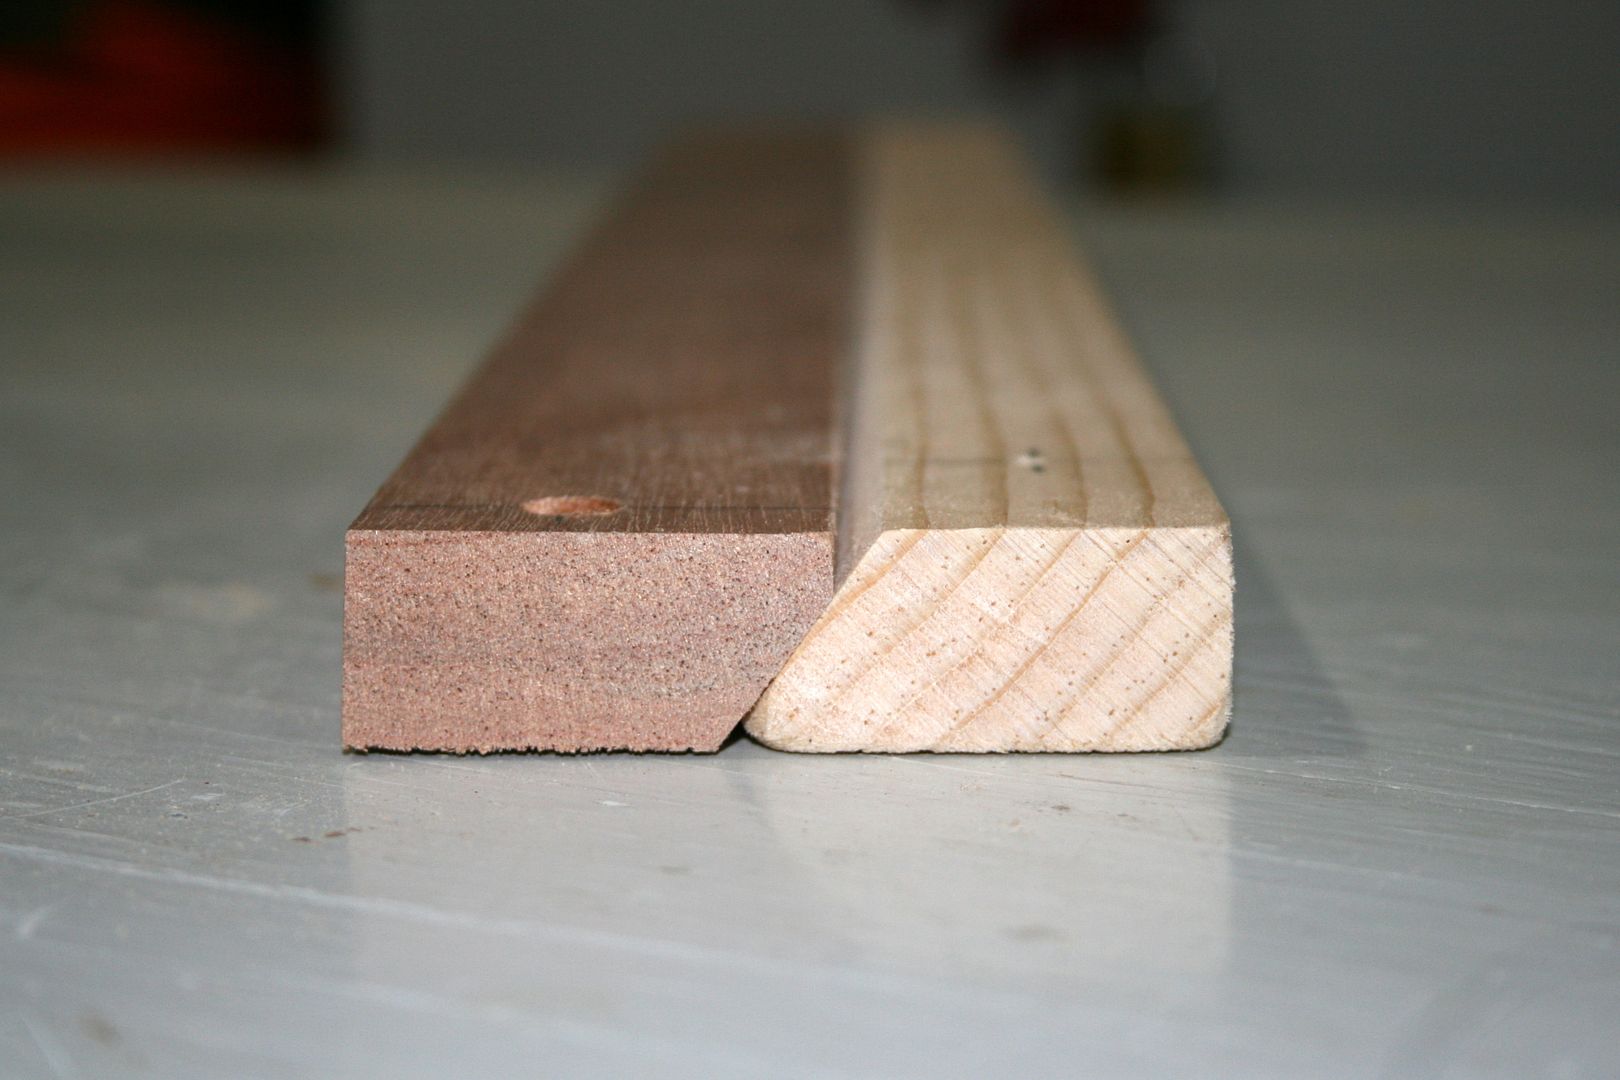
Two 2 frame cleats are screwed-and-glued to the back of the frame – the bottom one with the "mouth" upward and the top one with the "mouth" downward. The 2 wall cleats are screwed to the door with both mouths upward.

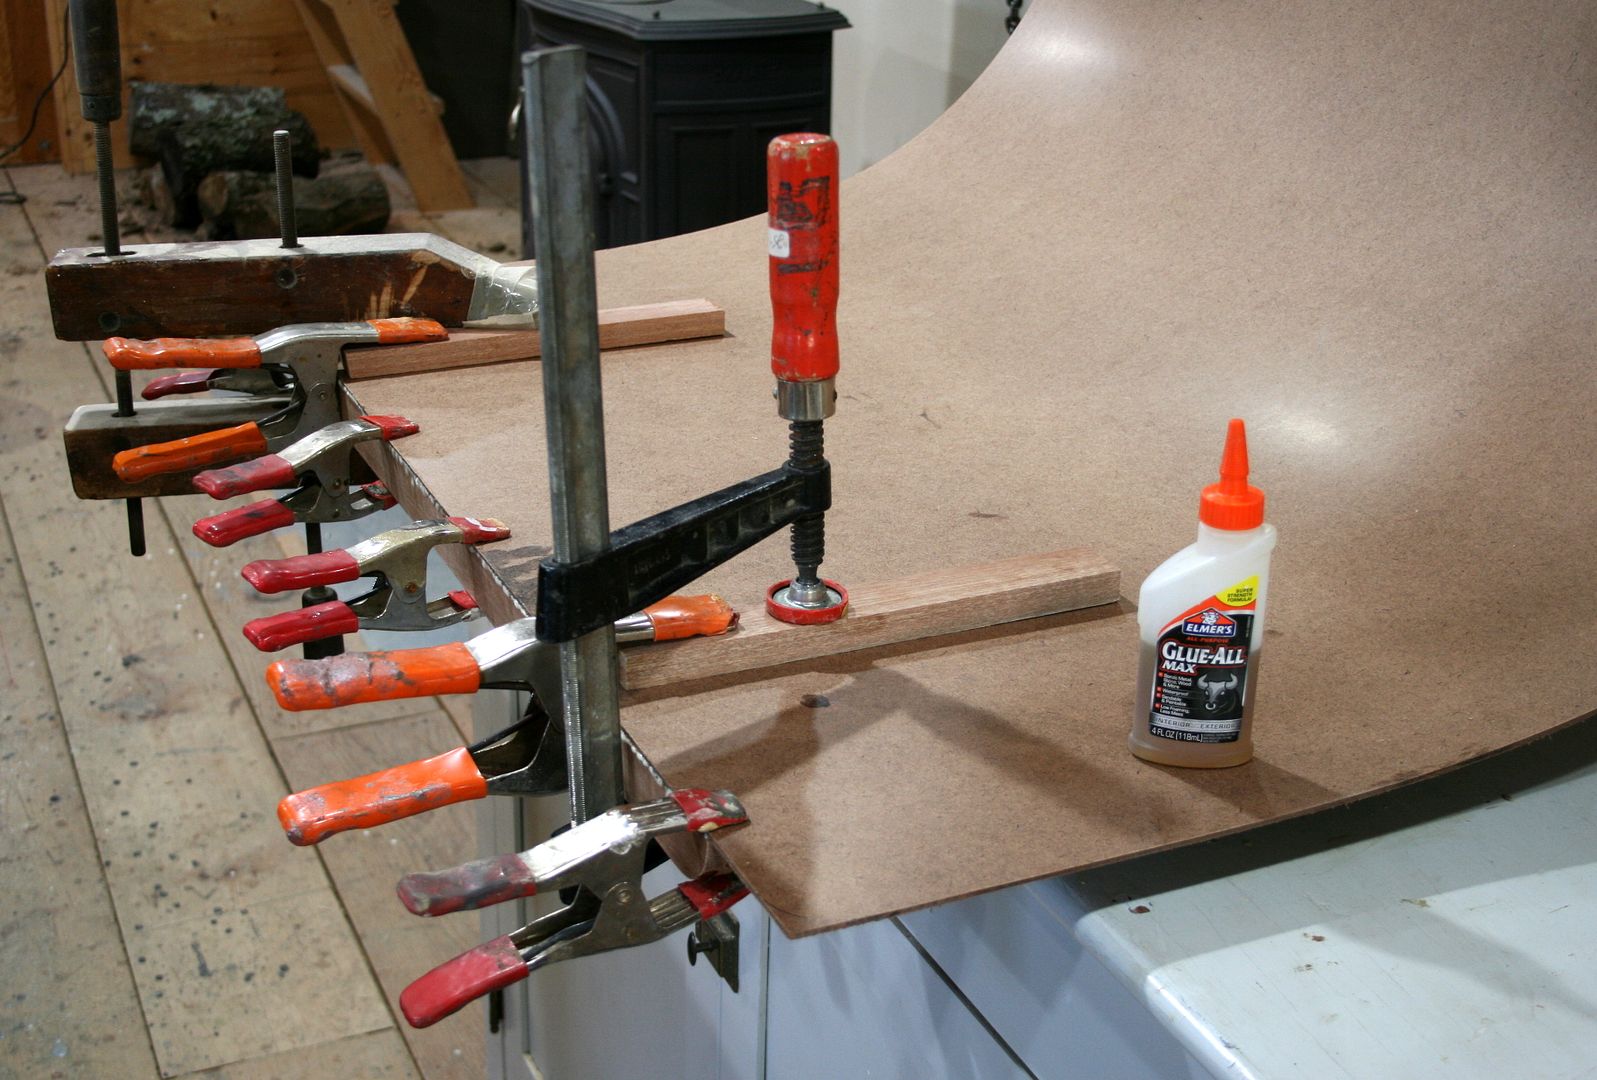
I used Elmer's version of Gorilla Glue – a polyurethane glue – to fasten the Masonite to the frames. The glue and its water are applied to just the flat parts of the legs and then clamped with blocks and deep-throated clamps. The front stiffener just needs spring clamps. I let the glue cure overnight.
I rounded the 4 corners of the Masonite because damage there is almost a certainty – and then lightly sanded the surface with 100-grit.
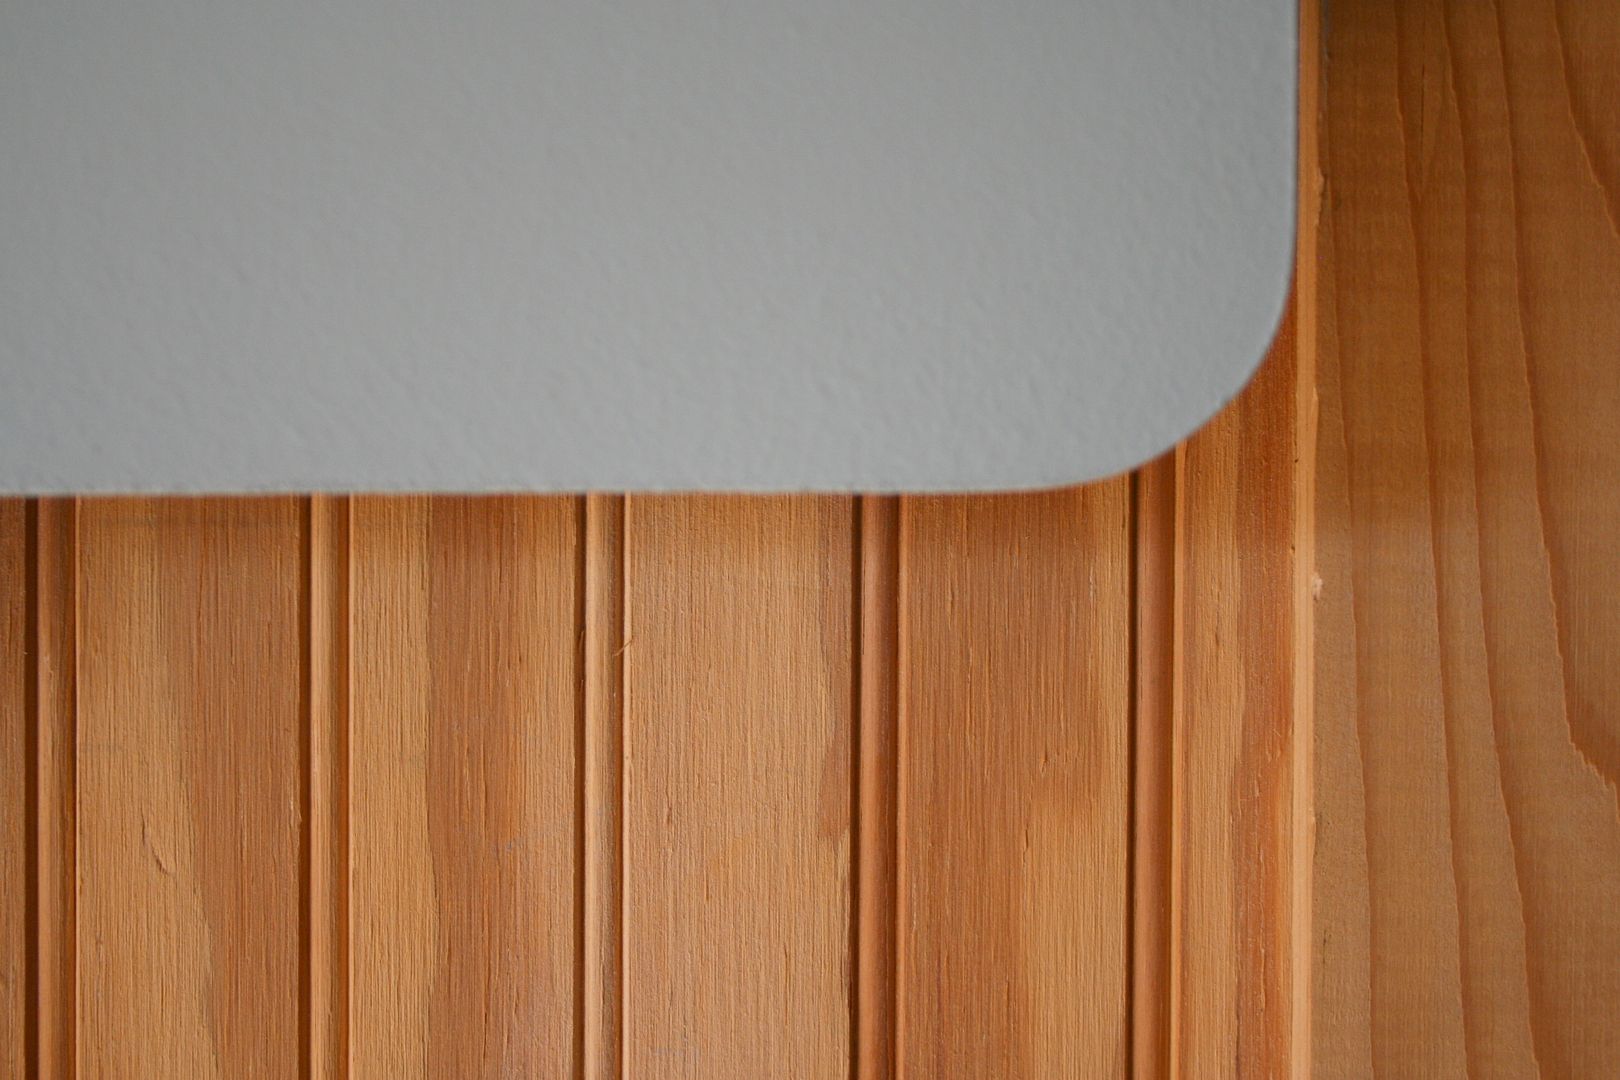
I then rolled on one coat of paint – surprised that a second coat was not needed on the raw board.

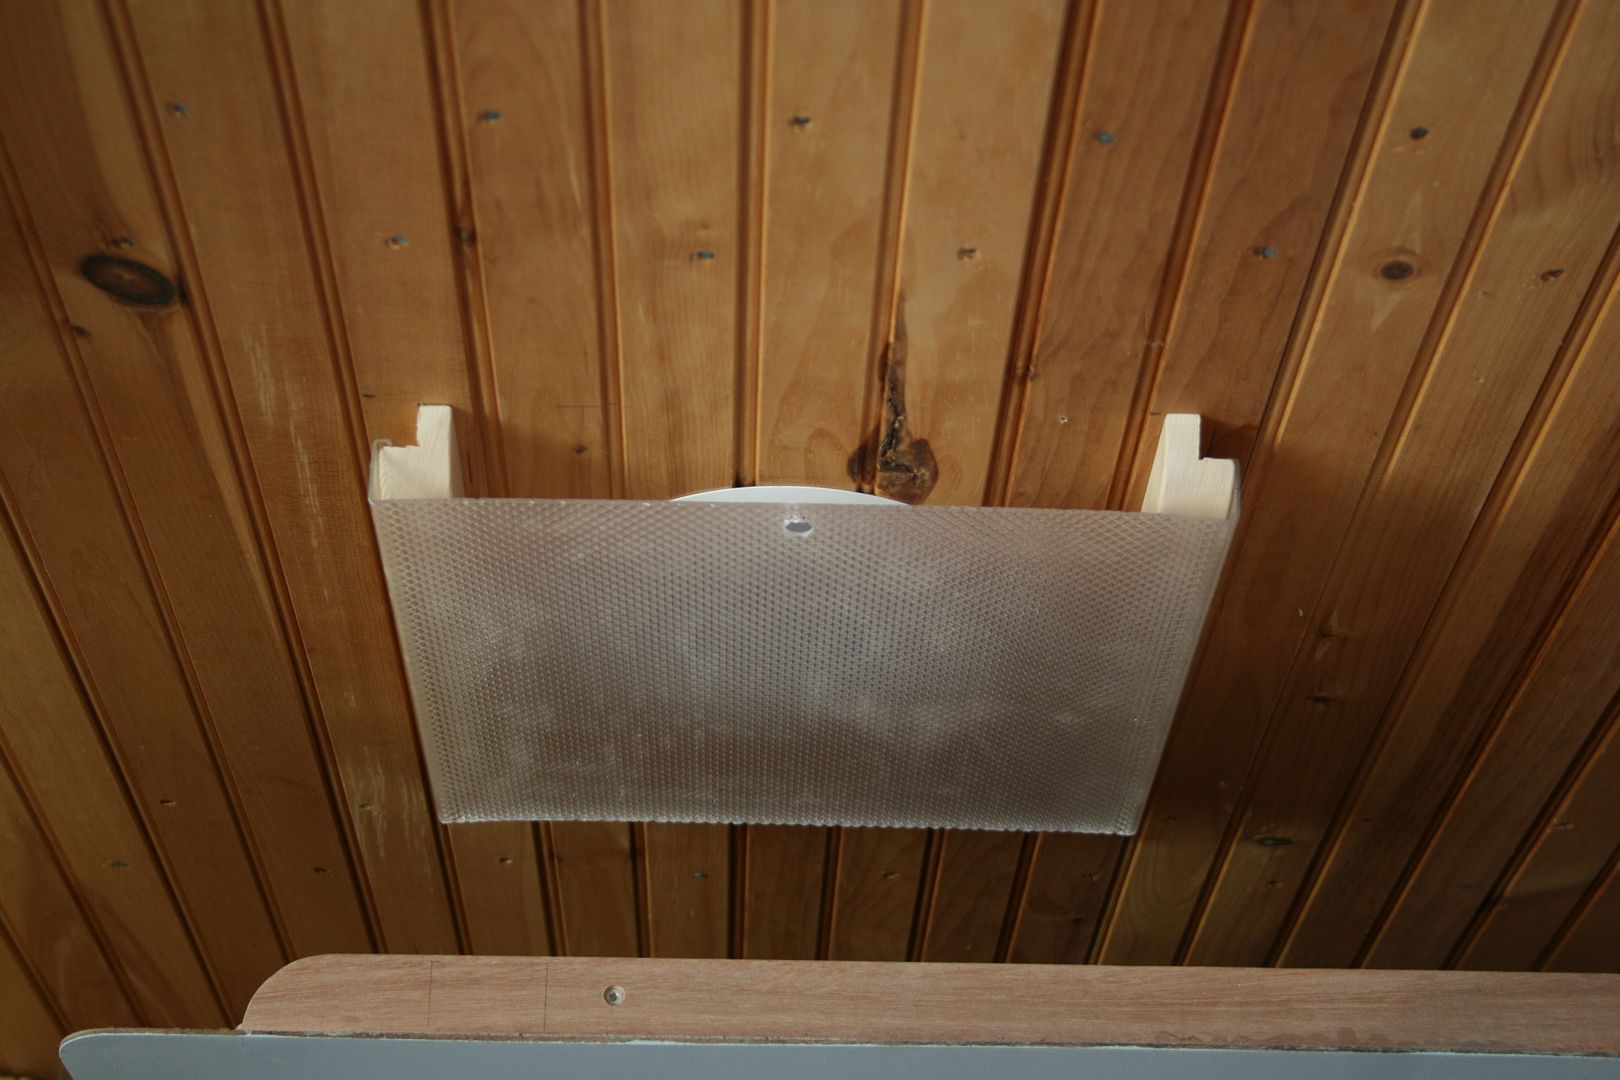
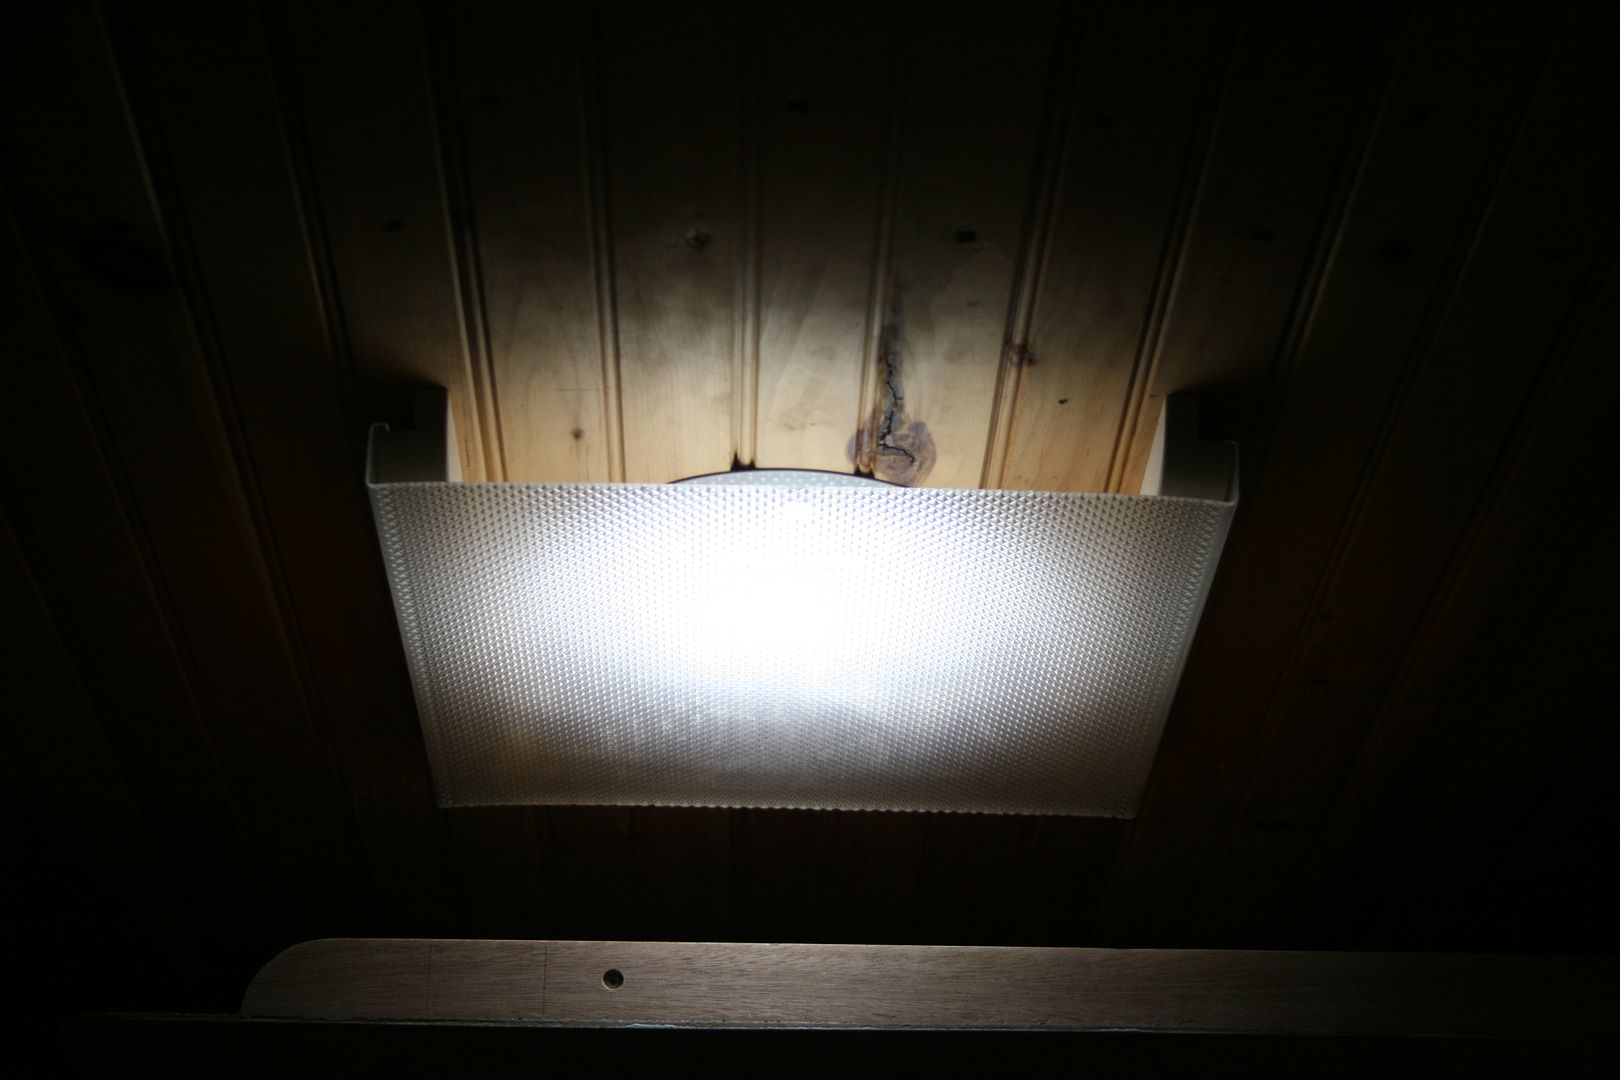
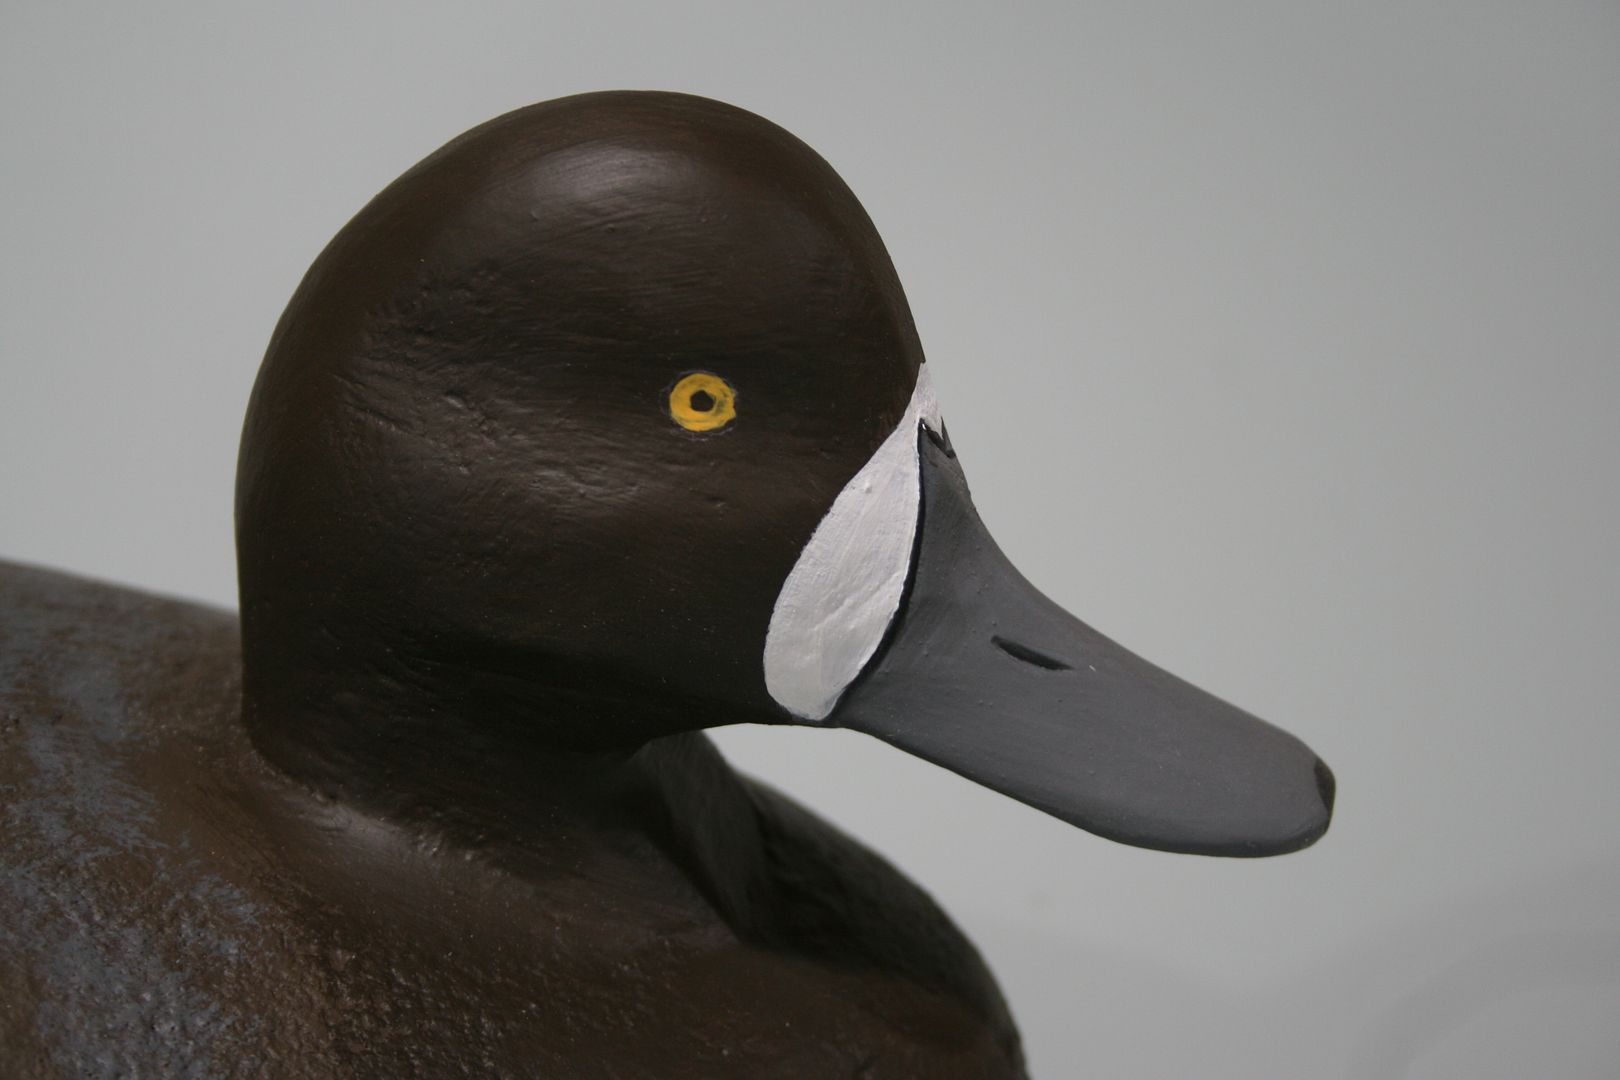
Photography was a real improvement. At 44 inches above the floor, I could get both true profile shots and also those looking a bit downward. For the artificial light, I have a single LED flood in one of my recessed fixtures. (I am gradually upgrading all of my CFLs to daylight value LEDs.)
I often photograph my birds in the diffuse natural light to early morning or late afternoon. To do so, I can now just swing the door open – set the cane bolt into the ground – and move my tripod outside.
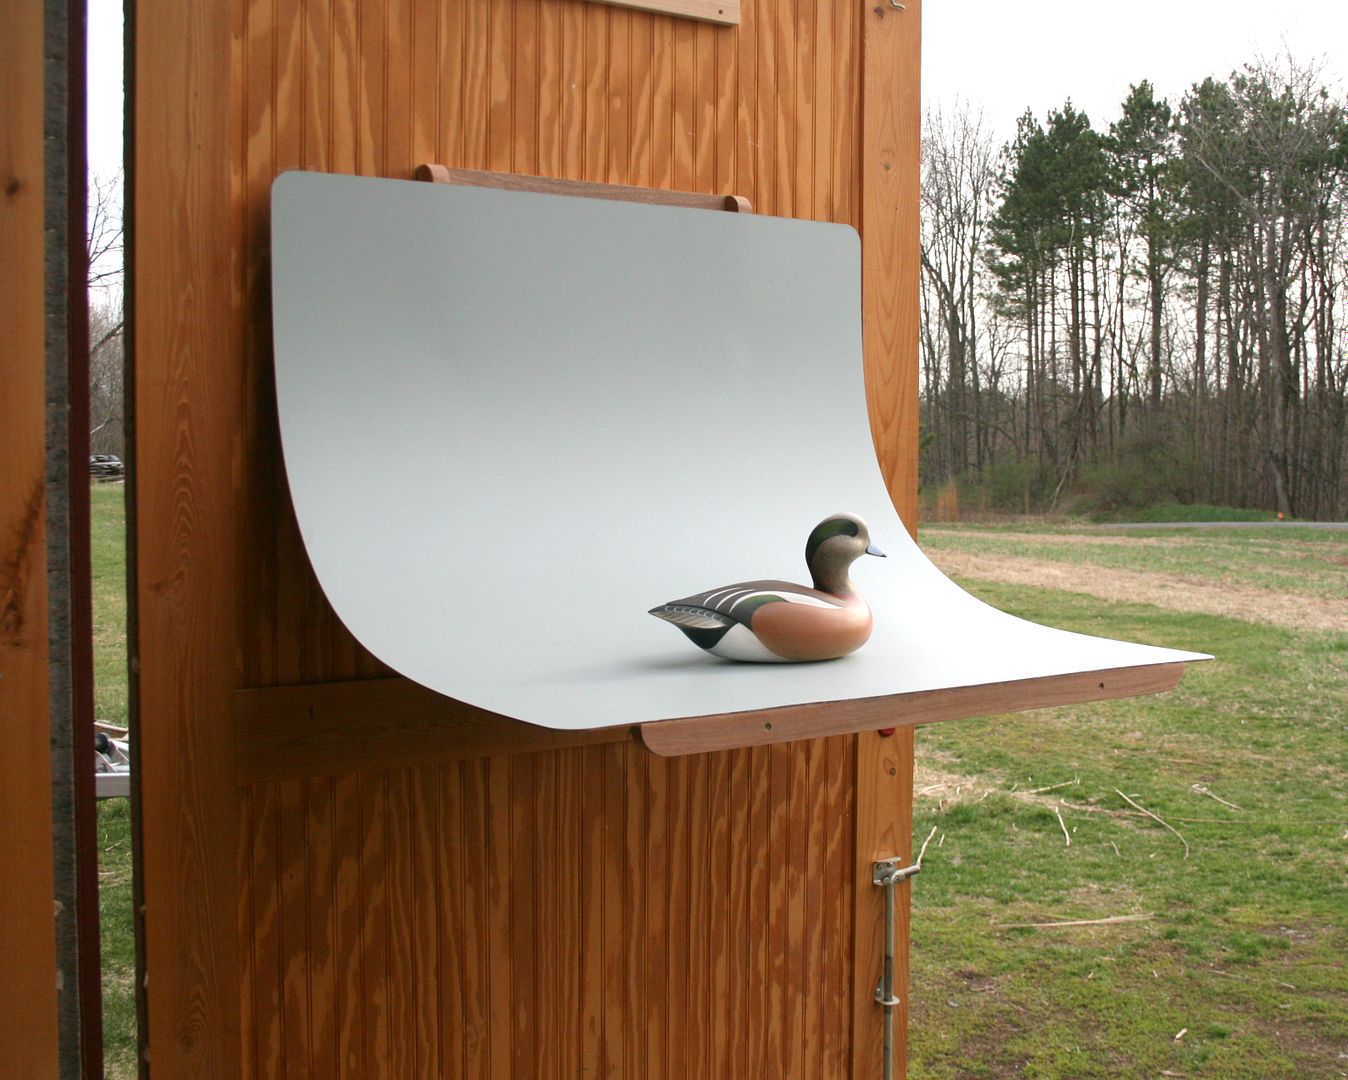
When not in use, the backdrop is up and out of the way – and even lets the ceiling light do its job.
Hope this is useful,
SJS
see also on my site at: https://stevenjaysanford.com/a-photo-backdrop-for-decoys/
All~
I built my first curved photo backdrop in the early 80s. I still have it – it has served me well – but is showing its age. More important, the way I built it has caused recurring problems as long as I have had it. My goal with this new one is to minimize the maintenance AND have a way to both use and store it that suits my work habits and my shop.
The idea behind such a backdrop is to provide a background that visually isolates the subject and provides few distractions. Photographers have long used cycloramas – or "cycs" – with curved walls to avoid horizons or corners showing in the finished image. So, I used some 1/8-inch Masonite (tempered hardboard, MDF, et cetera) to give me the curve I needed. The mistake I made was to nail through the Masonite into the frame. Although I have tried a variety if ringed nails and the like – and patched the nail holes repeatedly – the nail heads would make themselves known after the inevitable handling and moving. The new one uses just glue to hold the Masonite to the frame.
Also, I have tried rolled paper and a variety of fabrics on my old backdrop – but always come back to paint. Dead flat mars very easily – so I am now using satin latex. I have found no objectionable shine and it does wear better than flat. Nevertheless, I assume I will have to roll on a fresh coat of paint once or twice per year. I have also experimented with colors and tones and am now trying a fairly bright, cool grey.
I am mostly excited about the new storage features. With 2 wood cleats on the frame – and 2 corresponding cleats on the big south door of my shop – my backdrop can now be used without additional support and also stores out of the way. I have been propping my old backdrop on saw horses, benches, trash cans and even the tailgate of my Honda Element. Now, I can film in artificial light or natural light with the backdrop mounted on the door – at a very convenient height.
I began making the frames with some 5/4 Mahogany – but any mostly clear wood will do; certainly 1-inch (actually 3/4-inch thick) is sufficient. The "floor" is a bit longer than the "back wall". The 1/8-inch Masonite will take a 16-inch radius bend without breaking. I cut the Masonite 40 inches wide by 48 inches long.
I used 1/2-inch birch plywood for the "knees" that join the floor and back wall frames. I laid out my curved cut by drawing a full-size pattern on paper and then marking it on the plywood. Its best to rough out – cut them oversize - the 2 pieces of plywood with a jig saw and then stack them for the final cuts. I glued them (Titebond II) in 3 spots outside of the cut lines and then sawed them to the final lines on the band saw after the glue set.
I clamped each plywood knee to its 2 frame pieces and fastened them with Titebond and my pneumatic stapler.
The cleats are all beveled on the table saw – approximately 45 degrees – so they will mate and gravity will hold the backdrop to the wall.
Two 2 frame cleats are screwed-and-glued to the back of the frame – the bottom one with the "mouth" upward and the top one with the "mouth" downward. The 2 wall cleats are screwed to the door with both mouths upward.
I used Elmer's version of Gorilla Glue – a polyurethane glue – to fasten the Masonite to the frames. The glue and its water are applied to just the flat parts of the legs and then clamped with blocks and deep-throated clamps. The front stiffener just needs spring clamps. I let the glue cure overnight.
I rounded the 4 corners of the Masonite because damage there is almost a certainty – and then lightly sanded the surface with 100-grit.
I then rolled on one coat of paint – surprised that a second coat was not needed on the raw board.
Photography was a real improvement. At 44 inches above the floor, I could get both true profile shots and also those looking a bit downward. For the artificial light, I have a single LED flood in one of my recessed fixtures. (I am gradually upgrading all of my CFLs to daylight value LEDs.)
I often photograph my birds in the diffuse natural light to early morning or late afternoon. To do so, I can now just swing the door open – set the cane bolt into the ground – and move my tripod outside.
When not in use, the backdrop is up and out of the way – and even lets the ceiling light do its job.
Hope this is useful,
SJS