Advice on sneakbox - AA Broadbill or MLB Wigeon

With no help to turn the boat over I picked at a few things that were bothering me.

1: Rub Rails - there are a couple of sections of the rub rails where there are gaps between the rail and the hull. Using a heat gun and putty knife, I was able to release a section of the rail. I thought the rail was separating from the hull, but it was a bad fairing job. With a bit of sanding it fits tight to the hull now. I'll epoxy it in place later.

IMG_2367.jpeg
IMG_2370.jpeg

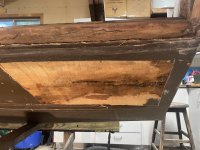
2: I took to sanding the inside of the hull. I've bared large sections and the water damage appears to be restricted just to the areas I'd discovered previously. nothing new :). Those blocks between the battens in the front of the boat were located at butt joints between the sheets of plywood. I did find the in the plans. They were nailed and bedding in that black rubber like compound. I failed to keep the water out and I removed them.

IMG_2360.jpeg

3: The frame are made off 5 pieces. Three pieces that form the frame and 2 plywood gussets. The looked like places that could hols water so I removed them. Small areas of one Rame has a little water damage and all were damp under that black rubber company. With the plywood and rubber removed, and sanded they look in good shape.

IMG_2371.jpeg

I'm not sure what kind of wood was used. The battens and rub rails have a pinkish/red tinge; I'm guessing mahogany. The frames, rub rails, and I think the inner keel are all oak. They seem to be in great shape despite being a bit damp and I'm guessing white oak.

Lots more sanding to go.
 
Scott

Those pictures tell me a whole lot more about the condition. The boat has a TON of life left. It seems like you have a pretty good handle on the damage area now and I don't see anything that can't be dealt with. If you were closer I'd say bring it to my shop and we will knock it out. For good measure you might consider countersinking some #8 or #10 bronze screws (Jamestown Distributors supplies them) in the rub rail and epoxy over the heads. That will both clamp them while the epoxy cures and give a bit more holding strength. If you use traditional wood screws (I would) be sure to predrill with the appropriate tapered drill bit like a Fuller.

Fuller.jpg
 
Last edited:
Hey Eric,

The rub rails were bedded in that black rubber compound, counter sunk and screwed. I don't know what kind of filer they used on the screws, I sanded off the paint in it was a white filler. It was hardened but not epoxy -- I used a small drill bit to make a hole in the filler, they were Robinson head screws and I just tapped the screw driver with a hammer and the all came out easily. They were 1 1/4 : ss screws.

For those Frearson head screws - do you need a specific screwdriver?

Would be nice to drop by your shop ... as I mentioned a couple of days ago I sought out a local boat builder. He's retired and his website is still running but updated (https://www.vexcel.ca/). He's a wealth of information and welcomed me to the shop anytime.

Anyway, I'm still learning...
Thanks
'Scott


IMG_2368.jpeg
 
I've not been able to flip the hull yet, but with a block and tackle I was able to get it up on one side so I can access the bottom. Bottom looks good. I have a couple of questions.

  • I mentioned before I was thinking about double up the floor by added 1/4" plywood filler strips between the battens. This would bring the hull thickness to 1/2". It would stiffen the hull a lot and make those 1:8 scarf joints in the plywood patches less important. Except for a bit if extra weight, I cannot see any negatives. Does anyone have any thoughts?
  • I've attached a screen grab that shows the attachment of the transom knees to the transom. The knees were screwed to either side of the inner keel and the transom knee block. In one of the early pictures I posted it shows the pump mounted between the knees. I did not like this design as the pump could not access all the water either side of the knees. When I replace the knees, I'm thinking of a single knee in mounted in the middle of the transom with a limber ole at the back. I have a couple of nice pieces of 2" white oak that I could for the knee. Thoughts?
  • On the same issue, the water also gets dammed on the outboard side of the battens. The battens look like they are let into the transom and I imagine they provide some strength to the hull. I'm also thinking about cutting mortise in the battens near the transom to allow water to drain. If I added another layer of plywood to the bottom, this would leave 1/4" of the batten intact. I was thinking of adding some small braces at each batten to attach the batten to the transom to make up for any strength lost by mortising the batten. Is this a stupid idea?
  • Finally, is it necessary to remove all the paint, or do I just need to roughen it up before applying epoxy for the patches?
Thanks
Scott
Screenshot 2024-10-06 at 12.21.29.png
 
Scott

I wonder if the black and white compounds you are finding are 3M 5200 or Sikaflex. In either case they are sandable after cured so you should be able to remove it where needed.

Frearson do need a Frearson, aka Reed Prince, driver. New impact bits are easily found online. The last time I looked for a screwdriver of that config nobody made it, so I turned to ebay for a used one. I just checked and there are several "Reed Prince" screwdrivers there now.

I'd definitely take up the boatbuilder on his offer to help. You might only need to stop by his place with some pictures from your phone to get good pointers from him.

  • I mentioned before I was thinking about double up the floor by added 1/4" plywood filler strips between the battens. This would bring the hull thickness to 1/2". It would stiffen the hull a lot and make those 1:8 scarf joints in the plywood patches less important. Except for a bit if extra weight, I cannot see any negatives. Does anyone have any thoughts?
This sounds reasonable to be. I don't think the weight added will be of any significance and it will be stronger. Be sure to seal the gluing surfaces thoroughly with epoxy and them use thickened epoxy and some weight to keep out any voids between the layers.

  • I've attached a screen grab that shows the attachment of the transom knees to the transom. The knees were screwed to either side of the inner keel and the transom knee block. In one of the early pictures I posted it shows the pump mounted between the knees. I did not like this design as the pump could not access all the water either side of the knees. When I replace the knees, I'm thinking of a single knee in mounted in the middle of the transom with a limber ole at the back. I have a couple of nice pieces of 2" white oak that I could for the knee. Thoughts?
I like that idea. I would epoxy and glass the knee in with a nice fillet and three layers of 6 oz 4" tape. The larger the bonding area the better. Good prep should result in a strong bond. I might use a #12 screw or two counterbored and sunk into the keel and also into the transom. I would do this in two steps. Epoxy paint all surfaces, use some thickened epoxy to bed the pre-bored knee into, and sink the screws. Then I'd go back and build the filles and glass. Some folks think white oak is incompatible with epoxy because it expands/contracts and can break the bond. I've never seen it and doubt that would be an issue on a chunk like a knee.

  • On the same issue, the water also gets dammed on the outboard side of the battens. The battens look like they are let into the transom and I imagine they provide some strength to the hull. I'm also thinking about cutting mortise in the battens near the transom to allow water to drain. If I added another layer of plywood to the bottom, this would leave 1/4" of the batten intact. I was thinking of adding some small braces at each batten to attach the batten to the transom to make up for any strength lost by mortising the batten. Is this a stupid idea?
I think I envision what you are describing. I might make sure the drain plug is at the bottom of the transom in the lowest spot. For any water that hangs up on the battens I'd sponge it up if it didn't evaporate on the trailer ride home. In my boat I use so much camo small passageways would get clogged. That would be my concern. If you think you won't have that problem you can mortise a passageway but make certain you seal the heck out of it because water will get in there. This is one of those times where keeping the boat clean and dry goes a long way towards avoiding issues.

  • Finally, is it necessary to remove all the paint, or do I just need to roughen it up before applying epoxy for the patches?
Affirmitive. Epoxy bond strength is greater than paint bond strength. I always go down to good clean wood and build back up with glass and epoxy. If I go over paint it would typically be on the outer edge of the repair area where I'm feathering the repair into the existing hull.
 
Thanks Eric -- that's really helpful.

Yesterday I took to the hull. I had plans to make nice surgical removals of the affected areas of plywood with a router and a patterning bit. It was a good plan but in the end I hacked up the hull with a hammer & chisel and one of those multi-tools. What did they do before multi-tools?

I cased the moisture removing areas well past any sign of water. I took of more that I'd had wanted, I had hoped that I could keep the sections to be replaced to under 4' as I'm about to get pieces of 4'x3' pieces if marine plywood sent by courier. Larger has to come by freight and get expensive. In the photo I've removed a section of the outer keel and the plywood on the port side, and have started on the starboard side -- lots of delaminated plywood.

.
The only additional problem I found is the transom. It transom consists of several layers. The frame is white oak and in good condition. The outside layer is 3/4" plywood and it was wet. So far I have just removed plywood to get to good dry areas. Youncan stir see some moisture in the plywood on the starboard side in this picture.
IMG_2382.jpeg

A friend dropped by and we flipped the boat. I continued to chase moisture in the transom. I'm in good wood now, but I think I should replace all the 3/4" plywood on the transom.

IMG_2386.jpeg

My thought was to remove as much bad bits as I cloud find, then reassess and see if it was worth saving the boat. All the framing and at the inner keel is sound and I will carry on -- of to get some epoxy.

Thanks again
Scott
 

Attachments

  • IMG_2381.jpeg
    IMG_2381.jpeg
    3 MB · Views: 6
I'm slowly picking away at the hull. I managed to source some local epoxy and not so local marine plywood. There was more water damage than I originally found. When I started to make the scarf joints on the plywood it was still damp in places and I had to enlarge the holes quite a but. Eric, you thought that black sealant was 3M 5200. What ever it was it is pretty tenacious and very hard to remove. I went thought a few multi-tool saw blades before I discovered their scraper blades -- these worked really well for removing the sealant and ok for hardened epoxy. Anyway, I have the scarf joints mad on the hull now and will hopefully work on fitting the plywood tomorrow. I plan to copy the shape of the transom today and maybe get all the 3/4 plywood off.

IMG_2392.jpeg
IMG_2395.jpeg
 
Scott

If it was tough as hell to get off, then yes, it is likely 3M 5200. You are making fabulous progress, and I can tell are serious about doing it right. I think the boat will see water this season after all. I see a table saw and a jointer in your shop. I didn't know you were a woodworker until now but am not surprised. You are making it look easy, and I know it isn't for many.
 
I would not say I'm a woodworker. In the last 10 years of my career I collected a few tools: a General 14" bandsaw, I rebuilt a Unisaw and a Makita 2030 jointer/planer thinking I would need something to do. Unfortunately my garage is not big enough for the boat and tools and I had to put everything on wheels and push them the side. I've mostly been building cabinets and wooden countertops. I tell my wife I can make really expensive sawdust. I say I'm a Google Scholar ... you can figure out how to do just about anything nowadays with Google and forums like this. Not sure of the proper way to do this. I created a pattern for the transom. I think I will make one of cardboard first to check the fit before I commit to making some expensive sawdust from that 3/4" marine plywood.IMG_2397.jpeg
 
Back
Top