
With all the bulkheads cut and the boat checked for squareness it was time to begin the epoxy filleting process. Before I go into the filleting process a word of caution is needed, otherwise I would be remiss. Epoxy is a toxic substance that needs to be handled with care. Absence of fumes or odor may give the impression that it is harmless but it isn't. Amateur boat builders are probably the worst offenders when it comes to disregard for safety. Don't risk your health for the sake of convenience. Follow the safety guidelines provided by the epoxy manufacturer.
During the scarfing process I learned that when you work with epoxy you must be prepared. Everything needs to be in order to work fast and efficient. Anything else will result in wasted epoxy that cured while you were trying to get ready.
For starters I had to get organized. I made a table with saw horses and placed all my epoxy and equipment on it. The equipment needed was:
Working with the epoxy took some getting used to. I experimented with different fast/slow epoxy mixtures and two ways to wet the fiberglass tape before I found a process I was comfortable with and produced good results. By the time I was finished with all my filleting work it had become second nature.
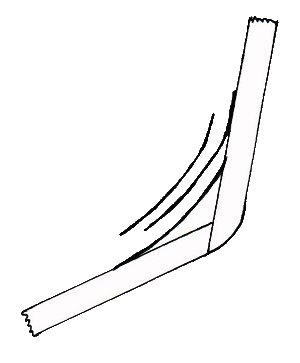
The preferred epoxy joint looks like the one in the diagram below. The distance "A" should be at least 75% the thickness of the plywood being epoxied. The distance "B" should be at least 1.5 times the thickness of the plywood. Whenever plywood of different thickness is being epoxied it is recommended that the dimensions of the joint be based on the thicker plywood. All my joints exceeded the above recommendations. This is probably normal for a first time builder.

The process that I finally converged on by experimenting is the following.
Step 1. Work in one small section at a time (e.g. flotation compartment, storage area).
Step 2. Pre-cut to size all the fiberglass tape needed to complete the chosen section.
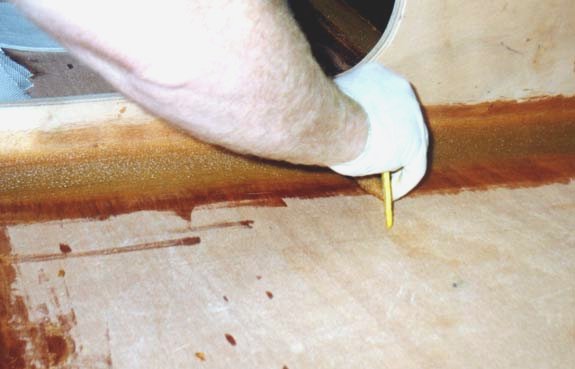
Step 3. Round the corner of an autobody squeegee with scissors so that it will create the joint shown above when spreading the epoxy.
Step 4. Paint all surfaces to be epoxied with pure epoxy (no wood flour added) with a chip brush.
Step 5. Thoroughly mix 9 ounces of epoxy (six pumps resin, four pumps slow cure hardener, two pumps fast cure hardener).
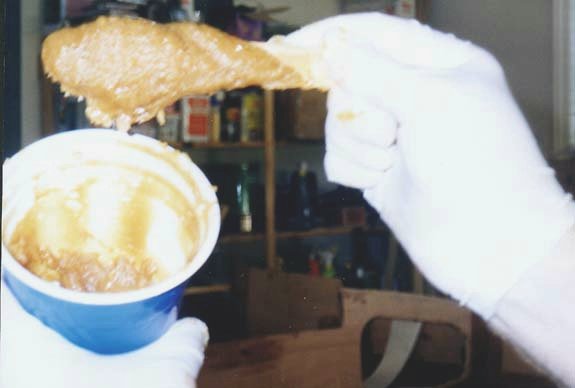
Step 6. Add wood flour to the epoxy mixture until it achieves the consistency of peanut butter. If you can place a large blob on a stirrer and not have it sag or run you have a good mixture. Do not combine step 6 and step 5. You risk not getting the epoxy resin/hardener mixed thoroughly.

Step 7. With the stirrer spread the epoxy in the joint. Mix up more "peanut butter" when needed.

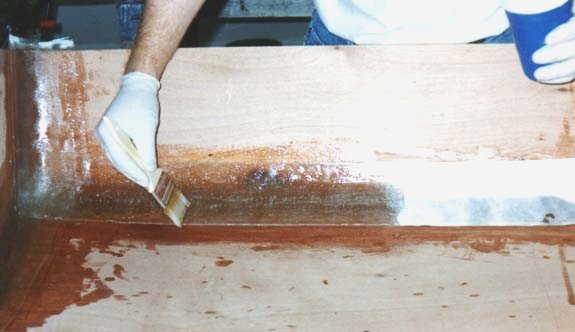
Step 8. With the autobody squeegee spread the peanut butter in the joint until it looks like the diagram above. Sorry the below picture is from the wrong angle. My photographer didn't know what I was looking for. Besides, she did agree to let me build the boat so I couldn't complain.


Step 9. Continue steps 5-8 above until the entire section has been squeegeed with peanut butter.
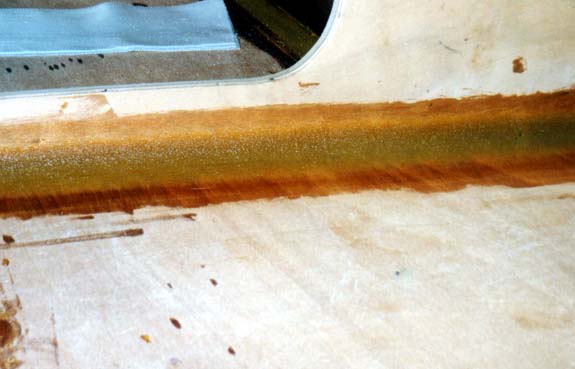
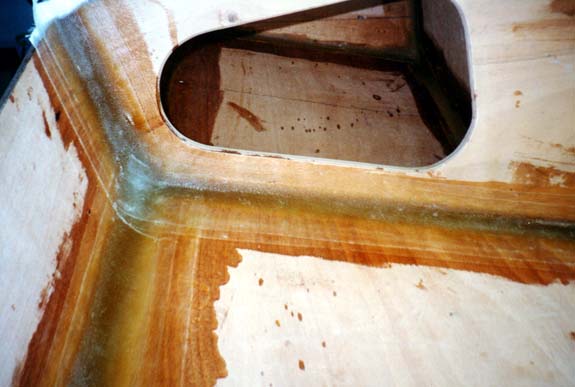
With all the peanut butter in place it is time to place the fiberglass tape. I used three layers of 4" 9 oz. woven cloth. There are many options when it comes to tapes and weights. I overlapped the tape as shown in the diagram below.

Step 10. Place pre-cut piece of fiberglass tape in place and wet out with pure epoxy using a chip brush. Use the brush tip to work out any bubbles. A toothed roller also helps to work out any bubbles. Continue this step until all three layers are in place.

Step 11. Use a foam roller to roll out any excess epoxy and make any adjustments to the peanut butter before it has hardened.

One of the modifications I made was the use of two sets of knees instead of the center cockpit bulkhead (discussion in Bulkhead section). To account for the strength provided by the center cockpit bulkhead I installed Douglas Fir floor timbers inline with the knees. These are 1 1/2" thick and epoxy filleted into place. In addition to this I also incorporated a drain trough down the center of the boat. The floor board rests on the timbers and the trough. It is screwed into the floor timbers with stainless steel screws and ties all the components together forming a strong framework.
Because the drain trough was not included in the plans I needed a way to cut the two pieces without going through a wasteful trial and error process. The drain trough was cut from one of the 1' pieces ripped from the 3/8" 5'x10' plywood during the scarfing process. I measured the length of the trough and cut the 1' wide piece to that length. Next I double checked to make sure that the boat was level. I then leveled and clamped the 1' piece vertically over the center of the boat. It was clamped to the storage bulkhead and the motor bracket about two inches from the bottom of the boat. Using a scrap block of wood with a pen taped to the top I slid the block of wood on the bottom down the length of the cockpit while marking the 1' wide piece of plywood. I removed the 1' piece and cut along the line with a jigsaw. I checked the fit and it was nearly perfect. Another was cut using the first as a template. I trimmed the tops off so that the floor board would just come up to the knees when resting on the trough. The drain trough was epoxy filleted into place after the keel had been epoxy filleted and taped. The keel of my boat is extremely strong.

After all the epoxy filleting was completed I sanded down all the joints to make them smooth. The tape I used had a winding around the edges (known as selvage) to keep it from unraveling. The selvage was very noticeable after the epoxy cured. I used a small hand held grinder with a sanding disk on it to knock off the selvage. The Makita Sander/Polisher was then used to smooth the joints. The idea here is not to cut into the tape with the sander, but just to clean up a little and knock off any edges. Some have suggested that it is preferable to mix up more epoxy and wood flour prior to sanding and spreading it on the joints. After it has hardened then go back and sand. This will prevent from cutting into the cloth and produce a smooth joint. I will try this technique the next time I build.
During the scarfing process I learned that when you work with epoxy you must be prepared. Everything needs to be in order to work fast and efficient. Anything else will result in wasted epoxy that cured while you were trying to get ready.
For starters I had to get organized. I made a table with saw horses and placed all my epoxy and equipment on it. The equipment needed was:
- Epoxy resin, fast and slow hardeners (I strongly recommend pumps for measuring the epoxy. The pumps, which look like snow cone flavor pumps, are inexpensive and will save quite a bit of time by not having to measure in graduated cups. The pumps are calibrated so that the resin pump will pump twice as much epoxy per stroke than the hardener pumps. This maintains the desired 2:1 ratio of the epoxy resin/hardener).
- Wood flour
- Solo cups (16 oz.)
- Stirrers (tongue depressors)
- Surgical gloves
- Autobody squeegees
- Chip brushes
- Fiberglass tape
- Scissors
- Foam rollers
- Toothed roller
- Acetone for clean-up
- Paper towels
Working with the epoxy took some getting used to. I experimented with different fast/slow epoxy mixtures and two ways to wet the fiberglass tape before I found a process I was comfortable with and produced good results. By the time I was finished with all my filleting work it had become second nature.
The preferred epoxy joint looks like the one in the diagram below. The distance "A" should be at least 75% the thickness of the plywood being epoxied. The distance "B" should be at least 1.5 times the thickness of the plywood. Whenever plywood of different thickness is being epoxied it is recommended that the dimensions of the joint be based on the thicker plywood. All my joints exceeded the above recommendations. This is probably normal for a first time builder.

The process that I finally converged on by experimenting is the following.
Step 1. Work in one small section at a time (e.g. flotation compartment, storage area).
Step 2. Pre-cut to size all the fiberglass tape needed to complete the chosen section.
Step 3. Round the corner of an autobody squeegee with scissors so that it will create the joint shown above when spreading the epoxy.
Step 4. Paint all surfaces to be epoxied with pure epoxy (no wood flour added) with a chip brush.
Step 5. Thoroughly mix 9 ounces of epoxy (six pumps resin, four pumps slow cure hardener, two pumps fast cure hardener).
Step 6. Add wood flour to the epoxy mixture until it achieves the consistency of peanut butter. If you can place a large blob on a stirrer and not have it sag or run you have a good mixture. Do not combine step 6 and step 5. You risk not getting the epoxy resin/hardener mixed thoroughly.
Step 7. With the stirrer spread the epoxy in the joint. Mix up more "peanut butter" when needed.

Step 8. With the autobody squeegee spread the peanut butter in the joint until it looks like the diagram above. Sorry the below picture is from the wrong angle. My photographer didn't know what I was looking for. Besides, she did agree to let me build the boat so I couldn't complain.
Step 9. Continue steps 5-8 above until the entire section has been squeegeed with peanut butter.
With all the peanut butter in place it is time to place the fiberglass tape. I used three layers of 4" 9 oz. woven cloth. There are many options when it comes to tapes and weights. I overlapped the tape as shown in the diagram below.
Step 10. Place pre-cut piece of fiberglass tape in place and wet out with pure epoxy using a chip brush. Use the brush tip to work out any bubbles. A toothed roller also helps to work out any bubbles. Continue this step until all three layers are in place.
Step 11. Use a foam roller to roll out any excess epoxy and make any adjustments to the peanut butter before it has hardened.
One of the modifications I made was the use of two sets of knees instead of the center cockpit bulkhead (discussion in Bulkhead section). To account for the strength provided by the center cockpit bulkhead I installed Douglas Fir floor timbers inline with the knees. These are 1 1/2" thick and epoxy filleted into place. In addition to this I also incorporated a drain trough down the center of the boat. The floor board rests on the timbers and the trough. It is screwed into the floor timbers with stainless steel screws and ties all the components together forming a strong framework.
Because the drain trough was not included in the plans I needed a way to cut the two pieces without going through a wasteful trial and error process. The drain trough was cut from one of the 1' pieces ripped from the 3/8" 5'x10' plywood during the scarfing process. I measured the length of the trough and cut the 1' wide piece to that length. Next I double checked to make sure that the boat was level. I then leveled and clamped the 1' piece vertically over the center of the boat. It was clamped to the storage bulkhead and the motor bracket about two inches from the bottom of the boat. Using a scrap block of wood with a pen taped to the top I slid the block of wood on the bottom down the length of the cockpit while marking the 1' wide piece of plywood. I removed the 1' piece and cut along the line with a jigsaw. I checked the fit and it was nearly perfect. Another was cut using the first as a template. I trimmed the tops off so that the floor board would just come up to the knees when resting on the trough. The drain trough was epoxy filleted into place after the keel had been epoxy filleted and taped. The keel of my boat is extremely strong.

After all the epoxy filleting was completed I sanded down all the joints to make them smooth. The tape I used had a winding around the edges (known as selvage) to keep it from unraveling. The selvage was very noticeable after the epoxy cured. I used a small hand held grinder with a sanding disk on it to knock off the selvage. The Makita Sander/Polisher was then used to smooth the joints. The idea here is not to cut into the tape with the sander, but just to clean up a little and knock off any edges. Some have suggested that it is preferable to mix up more epoxy and wood flour prior to sanding and spreading it on the joints. After it has hardened then go back and sand. This will prevent from cutting into the cloth and produce a smooth joint. I will try this technique the next time I build.