The grass rails can be built and installed at any stage. I made mine prior to installing the decks and installed them before painting the the deck and interior.
The first step was to determine the length of the grass rails. Using a steel tape I measured the length of a sheer clamp. The grass rails lie parallel with the sheer clamps so by measuring a sheer clamp I knew exactly what a grass rail's maximum length could be. I then backed off about 4". The rails start over the solid Mahogany piece that was epoxied to the bow doubler. If you recall the strongbacks were seated in this piece of Mahogany. The reason I chose this as the starting point of the grass rails was I would be able to securely mount the rails to this thick piece of Mahogany.
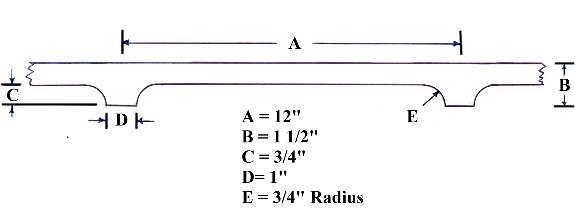
The actual length of the grass rails is 15' 10". I decided that the distance between the center of the posts (the part of the grass rail that contacts the deck) would be 12", with the exception of the first and second post, and the sixteenth and seventeenth posts which are 10" apart. The remaining two inches is the portion of the rails just beyond the center of the first and last posts.
To make the rails I started with 1 1/4" by 3" piece of Mahogany 15'10" long. The drawing below shows the details of the grass rails between two posts.

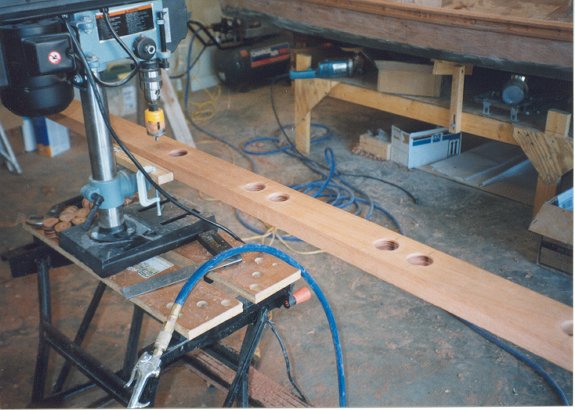
The first step was to mark the center of the posts on the Mahogany board. Next 1 1/2" holes were drilled with a drill press in the appropriate places with a hole saw. An ordinary hand drill could handle this task.

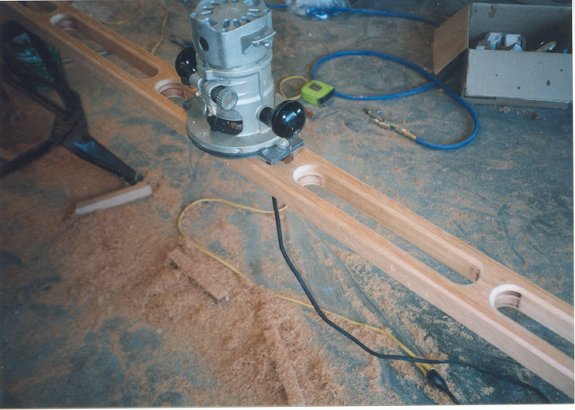
Once all the holes were drilled I drew parallel lines tangent to the tops and bottoms of the holes. Using my jigsaw I cut about 1/8" inside these lines. The reason I didn't try and cut exactly along the lines is that it is very difficult to get a straight cut with a jigsaw in 1 1/4" Mahogany. I tried it and although it was fairly straight I wasn't satisfied. To clean up after cutting with the jigsaw I used a router with a straight cut bit. With the router guide on the outside of the board I was able to get a perfectly straight cut.
The next step was to round every corner with the router. Using a 1/4" radius bearing guided round-over bit I rounded the outside edges on both sides, and the edges in each of the slots on both sides.

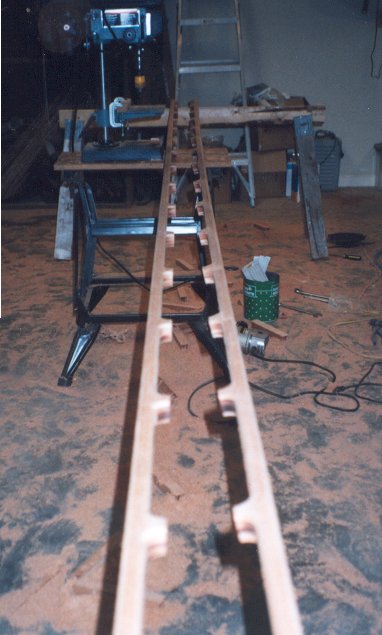
Next I used a 1/4" drill bit and drilled through the center of each post. These holes were for the bolts that would eventually hold the rails to the deck. I then used a countersink bit in each hole. After that I used my jigsaw to cut the piece into halves and round of the very ends, yielding my grass rails. Cool! Each grass rail received two coats of epoxy and was lightly sanded.

The next step was to mark the decking where the grass rails would go. The same guide that was used to mark the cockpit for trimming during decking installation was used to mark the placement of the grass rails. It was cut down to 4" and slid along the sheer clamp while marking with a pencil. This created a curve parallel to the side of the boat 4" from the edge.
I thought about several ways to mount the grass rails. I finally decided that making them easy to remove was the best route should they ever break. Epoxying into place seemed risky should they ever need repairing.
With the exception of the first two posts the grass rails were attached by drilling holes in the decking and using 2 1/2"x1/4"x20 silicon bronze flat head screws with washers, lock washers, and nuts. Each hole drilled in the decking was swabbed with epoxy using a Q-tip to prevent a way for water to invade the plywood. The first two posts were inaccessible because they were located in the flotation compartment which is sealed. I installed threaded inserts below these posts and screwed the bolts into them. The first post was located over Mahogany so the threaded insert had plenty to grab a hold of. The second was only over 3/8" plywood. Counting on this before I installed the decking, I epoxied a piece of 3/8" plywood to the bottom of the decking below the second post. The threaded insert screwed into this.
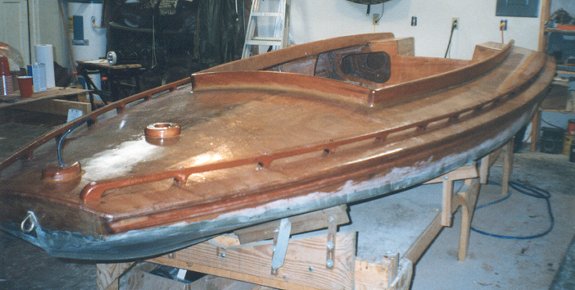
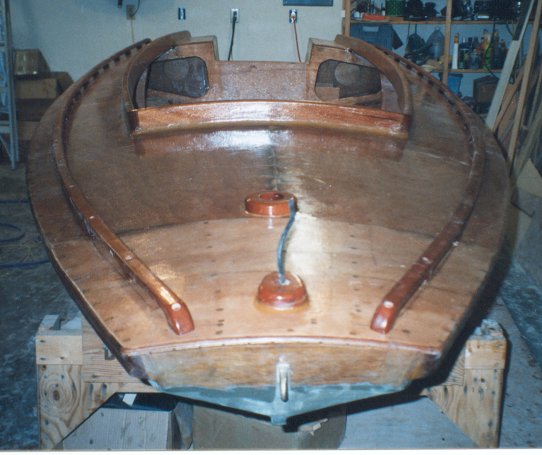
In addition to installing the grass rails I also added a mount for the gas fill, a 1" thick Mahogany "doughnut", and a block for the bow light to sit on. The purpose of the bow light block is to lift the light above the grass rails so they do not obstruct the light it provides.


The first step was to determine the length of the grass rails. Using a steel tape I measured the length of a sheer clamp. The grass rails lie parallel with the sheer clamps so by measuring a sheer clamp I knew exactly what a grass rail's maximum length could be. I then backed off about 4". The rails start over the solid Mahogany piece that was epoxied to the bow doubler. If you recall the strongbacks were seated in this piece of Mahogany. The reason I chose this as the starting point of the grass rails was I would be able to securely mount the rails to this thick piece of Mahogany.
The actual length of the grass rails is 15' 10". I decided that the distance between the center of the posts (the part of the grass rail that contacts the deck) would be 12", with the exception of the first and second post, and the sixteenth and seventeenth posts which are 10" apart. The remaining two inches is the portion of the rails just beyond the center of the first and last posts.
To make the rails I started with 1 1/4" by 3" piece of Mahogany 15'10" long. The drawing below shows the details of the grass rails between two posts.
The first step was to mark the center of the posts on the Mahogany board. Next 1 1/2" holes were drilled with a drill press in the appropriate places with a hole saw. An ordinary hand drill could handle this task.
Once all the holes were drilled I drew parallel lines tangent to the tops and bottoms of the holes. Using my jigsaw I cut about 1/8" inside these lines. The reason I didn't try and cut exactly along the lines is that it is very difficult to get a straight cut with a jigsaw in 1 1/4" Mahogany. I tried it and although it was fairly straight I wasn't satisfied. To clean up after cutting with the jigsaw I used a router with a straight cut bit. With the router guide on the outside of the board I was able to get a perfectly straight cut.
The next step was to round every corner with the router. Using a 1/4" radius bearing guided round-over bit I rounded the outside edges on both sides, and the edges in each of the slots on both sides.
Next I used a 1/4" drill bit and drilled through the center of each post. These holes were for the bolts that would eventually hold the rails to the deck. I then used a countersink bit in each hole. After that I used my jigsaw to cut the piece into halves and round of the very ends, yielding my grass rails. Cool! Each grass rail received two coats of epoxy and was lightly sanded.
The next step was to mark the decking where the grass rails would go. The same guide that was used to mark the cockpit for trimming during decking installation was used to mark the placement of the grass rails. It was cut down to 4" and slid along the sheer clamp while marking with a pencil. This created a curve parallel to the side of the boat 4" from the edge.
I thought about several ways to mount the grass rails. I finally decided that making them easy to remove was the best route should they ever break. Epoxying into place seemed risky should they ever need repairing.
With the exception of the first two posts the grass rails were attached by drilling holes in the decking and using 2 1/2"x1/4"x20 silicon bronze flat head screws with washers, lock washers, and nuts. Each hole drilled in the decking was swabbed with epoxy using a Q-tip to prevent a way for water to invade the plywood. The first two posts were inaccessible because they were located in the flotation compartment which is sealed. I installed threaded inserts below these posts and screwed the bolts into them. The first post was located over Mahogany so the threaded insert had plenty to grab a hold of. The second was only over 3/8" plywood. Counting on this before I installed the decking, I epoxied a piece of 3/8" plywood to the bottom of the decking below the second post. The threaded insert screwed into this.
In addition to installing the grass rails I also added a mount for the gas fill, a 1" thick Mahogany "doughnut", and a block for the bow light to sit on. The purpose of the bow light block is to lift the light above the grass rails so they do not obstruct the light it provides.