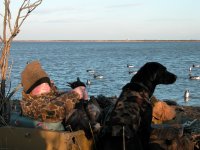
My family traditionally used the coffin style layout for hunting the Spartina grass marshes in New England. The coffin is quite simple, not nearly as refined as the Steve Sanford boxes.
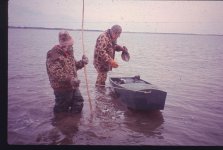
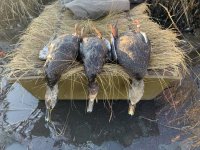
Black ducks are the number one puddle duck target species, well known for their wariness. A good hide is critical as the hunter is sitting in grass no more than 18" tall, but it also has to be watertight as the top of flood tide typically sees several inches to a foot of water on the marsh. I can't say the coffin is any better than other designs, other than I enjoy being able to take a seat on the aft deck when things are slow. Plus the aft enclosure keeps your feet warm on super cold days, and provides a solid rest for the gun while one naps. The negative is that large boots are longer than the 11.5"
Because they're simple and relatively inexpensive to build, I like to build them in pairs. Then you have a spare if your buddy wants to hunt, or one flies off the trailer on the way home. Enough on that subject.
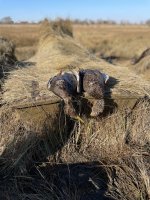
So the general dimensions are 7' long x 32" wide inside (33.5" outside). For simplicity of construction there's no bending wood aside from affixing the plywood to the upturned bow. The sides are 1" x 12" pine all around, (except the bow) because the bottom and sides get a glass sheathing I use #3 pine for cost. Plywood is 1/4" CDX, screwed and glued to the frame. In the past I've used Weldwood, epoxy and plain old carpenters glue. This time I had a supply of Gorilla glue on hand so we'll see how it does. The coffins typically only last me a couple of years because they take a beating and are stored outside, so I'm not making a lifetime boat. I haven't tried to extend the longevity, I think because I enjoy making them. I can get two boxes to the point of completion seen in the photos (this and the following post) in about four hours. There is a lot more work to be done, and I haven't given any thought to canvas yet.
The photos are pretty self explanatory, these boats are simple. I cut the sides in pairs with a jigsaw, the clean up the curve with a sanding block. The curve begins roughly 24" from the bow, I just eyeball a pleasing curve along whatever thin scrap I have on hand. The one important consideration is that the curve be tangent to the flat bottom or the plywood will buckle and crack. The bow is about 5" deep, a 6" piece of pine (really 5.5" of course) has a bevel on the bottom to match the curve. One pass on the table saw does the trick.
The 1x3 on the bottom will serve as the headrest block, but also serves to stiffen the frame while attaching the bottom. It's placed just aft of the beginning of the bottom curve.
Both the bow and stern are reinforced with a scrap piece of pine where lines will be affixed. I like to drill a pair of holes 6" or so apart so a loop can be left on the outside, handy for carrying.
The deck extends 36" from the stern. I don't think there's any magic in that measurement, but it's easy to remember. There's reinforcement for it along the leading edge, not seen in the photos.
The weather was lousey this weekend so I had to work in the garage. The photos are kind of dark, hopefully I can work outside in the next couple of weeks and show additional progress.


Black ducks are the number one puddle duck target species, well known for their wariness. A good hide is critical as the hunter is sitting in grass no more than 18" tall, but it also has to be watertight as the top of flood tide typically sees several inches to a foot of water on the marsh. I can't say the coffin is any better than other designs, other than I enjoy being able to take a seat on the aft deck when things are slow. Plus the aft enclosure keeps your feet warm on super cold days, and provides a solid rest for the gun while one naps.
The negative is that large boots are longer than the 11.5"Because they're simple and relatively inexpensive to build, I like to build them in pairs. Then you have a spare if your buddy wants to hunt, or one flies off the trailer on the way home. Enough on that subject.
So the general dimensions are 7' long x 32" wide inside (33.5" outside). For simplicity of construction there's no bending wood aside from affixing the plywood to the upturned bow. The sides are 1" x 12" pine all around, (except the bow) because the bottom and sides get a glass sheathing I use #3 pine for cost. Plywood is 1/4" CDX, screwed and glued to the frame. In the past I've used Weldwood, epoxy and plain old carpenters glue. This time I had a supply of Gorilla glue on hand so we'll see how it does. The coffins typically only last me a couple of years because they take a beating and are stored outside, so I'm not making a lifetime boat. I haven't tried to extend the longevity, I think because I enjoy making them. I can get two boxes to the point of completion seen in the photos (this and the following post) in about four hours. There is a lot more work to be done, and I haven't given any thought to canvas yet.
The photos are pretty self explanatory, these boats are simple. I cut the sides in pairs with a jigsaw, the clean up the curve with a sanding block. The curve begins roughly 24" from the bow, I just eyeball a pleasing curve along whatever thin scrap I have on hand. The one important consideration is that the curve be tangent to the flat bottom or the plywood will buckle and crack. The bow is about 5" deep, a 6" piece of pine (really 5.5" of course) has a bevel on the bottom to match the curve. One pass on the table saw does the trick.
The 1x3 on the bottom will serve as the headrest block, but also serves to stiffen the frame while attaching the bottom. It's placed just aft of the beginning of the bottom curve.
Both the bow and stern are reinforced with a scrap piece of pine where lines will be affixed. I like to drill a pair of holes 6" or so apart so a loop can be left on the outside, handy for carrying.
The deck extends 36" from the stern. I don't think there's any magic in that measurement, but it's easy to remember. There's reinforcement for it along the leading edge, not seen in the photos.
The weather was lousey this weekend so I had to work in the garage. The photos are kind of dark, hopefully I can work outside in the next couple of weeks and show additional progress.