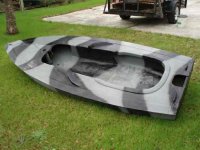
Sunfish to layout conversion

Jonathan Newell

New member
I was told this is the place to get some answers, so I just signed up. I have an old but solid sunfish- missing too much hardware to be worth restoring to sailing shape, so I want to try to convert her to a layout boat.

Any advice, warnings, pitfalls, photos, etc. would be appreciated. In particular, I am wondering whether its better to work around the centerboard/daggerboard, or remove it and seal it. I plan to use it on a flat 2-5' deep for the most part, so the centerboard couldn't be used for an "anchor", and I assume it won't add much to stability.

Any help would be appreciated.
 
I think I saw something a few years ago on converting a sunfish to a sneakbox.... I can't find anything on it.. I have a friend that has a sunfish that he would love to make into a sneakbox....
 
About 8 years ago a fellow brought one over to my shop and wanted some help with re-framing the area where the cockpit was removed. We (I helped him) framed the opening he had cut into the deck with plywood. He turned it into a real nice job, but it took a lot of work. There is some foam under the deck that will have to be removed. The inside will be a little rough and need smothing up. You may want to start by cutting the cockpit out and keeping the opening as small as you can until you decide how much room you need. The larger you make it the more framing and work will be needed. The centerboard trunk acts as part of the frame. It will most likely be in the way though and it ws removed in the boat I worked on. The epoxy (www.raka.com) bonded well to everything. We washed the surfaces to be glued with laquer thinner before any grinding. Best to use "virgin grade thinner" from a auto paint store for this. The main idea we used was to make the plywood go from the bottom of the boat up to 5" higher than the deck. The ply had a cleat fastened 5 3/8" from the top that supported the deck. I hope this helps and please let the group know how it goes.
 
john
a buddy of mine converted a sunfish into a layout/ one man hunting boat. he eliminated the center board and fiberglassed in a combing/dodger splash guard. he then installed a seat, then fixed chicken wire to the sides and grassed it up. he paddles it short distances using a kayak paddle. he says it is very stable and has no regrets about eliminating the center board. i have seen many birds killed from it and am always on the look out a cheap old sunfish. good luck
colin wheeler
 
This is only my second time checking in at the forum since the format change. (When I don't have time to hunt, I certainly don't have time to check out "the forum". I'll see if I can find what I did with the photos of conversions done by others (mostly BJ) and I'll see what I can think of at this late hour to add.

First, I think this is a great boat to convert to a duck boat. You will end up with a fiberglass boat capable of holding a big guy, the dog, and quite a few decoys in the cockpit and under the deck (more if bags of dekes are lashed to the foredeck). It should be easy to pole, row or kayak-paddle. A small motor ,either gas or electric could also be used if an appropriate mount was attached at the stern. A Barnegate style spray dodger or navy-top can be added if you need more than just the cockpit sides to keep water out.

The hull lines of the sunfish have ample rocker and vee making it a good deep water hull. In lakes and bays it would be usable as long as the wind and waves are mild to moderate. The wide flat, "boardboat" design of the sunfish also gives it a shallow draft, allowing you to use it in well under 12 inches of water as long as the daggerboard is not down. Above the waterline, it has the low profile look of a layout boat or a sneakbox.

I can't recall anyone leaving the daggerboard trunk in place. I, on the other hand want my boat to be able to double as a sailboat in the summer just for fun. I plan to move the daggertrunk nearly to the the gunnel on one side and then add another on the other side. A daggerboard in one or both will work much like a leeboard allowing me still to sail it. To have a full size cockpit you can lay down in, I'm pretty sure you'll have to move or remove the daggerboard unless you are very short. If you do remove your dagger trunk, I'd like to get it from you. I would gladly pay you to ship it to me. (I suppose I should follow that with "where are you located?)

Cutting the deck can be done with a skill saw or a spiral saw. Use a resirator; fiberglass, like asbestose can get down deep into YOUR lungs and stay there.
Some folks have had a tough time removing the "tub" (the old cockpit) and grinders or sanders were often employed at that stage. The last time I ran across a post by BJ, he was hanging out at the refuge's boats and blinds forum.

I'll continue to look for the photos; they must be on the retired PC. Meanwhile if you need to contact me, my email is: k.k.irwin@att.net
 
Great stuff, keep it coming. And Ken, you can certainly have the daggerboard trunk. I live on the Eastern Shore of Maryland.

I've decided that I'm going to take my time and do this right. I had been thinking about a quickie job just to get it in the water by the end of the season, but it looks like the results could be worth the extra effort.
 
Sailfish (sunfish) conversion

Here is how I did mine.

I started with a sailfish hull I found on craislist.com for $20. The sailfish was the smaller sister to the sunfish. Overall length is 13’ and width only 36” inches at the widest part.

This is the hull as I got it. Portions of the deck had already been removed.

2asbought2.jpg


1asbought1.jpg


I proceeded to remove the remaining deck. I started with a circular saw, but quickly switched to a cutoff wheel in a grinder. The saw was throwing the cut fiberglass fibers and I could feel them sticking in my uncovered arms. The grinder produced a very fine dust that was easy to clean up and less painful. As noted above follow proper safety procedures when cutting – safety glasses, dust mask, and long sleeves.

3cuttingawayremainingdeck.jpg


This photo shows the mast step and centerboard trunk after the deck was removed.

4mastandcenterboardfittingstobecut.jpg


Close up of mast step.

5maststeptoberemoved.jpg


And after removal with the cutoff wheel.

6maststepaftercut.jpg


Close up of centerboard trunk.

7centerboardwelltoberemoved.jpg


And after removal with cutoff wheel.

8centerboardwellaftercut.jpg


The remains of the bases for the mast step and centerboard trunk were trimmed as close to flush as possible with the cutoff wheel and grinder. Here is the final result on the centerboard trunk.

9centerboardslotaftergrinding.jpg


The centerboard slot was filled with epoxy/silca mix and sanded flush on the hull exterior. Then two layers of 12 oz tape and epoxy were put over the filled slot and feathered to meet the hull.

For the topside deck I wanted an arched deck similar to a traditional sneak box. Bulkheads were cut to a 49” diameter arc and epoxied into place in the hull. A cockpit was framed using 1x4 and 1x6 lumber. ¼” luan was used to plank the deck and pink foam insulation was used under the decks at the ends to provide positive flotation.

These photos show the bulkhead frames, the partially completed decking and the foam flotation.

11partiallydeckedwithfoam3.jpg


10partiallydeckedwithfoam1.jpg


11partiallydeckedwithfoam2.jpg


The completed decks were laminated with 6 oz cloth and epoxy. The hull was painted with flat gray oil based porch and deck enamel and then oversprayed with flat black and brown rattle can camo paint from the hardware store.

12finishedoveallview.jpg


13finishedbowview.jpg


14finishedlowprofile.jpg


I build some folding oar lock frames, but have since removed them as they were to flimsy and wobbly. I ended up poling the boat most places this year, but need to add some solid fixed oar locks.

I later added the dodger/cover shown in this photo and fastened cattails for marsh use. The dodger was cut from an old gray boat cover and ½” PVC tubing used as the hoop frames.

dodger.jpg


The boat worked well as intended. I did use it for some open layout hunting in Lake Erie, but only a couple hundred yards off shore as I was rowing and did not have a tender. Boat was solid in the slight chop that day and would likely be fine in as big a waves as I would be able to shoot straight in.

 
I built 2 of the Sunfish conversion boats, sold one and kept the other. I went for minimal weight so chopped the OAL to 10' on one and 11' on the other. The sail mast and center board supports were cut flush and glassed over.
I added a 40lb motor and battery box to the front for even weight distribution.

A great winter project.
6Layoutboat3.JPG

612-17-05layout2-med.JPG

 
Back
Top