Advice for attaching Skeg to Hull.

Richard Kassner

New member
Hello All,

I need advice from experienced boat builders. I am attaching a skeg to a Merrymeeting Bay Gunning Float. Below are the relevant particulars:

The Skeg is 3/4 inches thick, 26 inches long, and as tall as 3 3/4 inches. It is made of quatersawn white oak.
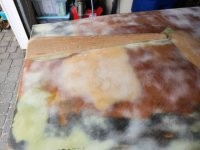
Skeg on Boat.jpg

The Hull is 5/16th inches thick and made of cedar strips laminated in fiberglass. The hull has been faired with epoxy, micro-balloons, 3M Glass Bubbles, &TotalFair. I used a 1/16th inch drill bit and drilled 5 small pilot holes through the hull.

Pilot Holes on Hull.jpg
I have #10 Philips Flat Head Wood Screws made of Stainless Steel 316. They range in size from 3" to 1". These screw Heads are 1/8" long. The screw Shanks range from 5/8" to 1/8." The Major Thread Diameter is 3/16". The Counter Sink size is 7/16". Below is a picture with 5 of them up against the Skeg.
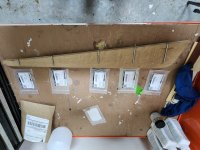
Skeg with Screws.jpg

I watched a video where the host glued a skeg to a dory using Polysulfide before screwing the skeg to the hull. I understand that Polysulfide provides a person the ability to remove the skeg in the future without too much effort unlike some Polyurethanes like 3M 5200 or Epoxy Resin.

I know that I can prevent leaks if I attach the Skeg with Epoxy Resin and make a Fillet between the Skeg and the Hull. However, if the Skeg gets damaged, replacing the Skeg will be very difficult by removing the Epoxy Resin and Fillets.

Questions:

1. Are "some" of Screws that I plan to use too long or are longer Screws best for this application? (I am planning on using a drill press to pre-drill the holes but I am concerned about getting long screws with a 3/16" diameter in a 3/4 " wide piece of hard White Oak. )
2. Should I use Stainless Steel 316 "Finishing Washers" to seat the Screw Head? (I am concerned about sinking the 1/8" long Screw Head into the hull given that the Hull is 5/16" thick and the cedar strips are thin. However, I realize that the Finishing Washers will cause the Screw Head to stand proud inside the boat.)
3. Is the Polysulfide (like BoatLife Life-Caulk) a good idea or should I use 3M 4200 (not 5200) or is Dolfinite 2005N Natural Bedding Compound O.K. for this purpose? (I have the Dolfinite but never have used it.)
4. Would it be a good idea to drill 3/16" holes through the Hull to accommodate the Major Thread Diameter of the Screws even if 2 of the shorter Screws have Shanks shorter than the 5/16" Hull? (I am concerned about leaks but I am concerned about Screw threads damaging the Hull.)
5. Or should I just Epoxy the Skeg in with Fillets and forgo the Screws all together? (Forget about the idea of being able to remove the Skeg easiest should it get damaged.)

Any insights would be most welcome. Thanks in advance.
 
Last edited:
I just did this last week on a boat ive been working on. The skeg was attached using the same type of hardware that you are using except the longest fastener was a bronze carriage bolt that went through the skeg , planking and transom knee on inside. I bedded it in DAP caulk. I didnt have any Dolfinite on hand or I would have used that. I ran a full length keel over the top of the skeg all the way forward to the stem.
You could go either way on the epoxy vs fasteners. I think on a boat this size I would vote for epoxy . A future repair would not be bad.
 
If all you have to secure the skeg to the hull is 5/16" wood/glass, I'd install a backer in the boat to give the screws a substantial anchor point and to distribute load. You risk tearing a chunk out of the bottom if you hit something at speed with nothing more than some screws in 5/16".

I like attachment with epoxy and a fillet, build it to last.
 
I'm definitely not an expert on boat building, but a backer inside the hull, like mentioned above by SJ, immediately came to my mind as well.
Or at least using pan head screws with a large washer.
Would love to see some photos of the rest of the hull too! Looks like a cool rehab project.
 
I,m thinking also a piece of aluminum attached to lenght of bottom of keel to avoid abrasion which would help with avoiding a needed replacement. Countersunk bolts right thru aluminum strip ,keel and thru hull with backer on inside.
 
5. Or should I just Epoxy the Skeg in with Fillets and forgo the Screws all together?
I would be most comfortable with an epoxy joint, no hardware. A good epoxy joint with a nice fillet on both sides will distribute the load along the entire length of the joint. Even distribution of the forces over a broader area, with absolutely no stress points.
 
Hello All,

I need advice from experienced boat builders. I am attaching a skeg to a Merrymeeting Bay Gunning Float. Below are the relevant particulars:

The Skeg is 3/4 inches thick, 26 inches long, and as tall as 3 3/4 inches. It is made of quatersawn white oak.

View attachment 56555

The Hull is 5/16th inches thick and made of cedar strips laminated in fiberglass. The hull has been faired with epoxy, micro-balloons, 3M Glass Bubbles, &TotalFair. I used a 1/16th inch drill bit and drilled 5 small pilot holes through the hull.

View attachment 56556
I have #10 Philips Flat Head Wood Screws made of Stainless Steel 316. They range in size from 3" to 1". These screw Heads are 1/8" long. The screw Shanks range from 5/8" to 1/8." The Major Thread Diameter is 3/16". The Counter Sink size is 7/16". Below is a picture with 5 of them up against the Skeg.

View attachment 56557

I watched a video where the host glued a skeg to a dory using Polysulfide before screwing the skeg to the hull. I understand that Polysulfide provides a person the ability to remove the skeg in the future without too much effort unlike some Polyurethanes like 3M 5200 or Epoxy Resin.

I know that I can prevent leaks if I attach the Skeg with Epoxy Resin and make a Fillet between the Skeg and the Hull. However, if the Skeg gets damaged, replacing the Skeg will be very difficult by removing the Epoxy Resin and Fillets.

Questions:

1. Are "some" of Screws that I plan to use too long or are longer Screws best for this application? (I am planning on using a drill press to pre-drill the holes but I am concerned about getting long screws with a 3/16" diameter in a 3/4 " wide piece of hard White Oak. )
2. Should I use Stainless Steel 316 "Finishing Washers" to seat the Screw Head? (I am concerned about sinking the 1/8" long Screw Head into the hull given that the Hull is 5/16" thick and the cedar strips are thin. However, I realize that the Finishing Washers will cause the Screw Head to stand proud inside the boat.)
3. Is the Polysulfide (like BoatLife Life-Caulk) a good idea or should I use 3M 4200 (not 5200) or is Dolfinite 2005N Natural Bedding Compound O.K. for this purpose? (I have the Dolfinite but never have used it.)
4. Would it be a good idea to drill 3/16" holes through the Hull to accommodate the Major Thread Diameter of the Screws even if 2 of the shorter Screws have Shanks shorter than the 5/16" Hull? (I am concerned about leaks but I am concerned about Screw threads damaging the Hull.)
5. Or should I just Epoxy the Skeg in with Fillets and forgo the Screws all together? (Forget about the idea of being able to remove the Skeg easiest should it get damaged.)

Any insights would be most welcome. Thanks in advance.
I would ease the forward radius some more, so that nothing you drag it along will stop on it, damaging it and putting stress on the leading edge.

As Dave suggested, if the fit is good, and you can clamp it well during installation, the hardware is not needed and makes any changes in the future that much easier. I often will use screws to attach/clamp something, but remove them and back fill with thickened epoxy after cure.
 
I'm piling on w/ Dave & epoxy, it's a Merrymeeting Bay Gunning Float, not a stump jumping surface drive battering ram. You don't need to breach the hull proper and it will be simpler to replace in the future if it's ever required.

Scott
 
I'm definitely not an expert on boat building, but a backer inside the hull, like mentioned above by SJ, immediately came to my mind as well.
Or at least using pan head screws with a large washer.
Would love to see some photos of the rest of the hull too! Looks like a cool rehab project.
Hello Carl,

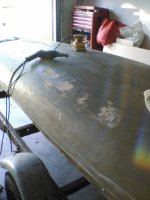
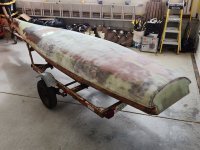
I have attached some pictures of the hull.Transom Cut.jpgHull damage.jpgHull 2.jpg

View attachment 56572
 
I'm definitely not an expert on boat building, but a backer inside the hull, like mentioned above by SJ, immediately came to my mind as well.
Or at least using pan head screws with a large washer.
Would love to see some photos of the rest of the hull too! Looks like a cool rehab project.
Here are some more pictures that did not make it in the first reply.Hull3.jpgHull damage 2.jpg Hull 1.jpg
 
I would ease the forward radius some more, so that nothing you drag it along will stop on it, damaging it and putting stress on the leading edge.

As Dave suggested, if the fit is good, and you can clamp it well during installation, the hardware is not needed and makes any changes in the future that much easier. I often will use screws to attach/clamp something, but remove them and back fill with thickened epoxy after cure.
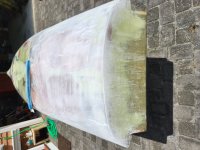
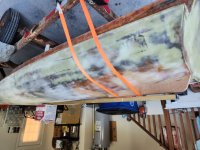
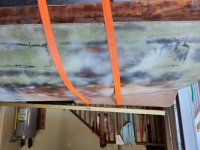
When I built the skeg, I tried to make it lower than the center of the boat. My thought is the hull will drag before anything contacts the skeg. At least that was the idea. I can clamp the skeg to the boat with straps so I could just use epoxy. See pics. Thanks. (I don't know why the pictures are coming in upside down. Sorry.)
Clearance 1.jpgClearance 2.jpg
 
I just did this last week on a boat ive been working on. The skeg was attached using the same type of hardware that you are using except the longest fastener was a bronze carriage bolt that went through the skeg , planking and transom knee on inside. I bedded it in DAP caulk. I didnt have any Dolfinite on hand or I would have used that. I ran a full length keel over the top of the skeg all the way forward to the stem.
You could go either way on the epoxy vs fasteners. I think on a boat this size I would vote for epoxy . A future repair would not be bad.
Thanks Bob.
 
If all you have to secure the skeg to the hull is 5/16" wood/glass, I'd install a backer in the boat to give the screws a substantial anchor point and to distribute load. You risk tearing a chunk out of the bottom if you hit something at speed with nothing more than some screws in 5/16".

I like attachment with epoxy and a fillet, build it to last.
Thanks for the backer idea. The Hull is very thin. I have a picture of the how thin the hull is after cutting away the transom. Thin Hull.jpg
 
I,m thinking also a piece of aluminum attached to lenght of bottom of keel to avoid abrasion which would help with avoiding a needed replacement. Countersunk bolts right thru aluminum strip ,keel and thru hull with backer on inside.
Hello Roy,
The aluminum attached to the length of the bottom of the keel sounds like a good idea. I might not have enough room to run the backer too much past the last screw hole at the rear of the hull. (I was looking at that today.) That last screw hole is very close to the fillet I made between the transom and the hull. The original builder ran screws with no backer. If I run screws, I think I should use a backer as you and others suggest.
 
Last edited:
I would be most comfortable with an epoxy joint, no hardware. A good epoxy joint with a nice fillet on both sides will distribute the load along the entire length of the joint. Even distribution of the forces over a broader area, with absolutely no stress points.
Thanks Dave,

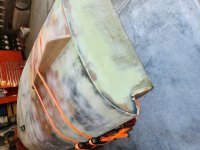
I can clamp the skeg on to the hull with ratchet straps and make the skeg level without hardware. (See picture.) In fact, the skeg doesn't rock on the hull if I push on the skeg at either end. (I don't know why the pictures are inserting wrong way around. Sorry.) ratchet straps.jpgLevel 1.jpg
 
Last edited:
I'm piling on w/ Dave & epoxy, it's a Merrymeeting Bay Gunning Float, not a stump jumping surface drive battering ram. You don't need to breach the hull proper and it will be simpler to replace in the future if it's ever required.

Scott
Hello Scott,

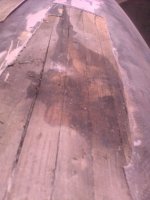
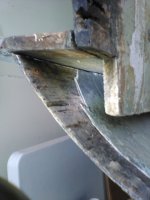
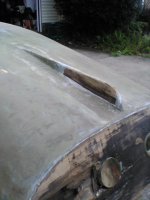
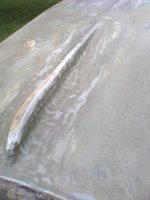
Looks like the epoxy is getting the votes. I had a devil of time removing the old skeg. The builder used screws, a bunch of laminate, microballoons, and polyester resin. Interestingly enough, the builder just glued the skeg to the laminated hull. (In the 3rd picture, you can see the 2 strips of laminate that I removed from the wood core that was under the skeg.) The skeg popped right off once I got past all the laminate, microballoons, and resin on top of and beside the skeg. I think multiple owners may have heaped on more fillets and laminate around that skeg as time went on. I will not laminate the skeg because the water can get in behind the laminate and warp the wood -which did happen with the old skeg. See pictures below.Skeg 2.jpg

Skeg 1.jpg
Skeg 3.jpgSkeg 4.jpg
 
Last edited:
I would be most comfortable with an epoxy joint, no hardware. A good epoxy joint with a nice fillet on both sides will distribute the load along the entire length of the joint. Even distribution of the forces over a broader area, with absolutely no stress points.


This! Further, removing it in the future is a simple chore for a Sawzall and a belt or disc sander.
 
This! Further, removing it in the future is a simple chore for a Sawzall and a belt or disc sander.
The Woodenboat forum is full of debates over epoxy and white oak. I would epoxy and fasten after predrilling for the fasteners. I would also lubricate the screws with beeswax or a wax toilet ring to aid in installing the screws. I use a hand brace when installing fasteners to get a feel if the screw is seizing or stretching.

Rick Lathrop
 
Rick

I've heard that before but have never experienced any failures. Granted, I don't use a lot of white oak and epoxy, but I am inclined to think this is one of those internet stories that grows legs and becomes something people with no experience like to say.
 
Back
Top