Advice on sneakbox - AA Broadbill or MLB Wigeon

I have a small workshop that is full... we recently moved and I had to squish into a lat smaller space. I've spent the morning prioritizing, down-sizing and re-organizing. I cannot get the boat in the shop, but I'm going to need to get everything on mobile bases as I will only have room to run one big tool at a time. I was just going to put the boat on a pair of saw horses, but I think it's better if I can roll it around. If anyone has a good idea for a mobile base for working on the boat let me know. I'm just starting to search.

Hey Matt - your are right... very special birds.

Scott
 
Scott

If it needs to be mobile that will take a bit more structure than sawhorses. Take a look below at my Scaup build, in particular the "cradle" section. I made a cradle that I modified as the build progressed. If I had wanted to add some casters to make it mobile it would have been simple with some casters like the below. There are a lot of similar solutions out there assuming you don't have to move over gravel or rough terrain. As you know some cheap framing 2x4s make most of the structure along with the casters.

As for your repairs that comes with the territory of buying used wood boats. When owners lose interest they often park them outside and don't pay them the needed attention to ensure water isn't getting to them all the time and correct the first sign of issues. I firmly believe get all the bad out and then go to work building back. Take notes and pictures on everything that comes out so you can rebuild with less guesswork. Of course now is the time to improve things you see the original builder could have done better. I put off a repair on my Brant for several years and finally last fall it had to be dealt with. I lost the season to the project but my boat is new again and ready for many more years of use, and it was paid for many many years ago.


Eric - I'm sure that is what happened. The guy I bought it from did not know a lot about boats. It had no cover for the cockpit. Given the saturation of the wood, and that is no visible evidence of rot, I'm guessing it was left outside and was filled with water. I should have looked further .. I did not like the design at the transom as it looked like a water trap.

I've contacted Clark Craft to see if they can send me a diagram of the cross section of the bilge. I'm hoping the keel is good, if it is not it maybe beyond my skills to repair. If it looks salvageable, I will order the plans from Clark Craft. I also saw one of Steve Stanford's rebuilds where he photographs sections with measurements on various pieces -- I will do that for sure.

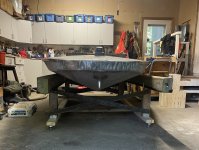
I scabbed a cradle together. I had a couple of 10', 3x5 bunks off my old trailer and I quickly put them together on wheels. It seems strong and the boat is not all that heavy. I'd like to get it in the garange and remove some of the saturated wood and some the coatings on the entering of the bilge to let things dry out.

Tomorrow I will get under the hull with a hammer and tap to see if I can hear the extent of the damage. But, I was really hoping tomorrow morning I was going to be in the boat looking over decoys .
Scott
 
Scott

I know they still sell the plans which might come in handy. The plans I had and can't find were a set of step-by-step instructions with really good drawings and a set of full-sized blueprints for transferring to your stock to cut out the individual pieces. Let us know what you find.
 
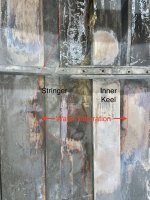
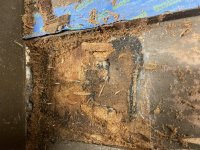
I got the boat in the garage and took the sander and scrapers to sections of the hull. There are 2 stringers or battens that run either side of the keel. Sanding the top of the inner keel - all looks good. As I sanded the inside of the plywood either side of the keel, you can see the extent of the dampness in the wood - the sanding dust is captured by the moisture and gives a very good idea of the extent of the damage. While writing this note, I received a response from Clark Craft. They kindly provided digital copies of a couple pages of their assembly diagrams. They are perfect as they show how each component was constructed. I have a mess in the garage - I barely fit in it before the boat was in ;-)
IMG_2345.jpeg

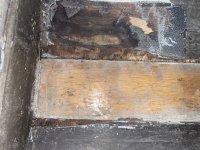
I think I can replace ~4' section plywood from the transom outboard to second stringer on one side of the keel. The other side is much more limited, but I think I'd take a larger area just to be sure.

IMG_2348.jpeg

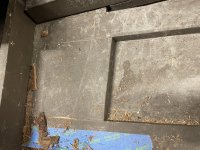
There also appears to be a small problem in the front compartment either side of the keel. Some had tried to make some repairs here. Defiantly looks worse when I put some light on it.
IMG_2347.jpeg

I'm going to putter on it a bit doing some sanding and scraping before I make any commitments to cutting into the hull. It will give me a bit of time to think about it. I do have a couple of questions off the top of my head that maybe some one might provide some guidance.

  • The specs call for 1/4" plywood for the hull. To replace a section of the plywood I thinking it should be done with a scarf joint... maybe 8:1. Does this have to be a scarf joint? and if so, how would you suggest making it?
  • I think it would be better to locate any joins over a stringer or the inner keel. I'm assuming the plywood I epoxied in place. How do you go about releasing the plywood from the stringer or inner keel. I'm thinking I would locate any nails by sanding and pull them. do I have to heat the plywood to release the epoxy
Thanks
Scott
 
Scott

I would want to get the wood dry as possible to work on. A fan to circulate air wouldn't be a bad start to the refurb process.

  • The specs call for 1/4" plywood for the hull. To replace a section of the plywood I thinking it should be done with a scarf joint... maybe 8:1. Does this have to be a scarf joint? and if so, how would you suggest making it?

A scarf joint is a good way to go on 1/4" plywood. A half lap might work but your getting pretty thin and that can be hard to accurately cut. For both of these my took of choice would be a router with a sled made to guide the cut. It will take some ingenuity to make such a sled and in my shop I'd spend more time coming up with that than actually making the cut and re-glassing. You can also use a butt joint but you will need to put a backer block on the inside of the hull. That is the simplest means I know. With some care you can make backer blocks unnoticeable or look original. In the end you are after a strong joint that won't suffer the same fate. Let me ask, are you sure the damage is all the way through the plywood? If not you can grind out a large dished area and build it back up with epoxy and fiberglass cloth. The idea is to spread the repair over a larger area for strength and to make sure you get all the bad wood out. Also, the link below is to a repair Joel Mill at Devlin made a long time ago (hence the internet archive link). He shows a great way to repair a damaged hull panel. In this case he couldn't get in from the top because the floor was in the way, but perhaps the pictures will give you some ideas. That's what it's really all about. Figuring a solution that works for your particular situation. Sometimes you have to get creative like Joel did.


  • I think it would be better to locate any joins over a stringer or the inner keel. I'm assuming the plywood I epoxied in place. How do you go about releasing the plywood from the stringer or inner keel. I'm thinking I would locate any nails by sanding and pull them. do I have to heat the plywood to release the epoxy
Yes. I would want to paint straight epoxy onto the repair and then use thickened epoxy when mating parts to close all gaps. In preparation you will have to break out prybars, saws, grinders, etc., but I don't think you'll need heat in this case. Anything to get the old bad wood out but leave a surface behind that lends itself to being reworked.

You are on the right track and I know the feeling of wondering just how you are going to get it all right. Like many things in life, it is a multi-step process that will reveal itself as you go. You don't need to know the end-to-end process at the start. Just get going and nibble away at the problem a little bit at a time. It will come.
 
Thanks for that link Eric... I downloaded the Gougeon Boat Repair manual -- lots of stuff there, but nothing on separating wood bonded together with epoxy -- I've sent them a question.

I'm still puttering with the sander. Really, I'm just removing the paint epoxy and sketching out the affected areas. To remove the plywood over the battens and inner keel I'm thinking of turning the boat over, removing the fiberglass to expose and fasteners, removing those, then using a patterning plunge bit on the router and routing out the plywood. The easiest maybe to find a cheap sacrificial bit and route out the fasteners too ... the plans suggest there alone only a few 3/4" nails to remove.

Next challenge will be be finding marine plywood. I'm going to try an visit a local boat builder tomorrow to see if he has any leads/input.

Scott
 
Scott

Do you know if marine ply was used to start with? A lot of boats are built with AB or AC fir. Marine, especially BS 1088, is really nice to work with starting new, but for patch material I wouldn't go to extremes to get it. I wouldn't use CDX, but a good quality grade fir ply will suffice given you glass over.
 
Scott

I forgot to mention. The only real way to separate the epoxy from the wood is to cut/grind/sand. In other words, mechanical destruction of the bad piece of wood and the epoxy bonding it to the good wood.
 
Scott

The link is to a recent workbench thread where I showed a hull repair I made to my Black Brant. It might give you some food for thought as well.

 
Eric - I'm not sure. It looks like some sort of marine plywood like BS 1088 but the glue has failed and it is completely delaminated in spots which I don't think should happen with that kind of plywood. So far it looks like I need a few pieces of odd sizes 18"x56", 8"x36" and a couple of pieces that are <8"x6". I'm going to see if the builder might have any pieces laying around that he would sell, maybe a bit of advice too.

Plywood selection from the box box stores looks limited here .. I can find ACX pine but not fir.
 
I heading out in search of some marine plywood today. I stopped into a local boat builder, they build "chaloupe Vercheres". They build traditional small wooden that were used for hunting on the St. Lawrence. There is a nice little write up on them here: . https://www.duckworksmagazine.com/01/articles/chaloupe/index.htm#google_vignette. He was nice, but could not provide a lot of help, but he gave me the contact of another builder. I dropped by and he was a wealth of information. He's retired from boat building and did he's training in Maine in the 1970s. He specialized in restoring vintage Chris-Craft boats. He provided his connections on local supply of lumber and his sources of plywood. Real nice guy, we talked to 2 1/2 hours and welcomed me back any time.

Got back to the boat this afternoon and I kept looking at the blocking between the inner keel and the buttons at the frame in front of the cockpit. The just make no sense to me -- can't understand their purpose. I decided to try and route one out -- I sanded of the top and could not see any nail heads -- I did not get very far before I hit one. That little block of wood maybe 6"x6" had 13 ss ring nails in it. It looks like a porcupine!

Here's what it looked like before
IMG_2358.jpeg
And afterIMG_2359.jpegSaturated with water. It was bedded in some sort of rubber compound and the hull of the boat is wet there too and have to go. The builder I me today said he could build me a new one way faster then repairing this one.

Scott
 
That may be a previous repair. Sometimes it's the mods that make you scratch your head. Lie I said before. Get it all torn down to good wood and see where you are. As it dries out some wood may be in better shape than you originally thought, but I can tell there is definitely punky wood that has to be replaced.
 
I have most of it out and now it makes sense. It is a butt joint in the plywood. I do not have the plans yet and I'm not sure if this was in the design -- if it was, it shouldn't have been.
 
I repaired/replaced the bottom on my melonseed. I ground back to good plywood. I ground an 8:1 taper on the edge of hull and patch panel. I then laid in 1708 fiberglass to build up the taper to flat and topped with layer of fiberglass over the outside.

There are photos on woodenboat forum if you are interested.

Rick
 
Hi Rick,

I've removed everything can be removed from the inside of the boat without cutting the hull. I think the easiest way to repair the hull is to replace a few large sections. As soon as I can find someone to help me flip the hull over I will start removing sections of the hull. I' really curious to see the condition of the bottom side of the inner keel. If it has significant damage I think it might be beyond my skills to repair. Based on what I've seen so far, I think it is good condition... fingers crossed.

I think the most challenging thing will be remove of the plywood from the battens without damaging them. I might be able to do that with a router and a patterning bit, but I thought I could do that for those blocks of wood at the butt joint and could not... just too many nails.

If all goes well I will butt joint the plywood over the battens and scarf joint across them. I have a thought, I'm not sure if it is a good one and looking for some advice. I'm thinking of doubling up the hull by setting in another layer of 1/4" plywood in-between the battens and running most of the length of the hull. That would bring the hull thickness to 1/2". The only negative I can see is it will add some weight to the boat... but there may be other good reasons for not doing this.

Well, I'm getting a head of myself, first challenge is getting the plywood removed from the battens and keel. I'de appreciate any thoughts.

Scott
 
Scott

As you re-work the issues you want water to have an easy path out of the boat. Limber holes and passageways from the front of the boat to the transom will prevent a lot of future problems. All those hard corners and tight spots in the bottom make areas for debris and water to collect. As you rework it think about ways to eliminate them. Even an application of thickened epoxy to radius hard corners can go a long way towards sealing up and preventing water intrusion. Is the bottom of the hull glassed? I suspect it is from your photos but if not now is the time to glass it. If it is glassed now is the time for a sanding, recoating with epoxy, more sanding, and paint. Yes, it is a lot of work, but it feels so good when you finish. At least to me.
 
I heading out in search of some marine plywood today. I stopped into a local boat builder, they build "chaloupe Vercheres". They build traditional small wooden that were used for hunting on the St. Lawrence. There is a nice little write up on them here: . https://www.duckworksmagazine.com/01/articles/chaloupe/index.htm#google_vignette. He was nice, but could not provide a lot of help, but he gave me the contact of another builder. I dropped by and he was a wealth of information. He's retired from boat building and did he's training in Maine in the 1970s. He specialized in restoring vintage Chris-Craft boats. He provided his connections on local supply of lumber and his sources of plywood. Real nice guy, we talked to 2 1/2 hours and welcomed me back any time.

Got back to the boat this afternoon and I kept looking at the blocking between the inner keel and the buttons at the frame in front of the cockpit. The just make no sense to me -- can't understand their purpose. I decided to try and route one out -- I sanded of the top and could not see any nail heads -- I did not get very far before I hit one. That little block of wood maybe 6"x6" had 13 ss ring nails in it. It looks like a porcupine!

Here's what it looked like before
View attachment 59166
And afterView attachment 59167Saturated with water. It was bedded in some sort of rubber compound and the hull of the boat is wet there too and have to go. The builder I me today said he could build me a new one way faster then repairing this one.

Scott

"He could build you one way faster then repairing this one....." That's what my buddy at the boatworks told me. He also restored Cris-Craft and Lymans. If possible visit your builder as much as possible it's very rewarding in so many ways.

I have hunted the St. Lawrence out of Clayton and Gananoque. Visited the Wooden Boat Museum & Decoy Museum always enjoyable. Much appreciation for the decoys and various vessels of that area. At one time the Clayton NY Decoy Show was "The Show" to attend and enter gunning decoys.

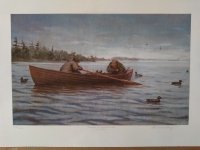
I've had this print for many years. It's still unframed pretty much sez it all for the down river area I visited and hunted several times.


my 2 cents
 

Attachments

  • st. lawrence skiff print.jpg
    st. lawrence skiff print.jpg
    78.7 KB · Views: 7
Scott

As you re-work the issues you want water to have an easy path out of the boat. Limber holes and passageways from the front of the boat to the transom will prevent a lot of future problems. All those hard corners and tight spots in the bottom make areas for debris and water to collect. As you rework it think about ways to eliminate them. Even an application of thickened epoxy to radius hard corners can go a long way towards sealing up and preventing water intrusion. Is the bottom of the hull glassed? I suspect it is from your photos but if not now is the time to glass it. If it is glassed now is the time for a sanding, recoating with epoxy, more sanding, and paint. Yes, it is a lot of work, but it feels so good when you finish. At least to me.
I was thinking the same. I'm not sure what the boat is framed the way to is. The frames sit on top of the inner keel and battens. This is good as water can pass, but if they were let into the battens the floor would be almost an inch lower. Seems to me that inch would make it easier to hide in the boat. It looks to me that the plywood was bedded in some black rubber like compound and fastened to the battens with 3/4' ss ring nails. Then the interior was covered with sort of epoxy. The outside was fibreglass and epoxied.

There was no fillers our radiused (is that a word) fillets anywhere. If it all works out and I can repair the boat I will tape and radius everything. I' not sure how much I'll do this year. If I can get it patched up, waterproofed, a quick coat of epoxy and paint that maybe all I do. I'd like to hunt it in November. It could come back in the shop for the winter for the finishing touches ..
 
Back
Top