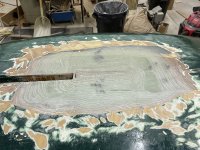
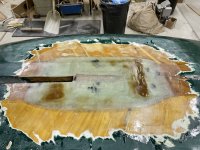
School me on Fiberglass Hull Repair...

Good morning all, proud to say that this weekend I became the new owner of a 1993 TDB Classic 14. I picked this boat up from a true gentleman of a duck hunter in Central Pennsylvania that was a pleasure to deal with. He was very up front with the history and story of the boat and the condition.

This is not a boat that sat in a garage, this boat was hunted in multiple states over its lifetime. He has some awesome stories and pictures from the 90's and early 2000's hunting out of this boat. The "catch" so to speak is the fiberglass patch in the bottom of the boat. The purchase price was right, so we made the trip and plan to bring the boat back to her former glory.

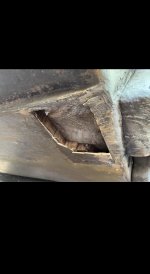
In 1995 he was pulling the boat out of the water and somehow the hull came off the trailer and hit the pavement. It cracked the bottom layer of fiberglass at the rear of the hull near the transom. He admitted that he had plans to hunt the next day, so the patch was done overnight. He cut a square out of the bottom of the hull, replaced the plywood, and fiberglassed it over. Fast forward to present day and the patch fell out while sitting on the trailer. The boat has not been in the water in 8 years.

The square that he cut now needs to be patched again. I have taken a screwdriver to the surrounding plywood and everything is very solid. The plywood he used for the patch is rotted away, but the plywood used to construct the boat is very structurally sound. The transom and floor are also solid. The patch area is about 5" x 5".

I am by no means a fiberglass man, but I have a friend who has experience with it. We would like to patch this area and get this boat back on the water. What do you guys recommend as a method of repair for this and what materials do you recommend? Details on how many layers of glass, what weight of cloth etc are very much appreciated.

Thank you!

IMG_4143.jpg
IMG_4145.jpg
IMG_4011.jpg
 
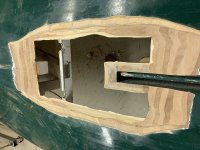
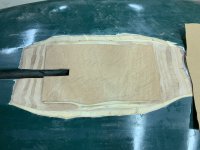
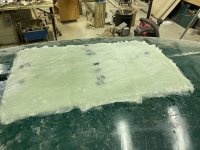
My repair suggestion would be to cut back to sound plywood in a shape that is easy to place a patch in. Grind a 12:1 taper around the edge of patch and hull. When I did a similar repair I laid in pre wetted 1708 laying the mat in alternate orientation in each layer to build the taper out to level. Then I ground it flush and laid a top layer of fiberglass tied into the rest of hull fiberglass. Wear plenty of protection, do sanding outside to minimize the dust getting everywhere. I also wound up killing my Milwaukee 8" sander grinder from grinding the fiberglass to level with a 60 grit disc.

Here are some photos to help
IMG_5524.jpegIMG_5535.jpeg
 

Attachments

  • IMG_5710.jpeg
    IMG_5710.jpeg
    4.5 MB · Views: 20
  • IMG_5716.jpeg
    IMG_5716.jpeg
    4.2 MB · Views: 20
  • IMG_5720.jpeg
    IMG_5720.jpeg
    4.8 MB · Views: 20
Last edited:
I concur with Richard - of course!

A couple of other thoughts:

1) If at all possible, I would flip the boat so gravity is your friend - and have the working surface at a comfortable height - 34 or 36 inches off the ground.

2) Is that balsa core or plywood? Looks to my eye like the former. Either way, make sure to expose everything that is wet or soft - then grind as Richard recommends. I have recently become enamored of my 4-inch angle grinder with a flap disk for tight jobs like this. Mine is a cheap Harbor Freight model but has done the job for many years. When removing either 'glass or wood I would use 40-grit. And, plan to use a few!

3) Outermost 'glass layer(s) can be faired with a disc sander - or even a belt sander (if you're pretty handy with one and keep in moving in gentle circuits.) Final fairing should use epoxy + fairing compound sanded with an orbital sander, starting at 60-grit but working down to 120. When everything is perfectly fair, brush or roll on a coat of straight epoxy (unthickened) to seal the micropores in the microballoons (in the fairing compound). Two or 3 coats of paint and you can commence the hunt!

Hope this helps!

SJS
 
This is great information all! Richard, thank you for the photos, that is very helpful.

Couple follow up questions.....

It looks as if you cut a piece of plywood to match the hole you created, what type of plywood did you use and how did you "fasten" it to the existing plywood in the hull? Or does the fiberglass encapsulation serve as the method of tying it all together?

Also, you mentioned 1708, I'm assuming 1708 Biaxial 17oz cloth with 3/4oz mat backing? Which epoxy did you use with that cloth?

Getting my list together to order from US Composites
 
Noah,

Richard is on the money with his repair suggestion. Check out the Youtube channel Boatworks Today. He has a lot of great videos on fiberglass repairs and products.

Any plywood you add for coring material, I would bed in some form of thickened resin (depends on what type of resin you are using, keep it the same) or a product like Thixo from Total Boat. For a repair that size, a good quality AB plywood should be fine. Coat it a few times with your resin to seal it completely. Your strength is going to come from the multiple layers of 1708. The plywood core is simply acting as a mandrel and will probably outlast the rest of the boat if done correctly. You could use a better product if you choose like marine grade plywood (no voids and waterproof glue in the manufacturing process), Coosa board, or something like Divinycell, but these will all be more costly. Jamestown Distributors used to sell smaller pieces of Coosa, not sure if they still do, but the rest of the boat has survived this long with plywood core. Stay away from Polyiso foam unless you're using Poly resin. 1708 is compatible with all 3 of the big resin types (polyester, epoxy, and vinylester).

I would use epoxy resin for your repair. It is the strongest and most waterproof of the three. Vinylester is a close second and is cheaper, but has a short shelf life. I have had good luck with the 3:1 medium cure from US Composites in the past. Get some wood flour as well and you can mix up your thickened epoxy for bedding compound. I would not use that mix for fairing though, unless you enjoy sanding and blowing through sandpaper.

Keep us posted with pictures.
 
This is great information all! Richard, thank you for the photos, that is very helpful.

Couple follow up questions.....

It looks as if you cut a piece of plywood to match the hole you created, what type of plywood did you use and how did you "fasten" it to the existing plywood in the hull? Or does the fiberglass encapsulation serve as the method of tying it all together?

Also, you mentioned 1708, I'm assuming 1708 Biaxial 17oz cloth with 3/4oz mat backing? Which epoxy did you use with that cloth?

Getting my list together to order from US Composites
I used Oakume marine plywood for my repair. I used a cardboard and waxpaper and packing tape to support the patch from underneath. Once the 1708 cured and was leveled I flipped the boat. Removed the cardboard and waxpaper and then sanded the underside. I then put down a layer of fiberglass tying to the existing interior fiberglass.

There was also an existing floorboard support, the rear of the centerboard case and the mainsheet mounting block to support the patch piece.

I purchased all my cloth and epoxy supplies from Raka https://raka.com/. I have used their products with good results.

Rick Lathrop
 
Thank you Tom and Rick, this forum is a wealth of knowledge and I appreciate your help.

Let me ask this, and apologies in advance if this is a dumb question. The 12:1 slope you sanded your existing hull to.....the area where my hull needs patched is near a couple "hard edges" i.e. it's not in a flat spot of the hull. The transom is at the rear of the patch and there is a step in the hull beside the patch.

I could sand these edges to an angle, but it would be much steeper than 12:1. Likely more along the lines of 60 degrees or so.

The other two edges of the square could have a flat slope as shown, but I am worried that method won't work for the two edges in close proximity to my patch.

Let me know your thoughts, and thanks again for the help!
 
I put hole in my boat a few years ago and documented the fix here https://duckboats.net/community/threads/fixing-a-hole-in-the-boat.338767/
I did the same as richard and cut a taper in and fit a piece to it. I am pretty sure I did not do a 12:1 scarf. more like a 6:1 and it has hald up great so far. I did not flip the boat, but would follow Steves advise if possible. I just had no means to do so or I would have. Working on your back for that type of a repair is no fun.
 
Thank you Neal. I will absolutely flip the hull over. I am actually surprised with how light this hull is considering its construction. A team of a couple or three guys should be able to flip it.

Good to hear you had good luck with a steeper angle. After watching some of the videos recommended by Tom I think that I have learned what is crucial is the angle at which the fiberglass is beveled moreso than that of the plywood underlayment.

On the two sides that won't allow a full depth 12:1 I can sand the fiberglass layer itself to 12:1 but the plywood will be at a steeper angle.

Most boats they repair on there don't even have wood, the hull is just 1/8" thick or so of fiberglass. The videos were a great visual for me.

Any input on this approach?
 
Noah,
First off, congratulations on joining the TDB family! You will enjoy years of gunning that boat. It's a fantastic platform and I owned my 14 classic for 9 years before moving into the 14 SeaClass model.

I work with TDB & the Olsen Family, we will be in Easton, MD this weekend but if you want any info on the boats history, how to fix and methods used you can reach out to Liz anytime over at Info@TDBCo.com Tom would be more then happy to walk you though this.

TDB does dozens of refurbishments each year and many are on the 14 classic & 17 classics. They can point you in the best way to tackle this...

Personally I agree with Richard above as well, that's the way I would do it.
 
Thanks Anthony, I shot them an email explaining the situation. Very curious to hear their thoughts on how to make the patch with the 12:1 not being feasible on two of the four sides.
 
Hey guys, little bit of an update. Talked to Tom last night and he gave me some great insight on the repair.

Steve, you were correct, it is a balsa core.

My main question was what his thoughts were with me not having the real estate for a full depth 12:1 slope. He told me not to worry about sloping the balsa core full depth, just put a bevel on the fiberglass itself. He advised me to not sacrifice the structure that was already there, i.e. the step in the hull beside the patch and the transom fiberglass behind the patch. Basically keep it small, get rid of only what is bad and nothing more, and just put the bevel on the glass.

He echoed your guys' thoughts on bedding the plywood patch in thickened epoxy and glassing over with 1708.

I'm feeling much more confident in this repair after talking with him and reading all of the posts on this thread. I'm looking forward to getting started!

Does anyone have a small 12"x12" or so piece of 3/4" marine ply they would be willing to sell?
 
Noah~

Sorry I cannot help with the marine plywood. However, you really do not need it for this application. A decent piece of AC plywood will do - especially since you are encapsulating it so thoroughly in epoxy. (You could also use 1/4-inch + 1/2 inch sandwiched if you have any on hand.)

The real benefit of marine plywood is the (purported) absence of voids in the inner plies. This is an important consideration when building a hull - especially bottom or sides or transom.

Option: Any shops that build/repair wooden vessels in your area?

Hope this helps!

SJS
 
Steve, there is actually a marine plywood supplier I found yesterday in Raleigh, NC (about two hours from me).

They sell quarter and half sheets so I will just pick up a quarter sheet. It will be good to have on hand for future projects/repairs also
 
Back
Top