Old Herters

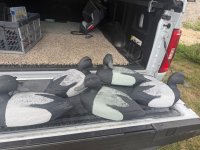
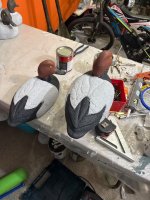
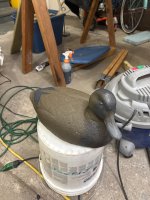
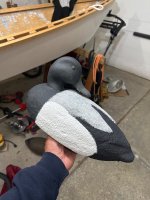
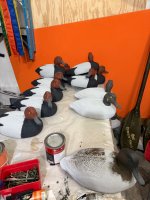
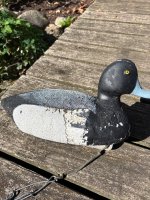
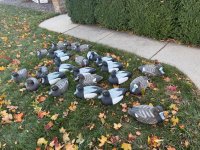
Well , I was waiting to hear back from about guy about a fiberglass banks style dory project and my 10 y/o daughter was asking make fish(tie flies), build a bird house, or build something . So what else am I supposed to do. I pulled down the first bag of the herters , grabbed titebond and the tote of walnut hulls. They helped for about 2 birds each (10 y/o’s) 5 year old stuck around for a few more. He liked doing the walnut coating . Got about 20 done too/bottom with one coat and just didn’t 6 more just the bottom. So about 16 more to do the first coat. Daughter stole a hen bb for her room since the boys both have decoys in their rooms, fair I guess. Hopefully they will help more with the painting . My daughter was scrolling Steve’s how to section for the painting, Steve, FYI she says “oh I can do that too dad “😂.

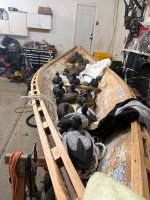
The dog pic was from earlier when I was about to head to a buddies for his trailer to pick up the dory. She came in covered in what I thought was poop , but I think she just rolled around at the neighbors with her dogs in the fresh cut grass that was in a puddle. Had to get the kids out of the truck and wash her……

Tony
I normally keep some lengths of thin electric fence style line cut into 16" lengths to insert thru head bolt hole with a hook bent on each end and just hang the decoys to dry after painting or restle coating. Allows full body coverage all at one time. Hung Out in the sun speeds up drying process and also lets any excess titebond simply run towards tail doing that process. This is the time of year i,ve always done those decoy projects ,outside weather permitting, on trestles and table. Mostly because the dull coat I spray over paint doesn,t like above about 35% humidity. Might work for you or might not but does speed up process a bit.
 
I normally keep some lengths of thin electric fence style line cut into 16" lengths to insert thru head bolt hole with a hook bent on each end and just hang the decoys to dry after painting or restle coating. Allows full body coverage all at one time. Hung Out in the sun speeds up drying process and also lets any excess titebond simply run towards tail doing that process. This is the time of year i,ve always done those decoy projects ,outside weather permitting, on trestles and table. Mostly because the dull coat I spray over paint doesn,t like above about 35% humidity. Might work for you or might not but does speed up process a bit.
I used a Philips screwdriver thru the head hole to help hold the decoy. The wire would be a good idea too. Unfortunately we aren’t getting over 70 this whole holiday weekend. Once I have 2 coats on each bird , I planned on putting them back into the attic to cook for a month or so.

Tony
 
Well it was a quick summer! Was gonna post on the work bench but figured I’d keep the story here. I got them all coated earlier in the summer, stuck them back up on the garage. Finally found time to prime all the bodies. Couple week ordeal balancing work, home and the dory project I thought was gonna be a quick weekend build.

Went with Steve’s paint plans and so far I think I’ll be upset when someone blows one apart trying to shoot a cripple!!

Tony
 

Attachments

  • IMG_2715.jpeg
    IMG_2715.jpeg
    468 KB · Views: 18
  • IMG_2718.jpeg
    IMG_2718.jpeg
    449.5 KB · Views: 17
  • IMG_2731.jpeg
    IMG_2731.jpeg
    373.5 KB · Views: 16
  • IMG_2732.jpeg
    IMG_2732.jpeg
    367.9 KB · Views: 13
  • IMG_2733.jpeg
    IMG_2733.jpeg
    509.7 KB · Views: 17
  • IMG_2734.jpeg
    IMG_2734.jpeg
    393.4 KB · Views: 18
  • IMG_2735.jpeg
    IMG_2735.jpeg
    372.9 KB · Views: 19
Well it was a quick summer! Was gonna post on the work bench but figured I’d keep the story here. I got them all coated earlier in the summer, stuck them back up on the garage. Finally found time to prime all the bodies. Couple week ordeal balancing work, home and the dory project I thought was gonna be a quick weekend build.

Went with Steve’s paint plans and so far I think I’ll be upset when someone blows one apart trying to shoot a cripple!!

Tony
Good morning, Tony~

Great work all around!

For your daughter's files...here are the Redhead paint schemes....


sm RedheadDrake with BEHR PAINTS.JPG

...and Mrs. Redhead...

sm Redhead Hen with BEHR PAINTS.JPG

All the best,

SJS
 
Thanks Steve, I’ll save those instead of constantly opening your website😂. Still need to get the hen paint, totally forgot when I went for the other stuff. Also shoulda got a quart of fedora. Didn’t realize I was painting the whole bird with it then doing details. The sample lasted 8.25 birds. I do really like how dark the hen BB look. In the winter when the leaves are down I can see straight across the river to Canada. Raft of birds within 100 yards of shore (shore being about 100 yards from house) you definitely see lots of white. Anything past that, it’s black rafts. Think more hens is almost a good thing.

Grabbed a sleeper mold from a buddy, tried one last night , baking the mold in the grill and warming foam in water but either the foam isn’t warm enough or my math was off. I’m gonna wait till later in the week to make more supposed to poke into upper 70’s.

Thanks again Steve for all the knowledge and simplified how tos!

Tony
 
Jason and Steve. I think the restle coating will happen. These will be on mainlines and we typically leave decoys on the lines and pile them in the bow of the boat. Steve, do you think that the epoxy is that much better than TB3? Significant increase in price btwn the two.
-Tony
For what it’s worth, I’ve tried using Titebond III and walnut shells. About half the decoys experienced significant flaking and failure of proper adhesion as shown in this photo (I removed loose material just with my fingers). Undoubtedly a prep issue. It also adds more weight than I thought it would. From now on I’m burlapping with only as much mastic as necessary and sealing with three coats of spar varnish. It creates a hard shell and adhesion won’t be a problem.
 

Attachments

  • image.jpg
    image.jpg
    717.7 KB · Views: 14
For what its worth, we use rustoleum paint for flocking... it also makes a nice adhesion for walnut shells if thats what you have to have on your decoys. I did it with some snow geese last year, to see if it was a texture I liked vs flocking, and they still are holding up great. I dont like the rough nature, and think ill honestly just paint the flat white rustoleum right to the foam when it comes time to really start cranking out snow goose decoys for a full body spread. Snow geese might be the only decoy I wont flock. Everything else is going to be fully flocked.
 
Well here they are finally done painting everything. Life is busy , seasons been open a week and a half and besides one raining morning trying to get birds feet down for my son , I haven’t been out. Did a five day grouse and salmon trip in the far western upper peninsula, that was a blast, but then suckers are hard to hit! Well they’re all bagged on long lines except for 2 blue bills.

Thanks to Steve for having such a wonderful website with very good instructions on painting. These are gunners, so not a ton of detail, but I have a feeling birds will get fooled this season!

Tony
 

Attachments

  • IMG_3077.jpeg
    IMG_3077.jpeg
    601.1 KB · Views: 30
  • IMG_3076.jpeg
    IMG_3076.jpeg
    785.9 KB · Views: 30
  • IMG_3075.jpeg
    IMG_3075.jpeg
    807 KB · Views: 30
Rod, I honestly haven’t pulled them out of the truck yet. Ended up going back to work, working till 6 am ( work for the utility company) then came home, drove son to school and napped. Definitely checking to see today. We hunt big water and it could be a bunch of trouble fixing flipped birds the whole time.

-Tony
If not weighted install a keel from composite deck board scraps.
 
Well here they are finally done painting everything. Life is busy , seasons been open a week and a half and besides one raining morning trying to get birds feet down for my son , I haven’t been out. Did a five day grouse and salmon trip in the far western upper peninsula, that was a blast, but then suckers are hard to hit! Well they’re all bagged on long lines except for 2 blue bills.

Thanks to Steve for having such a wonderful website with very good instructions on painting. These are gunners, so not a ton of detail, but I have a feeling birds will get fooled this season!

Tony
What pound foam did you use? I just picked up I think is the same sleeper mold as your canvasback.
 
Well here they are finally done painting everything. Life is busy , seasons been open a week and a half and besides one raining morning trying to get birds feet down for my son , I haven’t been out. Did a five day grouse and salmon trip in the far western upper peninsula, that was a blast, but then suckers are hard to hit! Well they’re all bagged on long lines except for 2 blue bills.

Thanks to Steve for having such a wonderful website with very good instructions on painting. These are gunners, so not a ton of detail, but I have a feeling birds will get fooled this season!

Tony
That’s a great looking rig.
 
What pound foam did you use? I just picked up I think is the same sleeper mold as your canvasback.
The sleepers I used 4lb. Then restle coated them. It’s the burpy frog/fowl weather mold. Borrowed it from a friend who made his from 3lb and he hasn’t had issues and the stay on lines in bow of boat all season
 
The sleepers I used 4lb. Then restle coated them. It’s the burpy frog/fowl weather mold. Borrowed it from a friend who made his from 3lb and he hasn’t had issues and the stay on lines in bow of boat all season
Ok it’s the same mold. Do remember what was the amout of ounces of part A part B you used.
 
Ok it’s the same mold. Do remember what was the amout of ounces of part A part B you used.
So i filled the mold with water and measured. It was like 70 ounces. Depending on expansion rate if what you use divide by that. I bought foam from fiberglass supply on amazon but used expansion rates of is composites foam. I waxed the mold a few times and brushed on pva release.

If you have one that doesn’t fill all the way, just mix a little foam and pour it on the spot and throw it back in the mold.

I also saved all the over fill and such and stuffed it in the mold as I went along and then would cut down the amount of foam in the mix (by estimate).

Tony
Thank you
 
Thank you
No problem. Also I would try to sand out any roughness in the mold. Then wax etc. I found if one was sorta sticking(usually around the head). I could slide thin plastic like thin as business card around the edges and usually get it to pop from the tail, prying btwn two pieces of the plastic with a 1” wood chisel so you don’t gouge the mold and did minimal damage to foam. If you’re restle coating you’ll never see the dent.

Tony
This will be the 1st time doing this. Those sleepers look great. What kind of keel did you use? And is it weighted?
 
I dont want to intrude on this conversation, so take everything i say with a small grain of salt. I started casting foam decoys with old decoy unlimited molds. Have a bunch collecting dust as I have moved on to other ways of doing things. I found a release agent that is paintable and does not require sanding to take paint. Not sure how PVA is but you just spray the mold every 3 casts with this stuff (like spraying a pan with pam before cooking) and the foam pulls right out from the mold. If memory serves me correct though, it doesnt like titebond3 so this wouldnt work for you guys who like to restle coat. I am a painter and flocker of decoys, so I go a much different route. If you were to restle coat with rustoleum, instead of titebond, I think it would work just fine. Yes we have played with this and it does work, but im not sure it comes out as smooth as the titebond and I dont like how rough the decoy feels. I personally, never liked a restle coat decoy, but lots do and dont think for a second its wrong, just my personal preferance is all. I cannot remember off the top of my head what the release agent is I have now, and I can certainly update the thread when I get home. The absolute best stuff was Cammie 980 for a release agent in these types of molds but its been discontinued unfortunately. I went through MANY different release agents and landed on one that is very very close to the way Cammie 980 worked for me.

Also, for a keel, there are ideas. I think I have a fowl weather mold and, correct me if im wrong, but doesnt their molds have a built in keel that gets cast in with foam? Like a bulge on the bottom half of the mold? If not, I have tricks for this as well that can serve as a removable keel and currently what i do with my current decoys. But if there is a bulge built into the mold, I get composite square railing from Menards, cut down to size to fit in the bulge, and then cast foam around it. Adds that weight towards the bottom of the decoy and allowed for self righting. Menards sells them on the cheap too. Here is a link to the composite stuff I use on my decoys. Its really gone up in price. I remember when I first started buying it, these rods were like $2/rod.

 
Back
Top