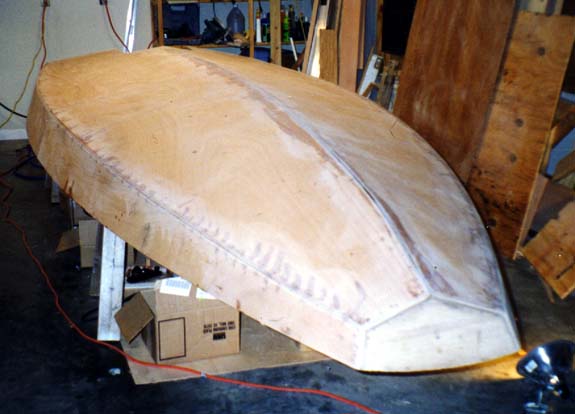
With all the joints filleted it was time to flip the boat over and work on the hull. Flipping the boat over was a three man job. The cradle was put aside for the time being while the boat rested upside down on two saw horses.
The first task was to remove the wire stitches. Even though the wires were encapsulated in epoxy removing them wasn't difficult. Essentially all that was required to remove them was heat and leverage. The first step was to untwist the wires. Next, using a small propane torch the ends of the wires were heated until they were glowing red hot. The heat is conducted along the wire into the area sealed in epoxy and brings the epoxy to its melting point. When this occurs the wire may be pulled out with pliers. The melted epoxy actually serves as a lubricant easing the removal. A block of wood is useful for leverage and to protect the plywood from getting marred. Occasionally a wire end would break while pulling on it. When this happened I would apply more heat and pull on the remaining wire end. After about three hours every single wire was extracted.
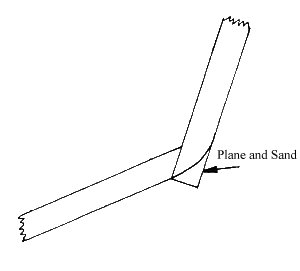
With the stitches removed it was time for final preparations before fiberglass sheathing the hull. Using a block plane the side pieces were planed at the chine. Wire holes and the joint down the keel were filled with epoxy which was allowed to cure. All edges were then radiused. Fiberglass loses its strength when it makes an abrupt change in direction. Corners should always be rounded to maintain strength. The chines were hand sanded to round-off the edges. The keel was sanded similarly. Edges formed by the transom and the motor well were rounded-off first with a router using a 3/8" radius roundover bit with a bearing guide, and then finished by hand with sandpaper.


Sheathing the hull with fiberglass cloth turned out to be one of the easiest steps in the whole boat building process. The entire hull was glassed in less than four hours, from start to finish.
With all the corners radiused the next step was to prepare the cloth. I used 50" wide 6 ounce fiberglass cloth. This was the recommended width and weight. Other options could be used if hunting circumstances warrant it (e.g. thick ice, rocks). The first step was to pre-cut the needed sections of cloth. There were a total of eight pieces needed. These include:

The cut pieces were set aside for the moment. Using the Makita sander I lightly went over the entire hull with 80 grit paper. Next I mixed up a batch of epoxy and painted all the joints. This served two purposes. First it allows the exposed end-grain to soak up a little extra epoxy to seal it off. Second, the epoxy helps hold the cloth in place initially as you place it over the hull allowing you to spread out wrinkles or gathers.
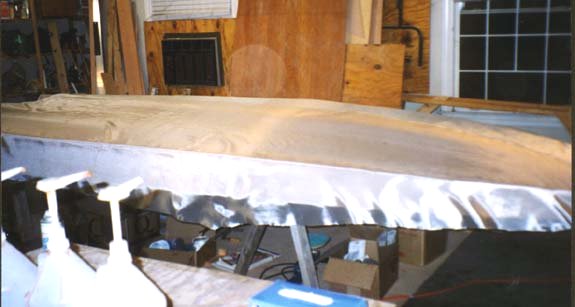
Next the Port bottom and side cloth piece was placed into position and smoothed out. At this point having an assistant is a huge help. I gave my father-in-law a crash course in mixing epoxy. He mixed up batch after batch while I worked it in the cloth. Epoxy mixing for this step is a little different than during the filleting process. Larger batches are mixed and used quickly. It is preferable to use mostly fast cure hardener because there is very little heat build-up once the epoxy is spread over the hull. Thermal build-up does not occur so if slow cure hardener is used you could be in for a long wait for the epoxy to harden. I worked with 15 ounce batches that were four ounces fast cure, one ounce slow cure, and of course, ten ounces resin.
Starting at the highest point in the middle I poured pure epoxy onto the cloth. With an auto body squeegee the epoxy was spread down and away. I used a figure eight motion with the squeegee to spread and move the epoxy over dry cloth. I worked my way from the middle of the boat towards the stern and the bow. This allowed the cloth a place to stretch and work out wrinkles. With the squeegee I applied enough pressure to squeeze out excess epoxy. Too much epoxy can cause the cloth to float up off the wood which greatly increases the chance for delaminating. The cloth appears clear, yet dull, and the weave is visible when it is wet out properly. The sides of the boat were wet out by pouring epoxy close to the chine and then working the epoxy over the chine and down the sides with the squeegee. The same procedure was repeated with Starboard bottom and side piece.
The remaining pieces were placed into position. Because they are nearly vertical it was not possible to pour epoxy on them without spilling. Instead a chip brush and foam roller was used to spread the epoxy. The squeegee was used to remove excess epoxy. Because they were cut oversized the edges of these pieces overlapped with the bottom and side pieces. Perfectly straight edges of the overlaps was not an issue since I would be applying several more layers of epoxy and taping all the seams, thus covering the overlaps.

After the epoxy had cured for several hours I used a utility knife to cut the overhanging cloth. It is amazing how easy epoxy saturated cloth is to cut if you catch it at the right time. If you try and cut it too early you risk peeling it off the wood. If you wait too late it is tough to cut with a knife and will have to be sanded. A dirty and time consuming process. When you time it just right it takes no more than ten minutes to trim away all the excess.
The epoxy was given a day to cure. The next step was to fiberglass tape all the joints and re-coat the entire hull with epoxy. Using the Makita sander/polisher I lightly sanded the entire hull. All corners and edges were sanded by hand to avoid cutting through the cloth with the sander/polisher. I then pre-cut fiberglass tape for the chines, keel, bow bulkhead, transom, longitudinals, and motor bracket. Two layers of tape were used on the transom and motor well components. With epoxy and a chip brush the fiberglass tape was wet into place. Another layer of epoxy was then rolled onto the entire hull with a foam roller.
After another day of curing the hull was lightly sanded again. The protruding tape edges were feathered by moving the sander/polisher across the tape edges from the low side to the high side with minimal pressure. All corners and edges were hand sanded to prevent cutting through the tape. A final coat of epoxy was applied to the hull. After a day of curing the hull was lightly sanded again, as before.
Final inspection of the hull was very pleasing -- no lumps, bumps, or seams. My first attempt at fiberglass sheathing was a huge success. At the outset of the project I thought the sheathing might be one of the hardest steps. It turned out to be one of the easiest. I was now ready to install the keelsons.
The first task was to remove the wire stitches. Even though the wires were encapsulated in epoxy removing them wasn't difficult. Essentially all that was required to remove them was heat and leverage. The first step was to untwist the wires. Next, using a small propane torch the ends of the wires were heated until they were glowing red hot. The heat is conducted along the wire into the area sealed in epoxy and brings the epoxy to its melting point. When this occurs the wire may be pulled out with pliers. The melted epoxy actually serves as a lubricant easing the removal. A block of wood is useful for leverage and to protect the plywood from getting marred. Occasionally a wire end would break while pulling on it. When this happened I would apply more heat and pull on the remaining wire end. After about three hours every single wire was extracted.
With the stitches removed it was time for final preparations before fiberglass sheathing the hull. Using a block plane the side pieces were planed at the chine. Wire holes and the joint down the keel were filled with epoxy which was allowed to cure. All edges were then radiused. Fiberglass loses its strength when it makes an abrupt change in direction. Corners should always be rounded to maintain strength. The chines were hand sanded to round-off the edges. The keel was sanded similarly. Edges formed by the transom and the motor well were rounded-off first with a router using a 3/8" radius roundover bit with a bearing guide, and then finished by hand with sandpaper.
Sheathing the hull with fiberglass cloth turned out to be one of the easiest steps in the whole boat building process. The entire hull was glassed in less than four hours, from start to finish.
With all the corners radiused the next step was to prepare the cloth. I used 50" wide 6 ounce fiberglass cloth. This was the recommended width and weight. Other options could be used if hunting circumstances warrant it (e.g. thick ice, rocks). The first step was to pre-cut the needed sections of cloth. There were a total of eight pieces needed. These include:
- Port bottom and side of the hull
- Starboard bottom and side of the hull
- Port transom
- Starboard transom
- Port motor well longitudinal
- Starboard motor well longitudinal
- Motor bracket doubler
- Bow bulkhead
The cut pieces were set aside for the moment. Using the Makita sander I lightly went over the entire hull with 80 grit paper. Next I mixed up a batch of epoxy and painted all the joints. This served two purposes. First it allows the exposed end-grain to soak up a little extra epoxy to seal it off. Second, the epoxy helps hold the cloth in place initially as you place it over the hull allowing you to spread out wrinkles or gathers.
Next the Port bottom and side cloth piece was placed into position and smoothed out. At this point having an assistant is a huge help. I gave my father-in-law a crash course in mixing epoxy. He mixed up batch after batch while I worked it in the cloth. Epoxy mixing for this step is a little different than during the filleting process. Larger batches are mixed and used quickly. It is preferable to use mostly fast cure hardener because there is very little heat build-up once the epoxy is spread over the hull. Thermal build-up does not occur so if slow cure hardener is used you could be in for a long wait for the epoxy to harden. I worked with 15 ounce batches that were four ounces fast cure, one ounce slow cure, and of course, ten ounces resin.
Starting at the highest point in the middle I poured pure epoxy onto the cloth. With an auto body squeegee the epoxy was spread down and away. I used a figure eight motion with the squeegee to spread and move the epoxy over dry cloth. I worked my way from the middle of the boat towards the stern and the bow. This allowed the cloth a place to stretch and work out wrinkles. With the squeegee I applied enough pressure to squeeze out excess epoxy. Too much epoxy can cause the cloth to float up off the wood which greatly increases the chance for delaminating. The cloth appears clear, yet dull, and the weave is visible when it is wet out properly. The sides of the boat were wet out by pouring epoxy close to the chine and then working the epoxy over the chine and down the sides with the squeegee. The same procedure was repeated with Starboard bottom and side piece.
The remaining pieces were placed into position. Because they are nearly vertical it was not possible to pour epoxy on them without spilling. Instead a chip brush and foam roller was used to spread the epoxy. The squeegee was used to remove excess epoxy. Because they were cut oversized the edges of these pieces overlapped with the bottom and side pieces. Perfectly straight edges of the overlaps was not an issue since I would be applying several more layers of epoxy and taping all the seams, thus covering the overlaps.
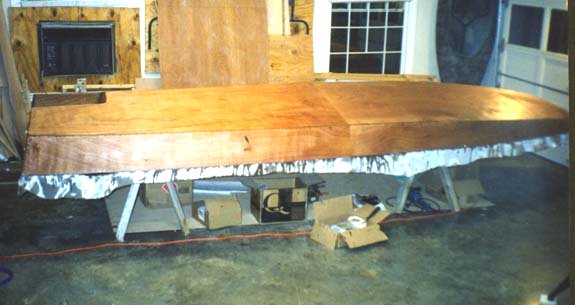
After the epoxy had cured for several hours I used a utility knife to cut the overhanging cloth. It is amazing how easy epoxy saturated cloth is to cut if you catch it at the right time. If you try and cut it too early you risk peeling it off the wood. If you wait too late it is tough to cut with a knife and will have to be sanded. A dirty and time consuming process. When you time it just right it takes no more than ten minutes to trim away all the excess.
The epoxy was given a day to cure. The next step was to fiberglass tape all the joints and re-coat the entire hull with epoxy. Using the Makita sander/polisher I lightly sanded the entire hull. All corners and edges were sanded by hand to avoid cutting through the cloth with the sander/polisher. I then pre-cut fiberglass tape for the chines, keel, bow bulkhead, transom, longitudinals, and motor bracket. Two layers of tape were used on the transom and motor well components. With epoxy and a chip brush the fiberglass tape was wet into place. Another layer of epoxy was then rolled onto the entire hull with a foam roller.
After another day of curing the hull was lightly sanded again. The protruding tape edges were feathered by moving the sander/polisher across the tape edges from the low side to the high side with minimal pressure. All corners and edges were hand sanded to prevent cutting through the tape. A final coat of epoxy was applied to the hull. After a day of curing the hull was lightly sanded again, as before.
Final inspection of the hull was very pleasing -- no lumps, bumps, or seams. My first attempt at fiberglass sheathing was a huge success. At the outset of the project I thought the sheathing might be one of the hardest steps. It turned out to be one of the easiest. I was now ready to install the keelsons.