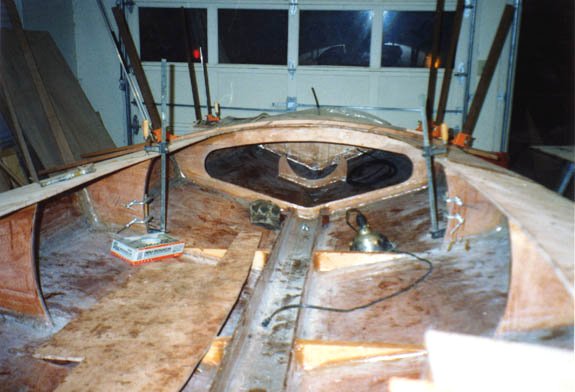
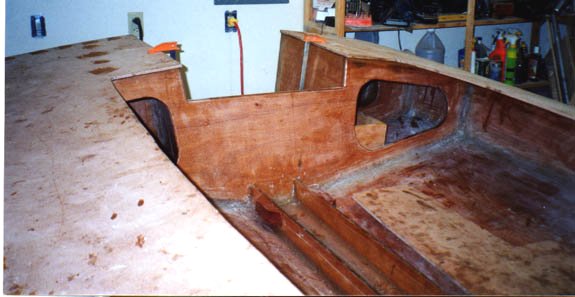
With the strongbacks and clamp installed, a light sanding of the epoxy coated interior, and planing the sheer clamps level with the plywood sides using a hand planer it was almost time to begin decking. The last thing to do before attaching decking was to pour the flotation foam. Using two-part polyurethane foam I mixed and poured it into the front flotation compartment. Marine grade electrical wire for the bow light was run into this compartment and the bow eye was installed prior to pouring the foam. The plans call for foam flotation on each side of motor well in the very rear of the boat. The compartments to the side of the motor well are divided into two parts. The rearmost is flotation and the forward area is storage. Not wanting to lose storage area I elected to use the flotation compartments for dry storage. Not wanting to lose flotation I installed water tight deck hatches. I used circular, water-tight hatches that have a six inch diameter opening. The lids to the hatches screw in. I never leave the hatches open. They are closed immediately after storing or retrieving any item. These sealed air flotation compartments passed the inspection required to register the boat. In the future I may add flotation under the floorboard for an extra margin of safety.
The blueprints do not contain lofting points for the decking, rather the hull of the boat serves as a template. The first step was to determine how the decking would be cut from two sheets of plywood plus a little scrap. After taking some measurements it was determined that the decking would consist of five pieces: two rear pieces that covered the sides of the motor well forward to the first set of knees(closest to the front of the cockpit), two center pieces that covered from the first set of knees to the floatation compartment, and a single piece that covered the flotation compartment.
Before I cut into my remaining expensive marine ply I used 1/8" Luan to rough out decking templates. Using the boat as a template I traced one of the rear decking pieces onto the Luan. I allowed excess of an inch or more when I traced it. I measured the shape and determined I could get two rear deck pieces from one piece of plywood. I then cut out the template and laid it on the Okoume and verified that both pieces could be obtained from one sheet. The process was repeated for the center deck pieces. Let me emphasize here that there is no need to worry about exact cuts at this point. All that is being done is roughing out the pieces. The boat will eventually be a guide for making finishing cuts.

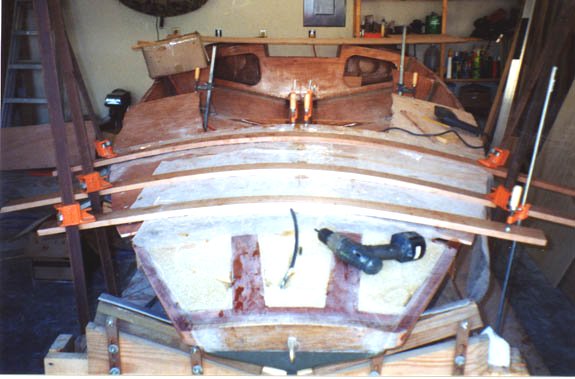
The next step was to bend the decking pieces into place, countersink all screw holes, mark and make the necessary cuts so that all decking pieces fit together. Pre-drilling, testing, and finalizing the fit is strongly recommended before you try and epoxy everything into place. Bending the plywood to the curvature of the boat in the storage/flotation area proved to be tricky. My first attempt failed and it took Jeff Smith's woodworking knowledge to bail me out in the following manner. The two center decking pieces were temporarily butt joined with a 6" wide 3/8" piece of scrap Okoume plywood. The butt joint was formed by screwing the 6" piece onto the backside of the center decking pieces. This created 3" of overlap on each deck piece that was later permanently epoxied into place. With the two center decking pieces joined they were bent into place. Bending was accomplished with the use of large clamps and Mahogany boards that served as straps. The boat was moved back on the cradle so that the clamps could hook on to it.

With the center decking pieces clamped into place I drilled the counter-sink holes in the decking and clamps/strongbacks. Drilling the holes in the clamps took some care. If a hole was drilled too close to the outside of the clamp the screw would be visible in the clamp's groove. If a hole was drilled too close to the inside I risked sinking the screw in the plywood instead of the strong Mahogany. Jeff showed me a slick way of drilling the holes consistently in the right place. With a piece of scrap 3/8" plywood he cut what resembled a tuning fork. One of the legs of the "tuning fork" was longer by the distance from the outside edge of the clamp to where the hole needed to be drilled. The distance between the legs of the tuning fork was 1/2", just large enough to fit over the protruding plywood decking. Using the tuning fork I simply put the shorter leg against the clamp and marked with a pencil the end of the longer leg on the decking. Marks were made every 6". After every couple of marks I would drill the counter-sink holes and screw in a temporary fastener (sheet rock screw). By fastening a little bit at a time I was "spreading out" the decking.

After the center decking pieces were temporarily fastened I climbed in the boat and marked the bottom of the decking along the flotation bulkhead, the storage bulkhead (cockpit side), and the knees (forward side). The objective of marking the decking was to ensure that all the decking pieces would fit together and that all decking joints would be centered over a bulkhead or knee, thereby creating a strong butt-joint. I then removed the screws and unclamped the center decking pieces. The lines just made were to serve as cutting guides so that all the decking pieces would fit together. With the flotation bulkhead line I measured 3/8" (half the thickness of the 3/4" bulkheads) forward and drew a parallel line. In all honesty that is what I meant to do. In actuality I made a mistake and marked behind the original line. This made the center decking piece 3/4" too short and I wound up having to install blocks on the flotation bulkhead in the storage area to support the decking. Oops. Next, I measured 3/8" back from my line drawn on the forward side of the knee and drew a parallel line. I scratched out the original lines to make certain I cut the correct ones. Using my jigsaw I cut along the lines.
This entire process of bending the decking into place, drilling, screwing in temporary fasteners, marking joint lines, removing the temporary fasteners, moving the joint lines, and cutting was repeated for the rear deck pieces, and the front deck piece. Upon completion it was time to epoxy and fasten the decking.
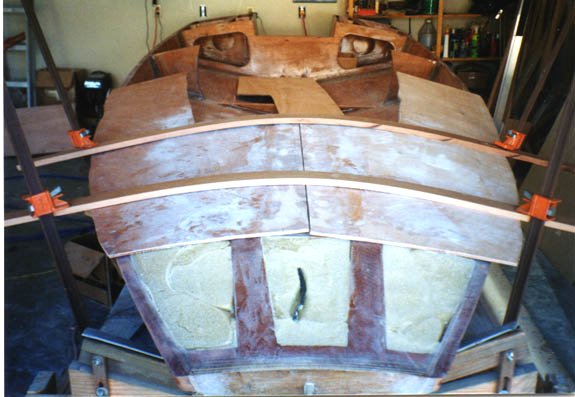
The first decking piece installed was the center piece. The two center pieces were butt-joined with the 6" piece of 3/8" just prior to installing. Epoxy mixed to the consistency of ketchup was used to bond the three pieces together. Screws were used to temporarily hold everything together. The clamp and bulkhead tops received a coat of pure epoxy and then a coat thickened to the consistency of ketchup as did the decking. The center piece was then clamped into place and #8 1 1/4" silicon bronze Frearson head screws were installed in each of the pre-drilled holes. Plastic sheeting was used under the Mahogany straps to keep excess epoxy from laminating them to the deck accidentally.

The same process was repeated for the rear decking pieces and the front deck piece.


The next step was quite possibly, no make that definitely, the worst step in the entire boat building process. In fact it was the only step I did not enjoy. I am referring to filleting the underside of the deck. The deck fillet joints are much smaller than the hull joints but were ten times more difficult. The reason being that you are applying epoxy upside down. Instead of gravity working the epoxy into the joint the epoxy wants to fall away from the joint and into your face, hair, etc.. The absolutely worst deck joints are those in the storage area. Imagine filleting joints upside down on your head in a suitcase!!
As with the hull joints the deck joints were painted with pure epoxy and then peanut butter was filleted with an autobody squeegee. The amount of epoxy used is much less. The idea here is to create a small radius with the epoxy to relieve stresses. The only deck joints that I taped were the knees. This was done because a Black Brant owner told me that after eight years of usage one of those joints delaminated. He also said repairing that joint was the only maintenance he ever had to perform. If I ever build another I will flip to boat upside down before I fillet the deck joints.
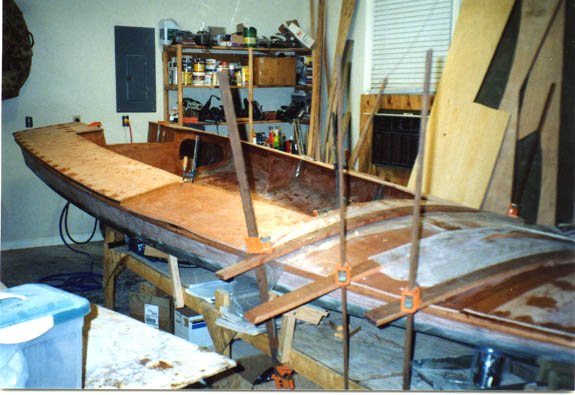
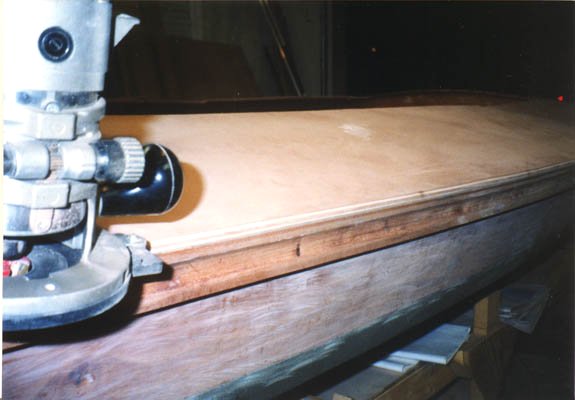
After the epoxy cured the clamps were removed. A small batch of peanut butter was made and the screw holes were filled. After curing they were sanded flush. The next step was to make the final decking cuts and route the edges. Using a jigsaw I cut the excess decking around the perimeter of the boat to within 1/4" of the bow/clamp/transom/longitudinals. Using my router and a 3/8" radius round-over bit with a bearing guide I went around the entire perimeter of the boat.

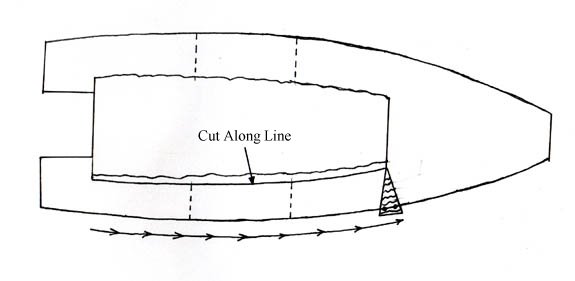
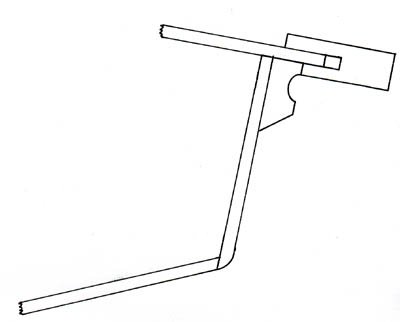
The last step in the decking installation process was to cut the interior edge of the cockpit decking, nice and curved. To do this I made a guide out of scrap plywood. The guide was shaped like an isosceles triangle and had two bolts at the bottom apexes to act as guides when sliding along the sheer clamp. The distance from the tip to a line drawn between the two bolts was 15 1/2", the width of the knees plus one inch to account for the clamp. In hindsight I wish I had made my decking a couple inches wider. Using the guide I slid it along the sheer clamp and marked the cockpit decking with a pencil. This created a curve parallel to the side of the boat. I then used my jigsaw and cut along the line. The decking was now ready for installation of cockpit coaming.

The blueprints do not contain lofting points for the decking, rather the hull of the boat serves as a template. The first step was to determine how the decking would be cut from two sheets of plywood plus a little scrap. After taking some measurements it was determined that the decking would consist of five pieces: two rear pieces that covered the sides of the motor well forward to the first set of knees(closest to the front of the cockpit), two center pieces that covered from the first set of knees to the floatation compartment, and a single piece that covered the flotation compartment.
Before I cut into my remaining expensive marine ply I used 1/8" Luan to rough out decking templates. Using the boat as a template I traced one of the rear decking pieces onto the Luan. I allowed excess of an inch or more when I traced it. I measured the shape and determined I could get two rear deck pieces from one piece of plywood. I then cut out the template and laid it on the Okoume and verified that both pieces could be obtained from one sheet. The process was repeated for the center deck pieces. Let me emphasize here that there is no need to worry about exact cuts at this point. All that is being done is roughing out the pieces. The boat will eventually be a guide for making finishing cuts.
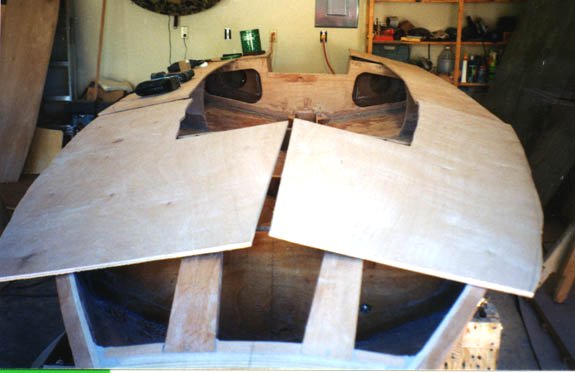
The next step was to bend the decking pieces into place, countersink all screw holes, mark and make the necessary cuts so that all decking pieces fit together. Pre-drilling, testing, and finalizing the fit is strongly recommended before you try and epoxy everything into place. Bending the plywood to the curvature of the boat in the storage/flotation area proved to be tricky. My first attempt failed and it took Jeff Smith's woodworking knowledge to bail me out in the following manner. The two center decking pieces were temporarily butt joined with a 6" wide 3/8" piece of scrap Okoume plywood. The butt joint was formed by screwing the 6" piece onto the backside of the center decking pieces. This created 3" of overlap on each deck piece that was later permanently epoxied into place. With the two center decking pieces joined they were bent into place. Bending was accomplished with the use of large clamps and Mahogany boards that served as straps. The boat was moved back on the cradle so that the clamps could hook on to it.
With the center decking pieces clamped into place I drilled the counter-sink holes in the decking and clamps/strongbacks. Drilling the holes in the clamps took some care. If a hole was drilled too close to the outside of the clamp the screw would be visible in the clamp's groove. If a hole was drilled too close to the inside I risked sinking the screw in the plywood instead of the strong Mahogany. Jeff showed me a slick way of drilling the holes consistently in the right place. With a piece of scrap 3/8" plywood he cut what resembled a tuning fork. One of the legs of the "tuning fork" was longer by the distance from the outside edge of the clamp to where the hole needed to be drilled. The distance between the legs of the tuning fork was 1/2", just large enough to fit over the protruding plywood decking. Using the tuning fork I simply put the shorter leg against the clamp and marked with a pencil the end of the longer leg on the decking. Marks were made every 6". After every couple of marks I would drill the counter-sink holes and screw in a temporary fastener (sheet rock screw). By fastening a little bit at a time I was "spreading out" the decking.
After the center decking pieces were temporarily fastened I climbed in the boat and marked the bottom of the decking along the flotation bulkhead, the storage bulkhead (cockpit side), and the knees (forward side). The objective of marking the decking was to ensure that all the decking pieces would fit together and that all decking joints would be centered over a bulkhead or knee, thereby creating a strong butt-joint. I then removed the screws and unclamped the center decking pieces. The lines just made were to serve as cutting guides so that all the decking pieces would fit together. With the flotation bulkhead line I measured 3/8" (half the thickness of the 3/4" bulkheads) forward and drew a parallel line. In all honesty that is what I meant to do. In actuality I made a mistake and marked behind the original line. This made the center decking piece 3/4" too short and I wound up having to install blocks on the flotation bulkhead in the storage area to support the decking. Oops. Next, I measured 3/8" back from my line drawn on the forward side of the knee and drew a parallel line. I scratched out the original lines to make certain I cut the correct ones. Using my jigsaw I cut along the lines.
This entire process of bending the decking into place, drilling, screwing in temporary fasteners, marking joint lines, removing the temporary fasteners, moving the joint lines, and cutting was repeated for the rear deck pieces, and the front deck piece. Upon completion it was time to epoxy and fasten the decking.
The first decking piece installed was the center piece. The two center pieces were butt-joined with the 6" piece of 3/8" just prior to installing. Epoxy mixed to the consistency of ketchup was used to bond the three pieces together. Screws were used to temporarily hold everything together. The clamp and bulkhead tops received a coat of pure epoxy and then a coat thickened to the consistency of ketchup as did the decking. The center piece was then clamped into place and #8 1 1/4" silicon bronze Frearson head screws were installed in each of the pre-drilled holes. Plastic sheeting was used under the Mahogany straps to keep excess epoxy from laminating them to the deck accidentally.
The same process was repeated for the rear decking pieces and the front deck piece.
The next step was quite possibly, no make that definitely, the worst step in the entire boat building process. In fact it was the only step I did not enjoy. I am referring to filleting the underside of the deck. The deck fillet joints are much smaller than the hull joints but were ten times more difficult. The reason being that you are applying epoxy upside down. Instead of gravity working the epoxy into the joint the epoxy wants to fall away from the joint and into your face, hair, etc.. The absolutely worst deck joints are those in the storage area. Imagine filleting joints upside down on your head in a suitcase!!
As with the hull joints the deck joints were painted with pure epoxy and then peanut butter was filleted with an autobody squeegee. The amount of epoxy used is much less. The idea here is to create a small radius with the epoxy to relieve stresses. The only deck joints that I taped were the knees. This was done because a Black Brant owner told me that after eight years of usage one of those joints delaminated. He also said repairing that joint was the only maintenance he ever had to perform. If I ever build another I will flip to boat upside down before I fillet the deck joints.
After the epoxy cured the clamps were removed. A small batch of peanut butter was made and the screw holes were filled. After curing they were sanded flush. The next step was to make the final decking cuts and route the edges. Using a jigsaw I cut the excess decking around the perimeter of the boat to within 1/4" of the bow/clamp/transom/longitudinals. Using my router and a 3/8" radius round-over bit with a bearing guide I went around the entire perimeter of the boat.
The last step in the decking installation process was to cut the interior edge of the cockpit decking, nice and curved. To do this I made a guide out of scrap plywood. The guide was shaped like an isosceles triangle and had two bolts at the bottom apexes to act as guides when sliding along the sheer clamp. The distance from the tip to a line drawn between the two bolts was 15 1/2", the width of the knees plus one inch to account for the clamp. In hindsight I wish I had made my decking a couple inches wider. Using the guide I slid it along the sheer clamp and marked the cockpit decking with a pencil. This created a curve parallel to the side of the boat. I then used my jigsaw and cut along the line. The decking was now ready for installation of cockpit coaming.