Rail Skiff Build

My buddy Dave, custodian and restorer of the LaPlace boat, gave me a hand last night. Sides are now epoxied and screwed in place. One downside to using this particular Western Red Cedar is that 1-1/4" #8 wood screws strip easily. A number of screws had to be removed, the holes plugged, and reset. Yes, the screws are being set with battery powered drills, but we're quite gentle. We give it just enough ooomph to pull the wood tight, kind of disappointed in this batch of WRC.
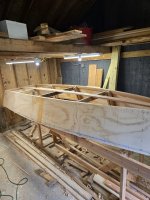
20250711_082620.jpg


That's going to be one pointy bow! It looks like it'll cut grass or anything else in it's way.
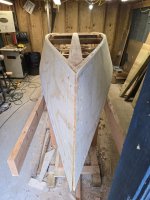
20250711_082644.jpg

I'm proud of my efforts to remind myself which way is up, and port/starboard. I'll leave why to your imagination. The sheer and chines need cleaning up, the hand plane will get some action later today. The 1/2" plywood bottom scarf was glued last evening, it goes on tonight. I want to get the boat out of the shed tomorrow. It may need to return for glassing, but I want to remove the molds from the strongback so you can move about the shed.
 
Last edited:
You going to keep this down south, or bring it to Maine? It's a few years since I poked around Merrymeeting Bay on striper fishing/duck scouting/rail hunts, but September is a good time for all three, and this post has me looking at the tide chart in September. September 8-11 and 19-20 look best, depending on river flows and storm tides. Anything over 5.5' at Richmond pushes the soras high enough to make for good hunting. I'm told some of the salt marshes have good sora hunting, too, but have never gone looking.
 
You going to keep this down south, or bring it to Maine? It's a few years since I poked around Merrymeeting Bay on striper fishing/duck scouting/rail hunts, but September is a good time for all three, and this post has me looking at the tide chart in September. September 8-11 and 19-20 look best, depending on river flows and storm tides. Anything over 5.5' at Richmond pushes the soras high enough to make for good hunting. I'm told some of the salt marshes have good sora hunting, too, but have never gone looking.
I hadn't thought about it yet, but that's an idea regarding MB. I'm hoping I can get the boat in the back of the F-250, that would make it pretty easy to cruise on down from Greenville to the coast. Wonder where an 18' pole can go for the ride? :oops:
 
I hadn't thought about it yet, but that's an idea regarding MB. I'm hoping I can get the boat in the back of the F-250, that would make it pretty easy to cruise on down from Greenville to the coast. Wonder where an 18' pole can go for the ride? :oops:
Have you got an 18' pole? I pole my MMB sculler with a canoe pole that is maybe 13'. Couldn't find a longer one. It's also shod with an iron shoe, which less than ideal on softer bottoms. Great in the canoe on fast rivers; OK on the sand flats chasing stripers, but I need something else for the MMB mud. If your truck has a canoe rack, you could probably tie or strap it on. How are you going to carry it in the boat when not poling? Maybe a pair of chocks? Won't help in back of the truck, but would work on a small trailer.
 
My buddy Dave, custodian and restorer of the LaPlace boat, gave me a hand last night. Sides are now epoxied and screwed in place. One downside to using this particular Western Red Cedar is that 1-1/4" #8 wood screws strip easily. A number of screws had to be removed, the holes plugged, and reset. Yes, the screws are being set with battery powered drills, but we're quite gentle. We give it just enough ooomph to pull the wood tight, kind of disappointed in this batch of WRC.

View attachment 66968


That's going to be one pointy bow! It looks like it'll cut grass or anything else in it's way.

View attachment 66969

I'm proud of my efforts to remind myself which way is up, and port/starboard. I'll leave why to your imagination. The sheer and chines need cleaning up, the hand plane will get some action later today. The 1/2" plywood bottom scarf was glued last evening, it goes on tonight. I want to get the boat out of the shed tomorrow. It may need to return for glassing, but I want to remove the molds from the strongback so you can move about the shed.
Really enjoyed what I’ve seen so far! I’ve been too preoccupied with my own bs and missed this thread.
 
And it finally looks like a boat. After I trim the plywood tomorrow, it will come off the molds. The bottom plywood scarf is not the best so some repair and/or reinforcement may be in order. I'll look it over when the epoxy cures. I'm sure it'll be ok, but it's aggravating. When it's my turn to be King, I will decree that all plywood be available in sheets of infinite length. :D

20250711_205408.jpg
 
Have you got an 18' pole? I pole my MMB sculler with a canoe pole that is maybe 13'. Couldn't find a longer one. It's also shod with an iron shoe, which less than ideal on softer bottoms. Great in the canoe on fast rivers; OK on the sand flats chasing stripers, but I need something else for the MMB mud. If your truck has a canoe rack, you could probably tie or strap it on. How are you going to carry it in the boat when not poling? Maybe a pair of chocks? Won't help in back of the truck, but would work on a small trailer.
I don't have an 18' now, my old pole is about 14'. It's at a friends house in another state, which is ok because it's too short as far as I'm concerned. I'm gonna pick up a 3-piece Stiffy with their standard foot. They're nice and light, but a little pricey. I haven't decided how to secure it, but the boat will almost always be poled. No outboard, and I don't even want to install oarlock holders if I can avoid it. My challenge will be fitting the boat in the truck, it's very close. I don't want to own another frigging trailer.
 
And it finally looks like a boat. After I trim the plywood tomorrow, it will come off the molds. The bottom plywood scarf is not the best so some repair and/or reinforcement may be in order. I'll look it over when the epoxy cures. I'm sure it'll be ok, but it's aggravating. When it's my turn to be King, I will decree that all plywood be available in sheets of infinite length. :D

View attachment 66992
Looks real good sir.

I have a set of plans for a "skiff" like that. Called the "croc" been on the back burner for a few years to build it.
 
Fell behind the schedule a little, as the boat is still in the shed. It is released from the molds, but glassing took longer that I anticipated. Full disclosure, my glassing skills are limited. The belt sander is my friend, after work today we'll work out the high spots and apply another coat (#3).

First photo, the bottom has been trimmed to meet the sides. There are many ways to do it, this time I used the power planer to rough it in, hand planed the fine points, sanded it, then relieved the edge with a router using a 1/2" roundover bit. The screw holes , the scarf seams, knots in the A/C plywood and various divots have been filled with thickened epoxy and everything sanded to make it fair. On this build I do not trust the scarf on the bottom. It didn't bond as well as the sides did, I think the plywood soaked up some resin even though it was saturated with thin, then peanut butter consistency thickened epoxy applied before clamping. A couple of layers of tape on the outside before the cloth will help, then we'll deal with the inside once it's flipped.

20250713_083921.jpg

All joints were taped with 4", the scarf and the bow got two layers. The material all came from US Composites, I've had good luck with them. On a recent order I screwed up selecting resin, they contacted me to inquire if I really wanted what the order indicated, which I did not. Good catch on their part. The resin is their thin 3/1 epoxy.

Here's what it looks like this morning. As I mentioned early in the thread, I'm on a tight timeline this summer, as I have other projects that must be finished by fall. Last Saturday I affixed the frame to the molds, and I worked on it evenings after work and on the weekend. This type of build is simple enough that a hull can be constructed in a short period of time. How long it takes to complete the interior is entirely up to the builder, it can be as easy or as painfully long and tedious as desired. So, here we are. Not a thing of beauty, but it's watertight and if you were a passenger on the Titanic you'd take a chance. :)

20250713_200608.jpg
 
Fell behind the schedule a little, as the boat is still in the shed. It is released from the molds, but glassing took longer that I anticipated. Full disclosure, my glassing skills are limited. The belt sander is my friend, after work today we'll work out the high spots and apply another coat (#3).

First photo, the bottom has been trimmed to meet the sides. There are many ways to do it, this time I used the power planer to rough it in, hand planed the fine points, sanded it, then relieved the edge with a router using a 1/2" roundover bit. The screw holes , the scarf seams, knots in the A/C plywood and various divots have been filled with thickened epoxy and everything sanded to make it fair. On this build I do not trust the scarf on the bottom. It didn't bond as well as the sides did, I think the plywood soaked up some resin even though it was saturated with thin, then peanut butter consistency thickened epoxy applied before clamping. A couple of layers of tape on the outside before the cloth will help, then we'll deal with the inside once it's flipped.

View attachment 67032

All joints were taped with 4", the scarf and the bow got two layers. The material all came from US Composites, I've had good luck with them. On a recent order I screwed up selecting resin, they contacted me to inquire if I really wanted what the order indicated, which I did not. Good catch on their part. The resin is their thin 3/1 epoxy.

Here's what it looks like this morning. As I mentioned early in the thread, I'm on a tight timeline this summer, as I have other projects that must be finished by fall. Last Saturday I affixed the frame to the molds, and I worked on it evenings after work and on the weekend. This type of build is simple enough that a hull can be constructed in a short period of time. How long it takes to complete the interior is entirely up to the builder, it can be as easy or as painfully long and tedious as desired. So, here we are. Not a thing of beauty, but it's watertight and if you were a passenger on the Titanic you'd take a chance. :)

View attachment 67033
Very nice. Exciting to be coming along this fast
 
In grays Sporting Journal , Fall 1980 issye there is a feature article on Oliver LaPlace

Bob

Thank you for the info. I've gotta go up in the attic today anyway and while there I'll hopefully find that issue among the many boxes of Gray's I've "collected" since issue #1. I very much enjoy rereading the old issues as they are a treasure trove of knowldege and exceptional writing. Each time that I go back and read a issue I recall what it was to be Young and deeply passionate about our lifestyle. Lots of very good memories...

Best regards
Vince
 
In grays Sporting Journal , Fall 1980 issye there is a feature article on Oliver LaPlace
Yes, thank you for looking it up. He was an interesting character, he did just about everything there was to do in the CT River. I'm not sure how true to his boat my craft will be, but if building it brings attention to his way of life and other old timers like him, it's good enough.
 
SJ~

To keep your pole secure but handy on the boat, you could fashion something like this - shown on a South Bay Duckboat for an 11-ffot pole. If you are right-handed, you will probably want it on the starboard gunwale.


sm Tolmie South Bay from sabove - showing webbing.JPG

The bail up forward is purposefully generous in size - so you can poke the top end of the pole through it even whilst standing aft. I make in from heavy galvanized wire wrapped with fuel hose.

sm Balabus - Pushpole Bail.jpg

The chock near the stern is open topped - so you can bend gracefully at the knee - to drop the bottom end of the pole in - or pick it up when needed. The loop of shock cord holds it in place - for crossing the Bay under power - or on the trailer.

sm Balabus - Pushpole lashed in aft chock.jpg

I use Herter's-style duckbills for the foot - and closet-pole for the pole itself. You may need to find some straight-grained White Ash and make your own. Or, you could laminate something from clear Spruce or Mahogany to get the length-with-strength that you need.

All the best,

SJS
 
Thanks Steve.
Over the years I've used several pole configurations, including a friends pole vaulting pole. IMO, for a rail boat longer is better. Right now my plan is a Stiffy 18' pole with the standard foot. I'm not sure if I'll install oarlock holders, as I believe that would require sheer clamps to reinforce the cedar sheers. I'll know for sure once its flipped. The only means of propulsion is probably going to be the pole, so stowage is not a priority. But then again, I usually second guess myself. Decisions, decisions!

Entire boat exterior sanded late afternoon, one more coat of epoxy applied. I really want to see her right side up, and get to work on the interior.
 
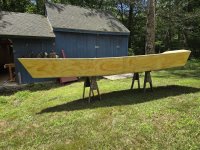
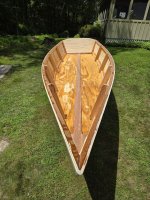
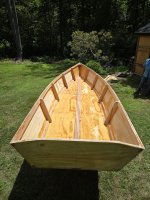
Finally out in the light of day. Lots of interior work to be done, a few DOH!!!'s to fix, and a poling deck to be installed. Nice to see the lines.

View attachment 67066View attachment 67067View attachment 67068
Looks great! For rail work I like the traditional 3 prong push pole head. Different than the herters head I use for mud work on the duck rig. The 3 prong head grips vegetation better, and that in turn acts as the bearing surface for pushing.

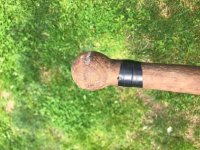
Here is a pic of a 16' 100 year old tapered pole recently given to me by a friend.

White oak inlet foot, copper riveted to Doug Fir or spruce.
 

Attachments

  • 1E90A141-99EC-4E84-A48F-EE95C03338AD.jpeg
    1E90A141-99EC-4E84-A48F-EE95C03338AD.jpeg
    207.8 KB · Views: 7
  • 1B9A245A-7520-4EB8-9BB4-1F36186563C7.jpeg
    1B9A245A-7520-4EB8-9BB4-1F36186563C7.jpeg
    132.7 KB · Views: 7
  • 84FE79DC-6A13-4462-875C-81C514561C72.jpeg
    84FE79DC-6A13-4462-875C-81C514561C72.jpeg
    303.7 KB · Views: 7
Back
Top