What’s on your workbench? August

William Reinicke

Active member
Had a freak freak accident in my well house yesterday. Essentially flooded, but my water softener drain line came loose, whipped around like an angry snake and with 2 minutes left to cycle, the water must of hit the wire just right and unplugged it. In turn, the motor turned off with the drain valve open. So for 2ish hours, my well was just pouring out and flooding the well house and made a small lake on the side of my house. Took literally 30 seconds to fix, but I assumed worse and work let me have the day off. So I played in the shop.

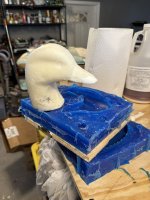
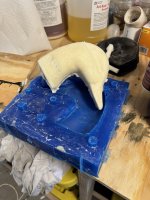
Lots had questions on the mold making and how I go about it. So I made another head mold, and casted a few foam heads to kind of show what I’m trying to achieve by next spring. The hope is to pull any combo head/body mold and cast any foam combo I want and then make them mine with flocking and airbrushing. Anyways, hope this kind of helps.

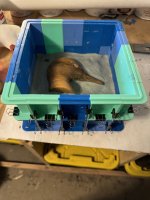
1) clay in the head or whatever you want to mold.
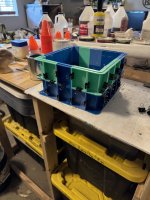
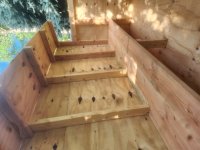
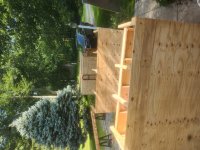
2) build the frame around the clay. Make sure you push clay up against all edges so no silicone leaks out.
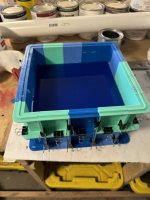
3) pour silicone over entire piece and clay, let dry for 4-6 hours
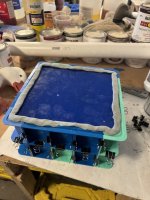
4) take it all apart, remove clay, leave head in place, rebuild frame around silicone, flip over and leave small strip of clay around bottom edge to prevent leaks, apply Vaseline over all the silicone and head and then pour second half silicone. Let dry for 4-6 hours.
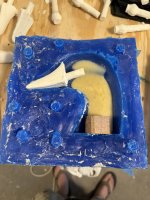
5) take down frame, peel apart mold, take master carve out and mold is ready. Spray with some release agent and cast.

You can see I made molds for the bill and I’m placing a small cube of composite material so I can drill and set a thread insert so I can attach my head to body with the eyebolt.

Again, I make decoys for myself and because I enjoy it a ton. I have nothing to hide. So don’t hesitate to reach out with any questions.
 

Attachments

  • IMG_1533.jpeg
    IMG_1533.jpeg
    116.6 KB · Views: 31
  • IMG_1534.jpeg
    IMG_1534.jpeg
    146.6 KB · Views: 29
  • IMG_1535.jpeg
    IMG_1535.jpeg
    113.5 KB · Views: 28
  • IMG_1538.jpeg
    IMG_1538.jpeg
    139.9 KB · Views: 29
  • IMG_1532.jpeg
    IMG_1532.jpeg
    182.6 KB · Views: 31
  • IMG_1536.jpeg
    IMG_1536.jpeg
    152.3 KB · Views: 31
  • IMG_1537.jpeg
    IMG_1537.jpeg
    161.8 KB · Views: 33
We typically build four blinds every year, the average number destroyed by ice and storms. Nothing as grand as Eric's fortress, small 3 guys and a dog size. They're all finished now, ready to be set. Only two months, time is short! Blind3.jpgBlind4.jpg
Blind1.jpgBlind2.jpg
 

Attachments

  • 1000000992.jpg
    1000000992.jpg
    250.9 KB · Views: 5
  • 1000000989.jpg
    1000000989.jpg
    271.8 KB · Views: 4
  • 1000000993.jpg
    1000000993.jpg
    223.6 KB · Views: 5
  • 1000000991.jpg
    1000000991.jpg
    369.6 KB · Views: 4
Last edited:
Heavy rains Friday kept us from working on the blind but it didn't stop the owner from flying over the property and getting a good look at the blind and food plot along with moist soil area we have been fostering. View attachment 56977View attachment 56978View attachment 56979
I always enjoy a flyover prior to the season. That looks like a good spot, along the river. It provides perspective, and context, to your first photos of the blind build. Nice ducks eye view of the blind, you guys have your hands full hiding it. Should be worth it when it's complete.
 
SJ

The last picture is the next field over (Silo Pond) to the where the blind is located (Love Lake). We have been working on establishing moist soil areas in the low spots where raising crops is tenuous at best. These areas are highly likely to flood anytime there is heavy rain and that is something Alabama sees often. The farmer would spray herbicide in these areas and plant crops every year, but I felt they are much more conducive to moist soil management and the landowner agreed. Wildlife is a higher priority to him than crop raising. We marked the areas off and informed the farmer to stay out of these areas and Thomas and I have taken over their management and only plant crops in the higher areas and let them stand all winter. When the lease with the farmer ends all of the land is going to be converted from row crop to native grasslands and prairie. Like I said, the owner is a conservationist/hunter and not a farmer. I'm looking forward to seeing this place transition to a more historical natural state.

One of our big accomplishments was getting trees planted to provide a barrier to wintering ducks on Love Lake from traffic up and down the gravel road. The traffic was disturbing them. Now during they are unaffected by traffic as the pine trees are over 10' tall. You can see the pine row in the first picture. Ducks are easily spooked by traffic, more than most people think. Since the road is used by other people, all year, we had to do something, and it worked.
 
Looks like you found your slice of duck hunting paradise. Better keep the landowner happy. Does that mean you can never retire? :oops:

I've always wanted a duck hunting property that I could manage like you're doing, but they are few and far between in this part of the country. We do a little bit of management on a club property, but we're handcuffed by state and local regulations regarding disturbance in wetlands.

I take it this property is not the beaver site? I'm curious, what was the final tally on the rodent removal project?
 
SJ

I am going to retire no matter what.

This is different property than where the beaver issue is. That property is about 45 minutes away. Beaver control is on hold while we work on the blind and also moccasins are too numerous. Plus, it has been a very wet year slowing our efforts since moving water offers beavers the opportunity to rebuild their dams very quickly. We hope to get some dry weather this fall to do more work there.
 
I am going to retire no matter what.

(y) I'm with ya on that. Another year, maybe two. My retired buddies say I'm in pre-retirement mode. I take about a week off every month. I need to ease into it gradually.
 
Flicker, watercolor sketch on cardboard.

Drake Wood Duck Decoy - Nessmuk, sign. Oil paint on wine case lid. DU donation.
 

Attachments

  • Flicker watercolor sketch.jpg
    Flicker watercolor sketch.jpg
    203.5 KB · Views: 3
  • Flicker.jpg
    Flicker.jpg
    220.1 KB · Views: 3
  • Nessmuk sign 2.jpg
    Nessmuk sign 2.jpg
    369.6 KB · Views: 3
  • Wood  Duck for new sign.jpg
    Wood Duck for new sign.jpg
    442.7 KB · Views: 3
  • Wood  Duck for new sign 2.jpg
    Wood Duck for new sign 2.jpg
    413.9 KB · Views: 3
Dave

One of our crew likes to cook. The blind we built last year has a "kitchen area" but it was a lot bigger blind. This year's blind we think the 4' center section will work for cooking. We want to put a small grill in there and plan on installing a pedestal bass seat that can easily be removed so as not to block folks entering/exiting the blind with a permanent seat. If we didn't have someone feeding us then you lathe idea would be a winner :giggle:.
 
Back
Top