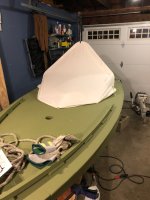
BBSB Pond Box Build

The good news....the bottom is planked.20250828_175158(0).jpg


The bad news....

20250828_175241.jpg


As I feared, I see no way to complete this boat with a true feather edge. This is entirely due to the use of narrow strips to plank it. There's no way to overhang them enough to come to a "feather". The only thing securing the outside 2 planks is the chine log which has bronze nails in it. I think the edge can be planed down from the deck to maybe 3/4" but I won't know until it's flipped. Someone suggested a fillet to simulate the feather, I'll consider that and the possibility of wrapping a false feather around the chine log. Not the end of the world if it doesn't work out, I bet the ducks won't notice.
 
I don't think a false feather edge, as you call it, will even be noticeable. Attach it, plane it, glass it, and paint it. It will look like its supposed to.
 
When it's flipped, I can better judge if it's feasible to bring it to an edge. I doubt that's happening until after next week.
 
Started plugging away again yesterday. First photo, the hull is flipped with the molds still attached to the ribs.

20250906_100244.jpg

I think I mentioned previously, molds 2 & 9 stay in the boat. The others are used for aligning deck framing, but are removed in the next photo to ensure they come free. A little epoxy always finds a way through the tape along the bottom. These came away easily, but left some tape stuck to a couple of ribs. You can see the sister installed when the #8 rib cracked during planking. The ducks won't mind.

20250906_100535.jpg

Next, I put an epoxy fillet along the outboard side of the chine log. If I'm going to have any chance of planing everything down to near a feather edge I'll need to remove some nails and screws. The chine log will be planed down to nothing, epoxy will be the only thing holding the boat together until it gets glassed. Filleting now gives it plenty of time to cure before the fasteners are removed. If you look close, the minimal plank overhang amidship is obvious. It's a result of using 1 1/2" planks instead of 5-6". I'm curious to see how the experiment turns out.

I decided to build the cockpit deck to 7" inboard of the chine log. This leaves a varying amount of room, it's about 24" where the gunner sits and 18" at the stern. If the stern was decked over, you'd never get your feet underneath. I forgot to take a photo when I was checking framing alignment, I had a cockpit coaming support piece fitted for each side.

20250907_092101.jpg

The cuts in the molds allowed the coaming support pieces to connect. The molds are put in and clamped for fastening the deck frame, then removed after glueing.

20250907_190506.jpg

Lots of wood butchering happening in these photos. First, building the deck this way is not recommended. The time honored technique of a full cross rib, later cut out and used for a cover, is the best way. I was short of lumber and will not build a hard cover, so I went for it. Fitting the pieces was the worst part of the build, by far. Don't attempt it unless you bring beer, and lots of it. I had none and won't make that mistake again.🍻 
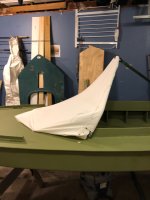
I'm holding my breath 'til tomorrow to see if it holds it's shape.

20250907_193545.jpg

So there it is tonight. The extra gussets will be installed once the epoxy sets. Then the coaming supports go in, followed by lots of planing. Then everything gets coated with epoxy.
 
You’re just cooking boats out! May the ducks be feet down and ready to meet their maker for you this season!!!

About the dodger. I had tried years ago making a layout boat curtain. Totally botched it up, it was super low, leaked, and awful. Fast forward 10-15 years I made another terrible one for a sunfish sneak boat, didn’t put belly into it, so again tight and useless. Then I watched a few you tube videos on canvass work. Bent conduit hoops , strung them where I wanted and used 6mil plastic and marked my patterns, then remarked them +1” ish. Used my wife’s sewing machine with heavier needle and outdoor thread. Came out great (great being a relative term, I don’t think any yacht owners would be calling for me to make canvas anytime soon!).

Point is it’s not as hard as you think, and although a sailrite machine would be the best tool, the singer or brother my wife has did the trick! Never to old to learn.

Tony
 

Attachments

  • 56480779040__DF6A360F-A3D0-4749-90A7-83A4689F3372.jpeg
    56480779040__DF6A360F-A3D0-4749-90A7-83A4689F3372.jpeg
    401.8 KB · Views: 13
  • IMG_0492.jpeg
    IMG_0492.jpeg
    303.2 KB · Views: 12
  • IMG_0493.jpeg
    IMG_0493.jpeg
    289.4 KB · Views: 12
  • 72098668112__F0EDC5DF-E6A6-4B97-B1BE-A6F54ED03189.jpeg
    72098668112__F0EDC5DF-E6A6-4B97-B1BE-A6F54ED03189.jpeg
    433.9 KB · Views: 13
  • IMG_1962.jpeg
    IMG_1962.jpeg
    666.3 KB · Views: 13
  • IMG_1963.jpeg
    IMG_1963.jpeg
    671.7 KB · Views: 13
You’re just cooking boats out! May the ducks be feet down and ready to meet their maker for you this season!!!

About the dodger. I had tried years ago making a layout boat curtain. Totally botched it up, it was super low, leaked, and awful. Fast forward 10-15 years I made another terrible one for a sunfish sneak boat, didn’t put belly into it, so again tight and useless. Then I watched a few you tube videos on canvass work. Bent conduit hoops , strung them where I wanted and used 6mil plastic and marked my patterns, then remarked them +1” ish. Used my wife’s sewing machine with heavier needle and outdoor thread. Came out great (great being a relative term, I don’t think any yacht owners would be calling for me to make canvas anytime soon!).

Point is it’s not as hard as you think, and although a sailrite machine would be the best tool, the singer or brother my wife has did the trick! Never to old to learn.

Tony
Your final product hides well. Nice to see a youngster in it.
 
SJ~
Exciting - and gorgeous!

To add to Tony's "canvas encouragement" - I use Dura-Skrim ( https://www.sailrite.com/Dura-Skrim-2-Patterning-Material-74) for making patterns. I clamp and tape it to the frame and mark it up with a Sharpie.


View attachment 68599


The grid both holds the shape and helps in layout for symmetry. Well worth the modest cost.

All the best,

SJS
I may have some of that kicking around. Or something very similar. I covered a vegetable starter box with it a few years ago. I dread getting to the point of working with the canvas. I'll probably harpoon my finger in the sewing machine.
 
I should have absorbed more of Granny's lessons when she tried to teach me to sew. I spent quite a bit of time watching her, I just never got the hang of it.
 
I should have absorbed more of Granny's lessons when she tried to teach me to sew. I spent quite a bit of time watching her, I just never got the hang of it.
SJ,

I would try to sew. I am learning as I go putting together a Sailrite sail kit for the widgeon. Main learning point is that there is no dead line and it is ok to walk away and come back a day or two later. My sail will have imperfections but I am learning as I go. I use some scrap cloth to practice on prior to making the needed seams.

Rick
I'll likely give it a try. My primary concern isn't aesthetics, more not putting my finger in the machine. :oops: :D

Speaking of machines, I broke two bandsaw blades yesterday. Both failed while the machine was idling as I laid out the next cut. Probably has a bulge in a tire, one more thing to fix.
 
Your final product hides well. Nice to see a youngster in it.
Thanks, I unfortunately don’t use the boat enough. Put it on Facebook for $500 with 2dz plastic ghg decoys and couldn’t give it away. It hides great. But most of the marsh I hunt is a long ride and that thing does 5mph no matter what motor is on it.

That’s my oldest son, that spot is literally around the block, gets tons of pressure but it’s an easy hunt if he got cold (8 at the time) . We got two mallards without calls( realized I lost them after we set up🤬). He’s hooked I just need to get him shooting , he’s ten now. Hard to convince mom we need a 6-800$ semi auto for reduced recoil.

Tony
 
You can't get kids started too early, provided they want to. I was four. In todays world, my parents would be in jail for such conduct. Yes, recoil sensitivity may be an issue. You need to see how they do. IMO ten is past "maybe it's time". Kids are really sensitive to noise so good hearing protection is a good idea. We didn't have that, my wife says my favorite response to her is "What?". Hope he gets into it, best of luck.
 
I spent a few minutes before dinner to glue up the coaming support frame and the rest of the gussets. It's starting to resemble a boat. Next big challenge is planing everything so the deck and bottom planks meet. It's very tight along the sides due to the small (36") rib radius, so a sander, chisel and rasp will be employed in ittybitty spots.


20250908_171800.jpg

Then we revisit the aforementioned jinky station #1 frame. I think I said previously mold #2 stays, it's actually #1. This is boat # five I've built from the Megargee plans, although this one is scaled down. Every one had some degree of separation at this station. More of an annoyance than anything, I'll add a deck rib alongside it. If you build one from the plans keep this in mind or tell me where I'm going astray. All the other molds worked and the lines are nice with minimal fussing.


20250908_171954.jpg
 
SJ

Are you going to glass the interior in addition to the exterior? Reason I ask is I think water will find its way through the cracks and into unprotected wood and held there by the exterior glass. I'm not sure I'd trust paint or even an epoxy coating alone to keep water from getting into the hull. I think I'd want an impermeable barrier.

She's looking good!
 
Back
Top