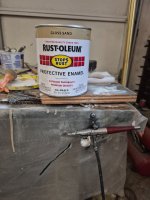
Don recommends 3% hydrogen peroxide for blood removal. Maybe this? it does say hydrogen peroxide does help get rid of calcium buildup on most surfacesI wouldn't hunt if I couldn't hunt over my custom double flocked Speck decoys....
All thanks to Don Mintz and his generous sharing of valuable information.
Yesterday was a prime example. Limits of Specks for my blind partner and I. Cupped and webbed to say the least. No other shots heard in the north Sacto. Valley. Generally poor Opener for most hunters in our area.
We hunt in very "hard" water. Lots of calcium. Some dekes always manage to fall over. When straightened up and dried out, there is a heavy, visible, white calcium line that adheres to the flocking. I hate it. Any thoughts on how to remove this? I was thinking a vinegar rinse might do the trick, but, I don't want to disrupt the enamel Rustoleum glue. Thanks
( Photo taken before deployment)
You are using an out of date browser. It may not display this or other websites correctly.
You should upgrade or use an alternative browser.
You should upgrade or use an alternative browser.
All Things Flocking
- Thread starter Don Mintz
- Start date
you may need to play around with a single decoy. I've heard oxyclean is good, but haven't tried it myself. We have lots of issues with moss leaving a ring around the bottom of decoys here on the snake river. I've never done much more than spray them off in my shop sink with hot water. We might just need to see what kinds of things work and what won't.
I put flocking on 40 decoys this morning by noon, some full coats, some second coats like the chest of a mallard drake. This is a photo of my high tech flocking set up. A kitchen sieve and a plastic tub, of course normally I'd be covered up with a respirator and goggles. The fishing shirt is good to cover everything so I don't have to drag it all back in the house. This is my carving and airbrushing exhaust booth. I've used everything as far as applicators and nothing works better than this simple operation. Puffer bottles have to be constantly reloaded as well as the air assist gun, not to mention they blow flocking all over the shop, been there, done that. I have one tub slightly higher than the one I'm working out of. I lay the lid upside down and let it overhang the tub in order to catch some of the drifting flocking.

As far as high tech, at one point we had designed a flocking booth that would have shortened the dusting process and contain the flocking much better, but once I moved my shop back home I didn't have the space. The big deal with flocking is painting the glue on, that's what takes time and there is no way around it. Two people can flock a hundred decoys a day, one color. Caleb and I would both paint on the rustoleum and I would flock both his and mine. He would paint 3 decoys to every one that I would paint, then I'd flock till I caught up and then paint again. First coats, especially in the summer need to go quickly so the paint doesn't tack up. Second coats are much more forgiving, rustoleum gloss stays sticky for a long time and on second coats I frequently will paint over a first coat in preparation for the second and sit it aside till I get the next one done and swap them out. That allows the paint to absorb better and even out, resulting in a much more uniform second coat. Probably the biggest deal is shelf space, 100 decoys at a time take up a lot of space, most flocking jobs are 3 and four colors, one day each color. It can get pretty crowded
've forgotten a last decoy in line a couple of times after I painted on the second coat of rustoleum, one time it was nearly an hour, it was still very wet, so I flocked it and it worked just fine. That won't work on a first coat.
Single coats don't wear very well. I'm working on a bunch of tanglefree mallards right now and the heads are factory flocked, well not really, it's more like a powder than flocking. At any rate most of the first coat has worn off, but does have a decent base of fuzzy still attached and I'm going to at least try getting my second coat to finish the job, we will see.
you have to wrap your mind around using gloss paint, both for flocking and through the airbrush. For flocking it is to make better adhesion with it's longer drying time, for airbrush to both remain compatible with the glue and using gloss over flocking through the airbrush doesn't make it glossy and is more durable. Any time you add flatteners to paint it weakens it. Even when painting gloss black over dark areas for contrast, it is blacker than painting flat black. The only flat paint we use is when painting un flocked decoys. It's good that gloss works, when dealing with rustoleum, there aren't many choices in flat colors anyway.
We recently painted a couple of non flocked specks. The flat black just wasn't looking black enough, so we painted over the flat black bars with gloss black with a technique we call hazing. Hazing is several light passes to make a color richer without making it glossy. It ends up a bit less glossy than satin black. It was a customer request that we didn't put the light barring on the back of these canada to speck conversions, not my idea. They wanted them dark,
I did a little blend flocking on some Pintail /mallard crosses today. Blend flocking is when I can use the same color of flocking over two different colors of enamel. Grey on the flank and brown on the chest give a nice base for the airbrush without leaving a seam. I have three more days of flocking on this pair.

The pintail mallard crosses are ready for paint. I've been scratching my head about the color of the cape on the cross, It's kind of mallard drakeish, I went with black enamel and goose grey flocking and it will at least give me a decent base to work with the airbrush. I did a little more experimentation with poses on these crosses.


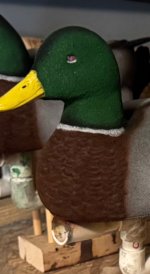
Tomorrow is the first day of our second season split. I just finished the first four drake mallard flock jobs. It was my first ever attempt at using an airbrush, with that in mind I'm pleased with how they turned out. I did a number of test flocks to get the colors where I wanted them. The paint/flock combos I settled on, all gloss Rustoleum:
Breast: Regal Red, touch of Leather Brown added. Dark Brown flock. The result has a hint of chestnut imparted by the red.
Tail: Black on Black
Body: Light gray flock over Smoke Gray
Head: Mallard head flock over Hunter Green with a touch of Leather Brown.
White: Painted by hand
Bill: Sunburst Yellow with a little Leather Brown. It's a little light/yellow, next batch gets toned down.
The best part was messing with the airbrush. A dusting of brown and black in various locations makes it look pretty nice although they don't compare to Don and William's birds. Next batch will get a slightly lighter touch with the dark airbrushed colors. The Black is one of the first batch I made a couple of weeks ago, next batch the eye stripes will be much less prominent. The eye stripes were done with flock, next batch will be airbrushed. I was under the gun to have the mallards ready for tomorrow, I'm looking forward to seeing them in the water. They started out life as factory plastic, this flock job has to look better than that to the birds.
That will work real well! I think my green for the heads is 75% hunter green and 25% sunburst yellow rusto paint. But looks damn good sir. Wait til you start laying down fine lines and figuring out layering paint colors with an airbrush to give it that dimensional look. I’m still figuring it all out myself.Tomorrow is the first day of our second season split. I just finished the first four drake mallard flock jobs. It was my first ever attempt at using an airbrush, with that in mind I'm pleased with how they turned out. I did a number of test flocks to get the colors where I wanted them. The paint/flock combos I settled on, all gloss Rustoleum:
Breast: Regal Red, touch of Leather Brown added. Dark Brown flock. The result has a hint of chestnut imparted by the red.
Tail: Black on Black
Body: Light gray flock over Smoke Gray
Head: Mallard head flock over Hunter Green with a touch of Leather Brown.
White: Painted by hand
Bill: Sunburst Yellow with a little Leather Brown. It's a little light/yellow, next batch gets toned down.
The best part was messing with the airbrush. A dusting of brown and black in various locations makes it look pretty nice although they don't compare to Don and William's birds. Next batch will get a slightly lighter touch with the dark airbrushed colors. The Black is one of the first batch I made a couple of weeks ago, next batch the eye stripes will be much less prominent. The eye stripes were done with flock, next batch will be airbrushed. I was under the gun to have the mallards ready for tomorrow, I'm looking forward to seeing them in the water. They started out life as factory plastic, this flock job has to look better than that to the birds.
View attachment 70623
Here’s my head color with that color mix through the airbrush. It’s sprayed over black flocking. Here is some of that fine lining over the base of the chest. Fine lining white with black to achieve the 3 colors. I do my chest a little different, but might change it up next batch I do. I do two coats of gray flocking (as usual), spray my base with rusty metal primer, then fine line with white and black.
Attachments
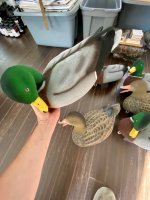
wow, everyone is doing so good on this flocking process. It all sounds pretty familiar on color choices. I need Bob to give me his flocking recipes for specks, I've got six of them in front of me.
I'll preface this next statement that it is a joke. Don't you know it takes 5 days for rustoleum to cure? me either. Although the cure time usually isn't an issue at the pace I work, but theoretically they take some days to fully cure. However I take them out next day frequently, I just make sure to allow them out of the bag to dry when I get home.
I'll preface this next statement that it is a joke. Don't you know it takes 5 days for rustoleum to cure? me either. Although the cure time usually isn't an issue at the pace I work, but theoretically they take some days to fully cure. However I take them out next day frequently, I just make sure to allow them out of the bag to dry when I get home.
B. Heitman
New member
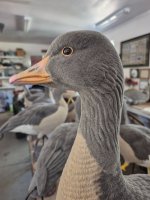
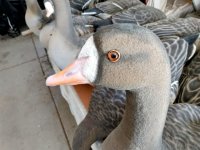
I'm honored ( and, hopefully, the " Bob" you are referring to!!!). In the field, the beak of a Speck is very prominent. It is NOT orange, red or pink. Specks are NOT a dark goose. In the field, at least in rice country, they are quite "light" in coloration.
The speck flocking recipe:
BACK/TAIL - TILE BROWN DIAMOND BRITE GLUE (Amazon ) or DARK BROWN RUSTOLEUM GLUE. GOOSE GRAY FLOCKING.
FLANK/HEAD/NECK- SAND RUSTOLEUM GLUE. STONE OR BIEGE FLOCKING.
HIGHLIGHT FEATHER EDGES WITH SAND RUSTOLEUM. HIGHLIGHT HEAD, NECK WITH DARK BROWN RUSTOLEUM. BLEND BACK AND FLANK ( DARK BROWN) WITH AIRBRUSHING AS APPROPRIATE.
AS PER DON MINTZ GOLDEN RULE: FLOCK BLACK ( SPECKS ON SPECKLEBELLY). FLOCK AND PAINT WHITE .
THE BEAK IS A STORY FOR ANOTHER DAY.....
Attachments

yep, you are the "Bob". Where do you get your sand color? I haven't seen it at our ACE hardware or at Home Depot. I've been mixing colors to get where I want to go in the sand direction.
I'm really curious about your beak colors. I've only made a half dozen specks over the past 20 years, so I've never really settled in on a how I want it done. I do what I call pixel painting on the bill, several colors, lots of misting because like you said, their bills are not orange like every factory paints them. I have a pantone book that shows about every color possible, many manufacturers use it for color mixing. When we had colors that were difficult to come up with like a wigeon flank or speck bill. I would take a color swatch of a general area I wanted a color from, blur it and put it in my photoshop program and and the scan would give me a pantone number to refer to the factory we were working with. In the pantone book it actually would give you the percentage of basic colors that it took to create that color. It was a pretty handy starting point. However I had a habit of making sure that the paint schedule was so complicated that China couldn't figure it out with or without the pantone number.
Airbrushing allows for a good amount of color transition rather than the factory paint by number process. Most factory painting is also done with a single action airbrush which makes transitions even more difficult. While it seems like a single action airbrush would be easier to operate, it's actually far harder than a double action. That's probably another discussion for another day.
This photo Caleb and I took of a speck we shot over a decade ago demonstrates the color problem and how difficult it is to match. I never realized just how far off I was with the paint on this tanglefree decoy until I looked at the photo. We weren't to the point of messing with a variety of flocking or paint colors then, it was brown flocking over smoke grey paint and airbrush from then on other than the tail.
That's why I asked Bob, he's played with specks a lot and I need help on the six I'm working on. This was actually the first day out with this speck decoy, we had a pair of decoys and had never even seen a speck here, just kind of took them out for fun. I shot a speck 44 years ago when we lived in Alaska and that was it for me till this one that Caleb and I both shot. About the only color I got right was the tail. I did change the tone of the color with an airbrush after seeing this picture. I have no idea where these decoys went.
My bill color had a base or orange, then the fun began. A little bit of a light slate, a very light faint haze of a dirty yellow, a little white, lots of subtle changes. What is kind of funny is I did very little barring except toward the back of the flank, the goose here is a juvenile and had no barring at all and man did he eat good.
B. Heitman
New member
The whole "face" of a mature Speck is one of Mother Nature's works of art, especially when seen in the field. The beak is a beautiful blend of colors, giving it a special "opalescent" quality. Hard for a mere mortal to reproduce....
What you refer to as "pixel" painting, would be key.
I start out hand painting the beak a solid light blue slate. This is followed by a "hazing" of light pink, basically around the bill edges and ridge, preserving some of the blue slate around the nostrils. Next, a "hazing" of what I call "speck orange" down the beak ridge and lower beak edge. Then I very lightly haze white at the beak tip and very, very sparingly over the body of the beak. A spraying of clear, matte Rustoleum finishes the process.
The beak pictured, is an early attempt to capture the unique beauty of these birds.....
Attachments
B. Heitman
New member
Oh, the Rustoleum Sand is available through Amazon. ACE doesn't seem to carry it anymore. Pricey to say the least, especially with Jeff Bezos trying to out maneuver Elon Musk in Outer Space.......
I checked on amazon and the prices are all over the place. I saw two quarts for $26 and one quart for $26, I wonder how that all shakes out. That color looks very close to what I've mixed starting with almond and brown that I used on the heads of black ducks. the bill colors you mention are just about right from my observation.
I don't particularly like almond for much of anything without mixing it and I really like the head color on SJ's black duck. I'm going to have to dig around and figure all that out, I've got to try out the sand. i'm assuming that is what SJ used on the head of the black duck, what flocking did you use on the head?
B. Heitman
New member
In reading over what I posted, I realized I made a mistake on the Speck head and neck. Apologies.
Tile Brown Diamond Brite (Amazon), or Dark Brown Rustoleum ( if you can find it) glue with Goose Gray flocking. I do a fair amount of "hazing" with airbrushed Sand Rustoleum over this combo.
Don, I would be honored if you would send me one of those beautiful Speck foamers you carved!! I'll try my recipe on it and send it back to you. I'd love to get your opinion. I'll pick up the postage and shipping .