All Things Flocking

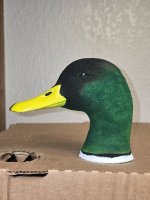
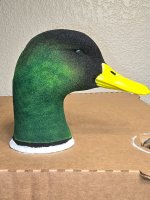
I'm really liking the colors I'm getting on the goldeneye hens. on the flank it's the standard goose grey all the way up to the head. On the back and tail I tried something different with dark feather grey over black rustoleum. The head is brown over brown, I wished there was a more caramel brown flocking to do the heads with, but the feather brown is a good base with orange painted over the highlights and a little brown to mute it out some.

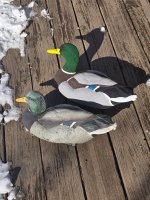
You might be wondering about the mesh bag. I've been doing this for several years because we hike pretty good distances to duck hunt. Tomorrow's hike will be a 3 mile round trip and at 68, I'm just not fond of carrying much more than myself on a long hike of up hill, down hill. A 12 slot bag full of these decoys will weigh right around 20 lbs. One thing about Idaho, it's full of rocks and it doesn't take a lot of time to gather enough rocks to weigh the decoys down. At the end of the hunt we just put them in a convenient pile for next time. The mesh bags are made of mesh laundry bags from amazon, cut up into about 10 inch pockets and sewed by the seamstress at Scheels, which happens to be my wife.

You don't want to have your pack in weight the maximum weight you can possibly carry, allow some space for a few limits of 2 lb birds. With flocked decoys you don't need to have a ton of decoys, you just need to cover the species you are after.

IMG_5514.jpg
a keel less decoy, 13 oz.
IMG_5512.jpg

A keeled decoy, 1 pound, 7 oz.
IMG_5511.jpg

I get my slot bags at Scheels, but they are rig em right bags, padded with a zip top lid. My favorite way to keep my flocked decoys clean since a lot of them are white. You can use the straps as shoulder type back pack straps.
IMG_5513.jpg
 
a little field testing today with another friend who had never diver hunted nor hunted over flocked decoys. He was pretty stunned by how down the barrel the ducks were decoying. He got some of those high speed crossing shots into the wind and learned all about the difference between putting the barrel on the bill of a mallard and a 5 foot lead. we had plenty of action for him to adjust and see some birds skipping across the water. I think we got my oldest grandson addicted, he's not quite ready to handle a shotgun, but he's paying his dues and learning about water fowling. According to ONX our hike is right at 3 miles round trip and takes us 2 hours and 30 minutes, the grandson has been a real trooper with the steep terrain and always wants to go again. It really makes it important to reduce the weight of decoys. We only carried 13 decoys and the weight was under 20 lbs for each of the two decoy bags with six and seven decoys along with shells and jackets. Rocks were plentiful and are stowed away in a conspicuous spot for our next trip. No more hauling weights, other than the ducks on the walk back to the truck.

this photo gives you an idea just how big my diver decoys are compared to the real thing,
IMG_5518.jpg

I'm behind the camera, our friend and my son and grandson. The dog is "Hank" and is in the first year of hunting and is really doing well, other than he still gets confused on occasion with what's a duck and what's a decoy, but he's about over that now.
IMG_9619.jpg
 
Just imagine, though... build a working call into the duck with a mouthpiece just below the tailfeathers.
It would need to be gusts of 40 to get it to work cuz i aint running a tube to it. Imagine a little pond water getting in the tube, sucking that up. Sounds like Giardia haven and you would live on the toilet for weeks!
 
It would need to be gusts of 40 to get it to work cuz i aint running a tube to it. Imagine a little pond water getting in the tube, sucking that up. Sounds like Giardia haven and you would live on the toilet for weeks!
Oh, I was just imagining you wearing as a camo hat. Or blowing directly into the tail.
 
Oh, I was just imagining you wearing as a camo hat. Or blowing directly into the tail.
They do decorative working calls custom carved to look like ducks. NWTF has a specific competition for that every year. Not necessarily a decoy per se, but working calls carved like ducks or decorative. Some of it is insane workmanship. The price they go for is insane as well. I think NWTF show is next month actually. Should be fun to watch. Im sure good ol RMC calls will take all the wins as he does every year.
 
I'm fooling around with some more grey colors in flocking to get my mallard drakes a little more late season. I like the contrast.

The middle one is from over a year ago and done with goose grey over half and half smoke grey and white rustoleum. It took a lot of white airbrush to get it as light as it is. On the other one it's about 20% smoke grey and 80% white with light feather grey flocking. The white airbrush is pretty minimal compared to the older decoy.
IMG_5531.jpg

the top one is light feather grey, the bottom is goose grey.
IMG_5530.jpg

A couple of things, one is I want the final color as close as possible before I airbrush. Another thing is painting light or white over dark colors is difficult, painting over light colors like this light feather grey is much easier. Painting dark colors over light flocking is much easier than the opposite approach.
IMG_5528.jpg
 
Just a hypothetical... would the light gray over white rustoleum be too light? The first coat might get lost in the paint and almost appear white maybe, but with a second coat maybe it might come through about perfect to not need white airbrushing?
 
i might fool around with the grey over white just to see. I can use it on some of the stuff I paint white over anyway You know what it's like to flock white over white, it's still not white/white. This might be worth the try. It will no doubt help with airbrushing, much easier to go dark with an airbrush than to go light.
 
I did a little enhancement on the speculum of one of the mallards I've been working on. I used a blue oil based paint pen to make the blue a little more defined. The white is hand painted with flat white oil based enamel and the edges cleaned up with an oil based paint pen,

IMG_5532.jpg
 
I did a little enhancement on the speculum of one of the mallards I've been working on. I used a blue oil based paint pen to make the blue a little more defined. The white is hand painted with flat white oil based enamel and the edges cleaned up with an oil based paint pen,

View attachment 72628
Looks great! I haven't been able to find a base blue that looks deep enough yet. I do have a question on heads though if anyone would oblige - Does the gloss sprayed over black flock work or would a flat spray over be best? I haven't decided on a "green" blend yet either. On the bills - The gloss on them look to be a bit shiny. I've read Don mention a "hazing" technique but this is my first go with an airbrush so not sure. Good thing is I have plenty to practice on! Thanks for all of you giving your help so freely!
 
Looks great! I haven't been able to find a base blue that looks deep enough yet. I do have a question on heads though if anyone would oblige - Does the gloss sprayed over black flock work or would a flat spray over be best? I haven't decided on a "green" blend yet either. On the bills - The gloss on them look to be a bit shiny. I've read Don mention a "hazing" technique but this is my first go with an airbrush so not sure. Good thing is I have plenty to practice on! Thanks for all of you giving your help so freely!
Gloss over flocking. All my paints are rustoleum gloss paint ran through the air brush. I play around with lots of the greens. Half my mallard were straight green off the shelf, some were a blend of yellow and green over black flocking. Both work great. Some hunt black flock on their drake mallards as well. i cant bring myself to do this still but it does make sense, when you glass birds at a distance, they appear black not green. Same concept guys use all black silos on geese. They grab attention from so much further away. If a duck is close enough to flare, seeing the head is black and not green, its probably shootable at that point and it doesnt matter anyways. Bills are glossy at first, I dont do anything special on my bills. After a hunt or two, the gloss really breaks down and the bills look good. I dont care too much about the bills being a bit glossy in the shop. Mine get abused enough nothing stays shiny very long. I just know how good that rustoleum paint holds up to elements and thats all I care about. Not sure about a hazing technique, I guess you could do a very light coat of flat over the initial gloss paint to break down the glossiness? I would just hold the air brush back about a foot, foot and a half and just put a light spray over the bill, enough to break down the gloss but not enough to change the color per se. That might help?
 
Yes, that helps thanks. I do think these would hunt just fine and would not hesitate to just have them black. Each one seems to have their own personality and I'm not sure where the end point is!
 

Attachments

  • 20260121_120753(1).jpg
    20260121_120753(1).jpg
    244.7 KB · Views: 9
Those will work just fine. Dakota decoys... my very first flocked project was old dakotas. Fabulous decoys and super cool head positions on those decoys.
 
I have yet to find a blue or green oil based enamel I like. You can bend colors by pixel painting. Pixel painting is painting two different colors to create a color, think of your paint spray as tiny dots or pixels on a digital image. For instance you want a brighter green on your mallard head over a black flocked base. Start with yellow, it might take a couple delayed passes to make it strong enough. A delayed pass is giving 15 or 30 minutes to let the paint set up a bit. After another 30 minutes you can do a green pass or green/yellow mix and the color will be stronger. If you want to push the color a little blue/green, you can blend a little blue toward the neck side of the head. That's pixel painting, you are misting tiny pin sized dots mixed in with the partially dried dots of an earlier pass and that will bend the color to a different direction.

You can do the same thing to achieve a blend of green to purple on a wood duck head. Start with a base of green in the same way as a mallard, then mist red over part of that area to achieve a green to purple blend.

Here is my idea on bills. The paint on a bill is one of the most vulnerable places for wear, so I want to paint them with gloss or satin. Any time a flattening agent is added to paint, it weakens it. However some colors can only be achieved with gloss colors. One is Hazing. Hazing is staying back away from the piece two or three inches with light passes. You don't want to saturate the surface, just haze over it. You can do this over a glossy mallard yellow bill that is dry and satin the bill down, just avoid trying to do it in one fell swoop. Usually I'll mix a base color and hand paint a bill twice to get maximum strength and wait a day and do the hazing. Most of my mallard drake bills have up to 3 color changes. Another way I think of bill gloss is a wet duck bill is totally natural.

This isn't the greatest picture, but you can see a little of the green to purple blend on the wigeon and a bit on the wood ducks.

150229115_2769197876674999_5052033882762178693_o.jpggfd.jpg
 
Couple pics at first timer air brush. One side tried to maintain consistent color the other tried to blend using Don's advice/tutorial. Some of the shading difference is due to the contour of head. Thanks Don and William!
 

Attachments

  • 20260127_100330.jpg
    20260127_100330.jpg
    198.3 KB · Views: 4
  • 20260127_100315.jpg
    20260127_100315.jpg
    260.3 KB · Views: 4
Here is a little paint pen tutorial. I've been talking a few guys through the use of paint pens privately lately. Let me say right up front I'm an expressionistic painter, especially when I'm painting hunting decoys which are nearly always flocked. I'm not interested in fine detail, but I am interested in contrast and color. Even when doing something decorative, I'll build the colors in a very loose fashion and continually refine, define details till I'm down to painting individual hairs, scales, or feather barbs one at a time, Painting over flocking doesn't really allow all that fine detail and in a hunting decoy it is not necessary. You are looking for basic color patterns, contrast and and accurate view of a bird yards away and not inches.

We are painting decoys at arms length, but that's not the perspective of a duck sliding into the decoys. You need to walk away from your decoys at five or ten yards and get an idea how they look at a distance. Figure out what shows up and what contrasting colors are working or not working, That's where the paint pens come in, It will be about the closest thing to fine detail you can get on flocking.

This decoy I finished a day or two ago is one I made in 2011 and rehabbed. I started with a straight up brown over brown rustoleum. It still had two coats of existing flocking from over a decade ago, all intact and in great shape. Other than filling shot holes, 25 of them, I really could have just painted it again.

This is where it ended up at about 5 feet. There is extensive paint pen use over the entire decoy. I used the broad end of the paint pen to enhance some of the white feather edges, tail feather edges and the edges of tertials. The oil based paint pens are very durable.

IMG_5600.jpg

This is what it looks like close up on the head that received most of the paint pen use. The head flecking is just an enhancement, both light and dark and is more for the buyer than the ducks. It mostly depends on your ability and just how far you want to go. I never know when to stop and I'm always looking for the next best thing,

After the airbrushing is done, I'll start in with the black paint pen, creating loose rows of detail at the proper angles. I'll add in some white highlights above the eye, you just can't do that with the airbrush without painting over it a dozen times, the paint pen will do it in one pass.
IMG_5591.jpg


I think where most people get frustrated is looking too close. We are not trying to duplicate, we are trying to reveal field markings through contrast and color. The the flecking at this point I've added to the black with brown, grey, on off white or cream color. It's always important to me to have at least three colors or shades of color on everything to enhance the 3D look.
IMG_5596.jpg

This last photo gives you a good idea of just how messy the surface of a double flocked decoy looks. You aren't going to have fine feather lines, what I'm looking for is contrast and color that is visible beyond 10 feet.

Once the flecking is done, I will make another pass with the airbrush on many of the white or light areas just to smooth things out.

what do you think of that 10 cents a pair eye ?
IMG_5594.jpg

I used to call this tangle flocking because all the fibers or crisscrossed and overlapped unlike the factory flocking that is applied electrostaticly. Factories have a process where a static charge draws the fiber to the painted or glued surface of a decoy, usually with a urethane glue. The fibers connect to the tip of each fiber. With the shaker style flocking I do, the fibers interlock into the oil based paint on the first coat. The second goat just makes that surface thicker with tiny little reinforcing filaments glued together. For the life of me I don't understand why factory flocking is not done the same way, the time consuming part is painting on the glue and you've got to do that no matter the process. Common failures with factory flocking is a failure of adhesion and the single point of contact to the glue and the use of rayon flocking.
 
Back
Top