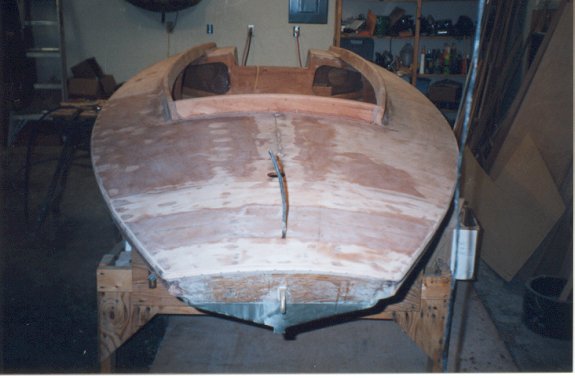
With the decking installed and trimmed it was time to install the cockpit coaming. Cockpit coaming is simply the board attached to the decking around the cockpit opening. Its purpose is to provide additional freeboard, add strength, and enhance appearance. The plans suggested using 3/4" x 2" lumber for the cockpit coaming. I opted for bigger coaming. Since the Scaup is bigger than the Black Brant I felt it would look better to increase the coaming size to keep things in proportion. I used 1"x3" Mahogany.
The first step was to prepare the Mahogany boards. Three boards were used, two 12' 1"x3"s for the side coaming pieces and one 4' 1"x6" for the front coaming piece. The two side coaming pieces, which run from the front of the cockpit to the transom, were tapered their last two feet. The heigth of the pieces was reduced from 3" to 2" over the last two feet. Once installed the taper, which starts at the motor well and runs to the transom, adds to the aesthetics of the boat. After tapering the side coaming pieces I rounded the top edges with my router and a 3/8" radius bearing guided round-over bit.
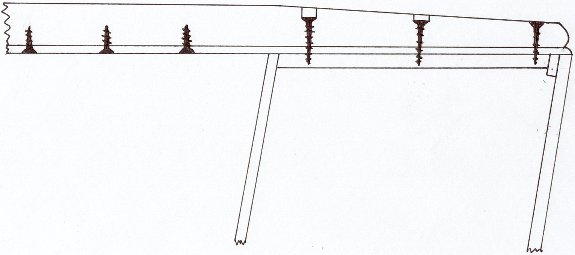
If you recall in the "Installing Sheer Clamps and Strong Backs" section I covered installation of "coaming anchors." The 1"x3" coaming anchors were mounted on each side of the motor well parallel to the clamp. They were positioned to be centered under the coaming. The purpose of the coaming anchors was to provide an initial point to attach the coaming that was strong and would allow for bending the coaming into place. The way this worked was to drill countersink holes in the coaming where the coaming anchor was. The coaming was then positioned and epoxied into place over the coaming anchors and three 3 1/2" silicon bronze Frearson head screws were screwed into the coaming anchors.

The next step was to screw and epoxy the coaming into place. My father helped me with this step but one person could do it. We started at the back of the cockpit and worked forward. First he would paint the top of the decking and the bottom of the coaming with pure epoxy. Then he would spread epoxy thickened to the consistency of ketchup. Next, he would grab the coaming at the front of the cockpit and bend it until it was in postion, flush with the edge of the decking. I then drilled a countersink hole in the bottom of the decking under the coaming and screwed in a #10 1 1/2" silicon bronze Frearson head screw. Screws were sunk every six inches. The entire process was repeated for the other side coaming piece.


After both side coaming pieces were installed I trimmed off the excess at the front of the cockpit, leaving one inch extending beyond the cockpit. This extra inch would eventually be occupied by the front coaming piece. The next step was to take some scrap 1/8" Luan plywood and cut a piece about 6" tall wide enough to just fit between the two side coaming pieces at the front of the cockpit. I held the piece of Luan level flush to the storage bulkhead. Using a pencil I marked the curve of the decking on the Luan using the decking as a guide. I then slid the Luan up, keeping it level, three inches and marked it again. Using my jigsaw I cut out a template for the front coaming piece. This template was shorter than what the actual piece needed to be. I used it to trace the outline of the coaming on my piece of 1"x6" Mahogany. Because the template was too short the lines were extended several inches. I cut the Mahogany 1"x6" with a jigsaw. Getting the final fit with the coaming piece was trial and error using a mitre saw to cut the excess off. The complex angles of the fit between the front coaming and the side pieces was of no concern. Epoxy has excellent gap filling properties. The next step was to sand the top and bottom of the front coaming piece. The top of it was then rounded with the router as was done for the side coaming pieces. The front coaming piece was then epoxied into place with epoxy thickened to the consistency of peanut butter after painting the bonding surfaces with pure epoxy.
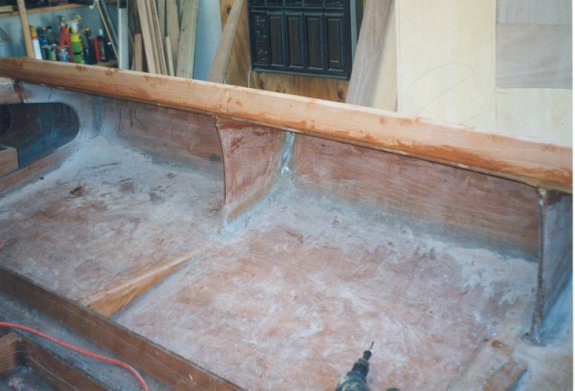
The final steps in the coaming installation process were to fillet the coaming/deck joints with peanut butter and to use the router to round-over the underside of the decking below the coaming. After drilling the hole for the gas tank fill I was ready to fiberglass sheath the deck.

The first step was to prepare the Mahogany boards. Three boards were used, two 12' 1"x3"s for the side coaming pieces and one 4' 1"x6" for the front coaming piece. The two side coaming pieces, which run from the front of the cockpit to the transom, were tapered their last two feet. The heigth of the pieces was reduced from 3" to 2" over the last two feet. Once installed the taper, which starts at the motor well and runs to the transom, adds to the aesthetics of the boat. After tapering the side coaming pieces I rounded the top edges with my router and a 3/8" radius bearing guided round-over bit.
If you recall in the "Installing Sheer Clamps and Strong Backs" section I covered installation of "coaming anchors." The 1"x3" coaming anchors were mounted on each side of the motor well parallel to the clamp. They were positioned to be centered under the coaming. The purpose of the coaming anchors was to provide an initial point to attach the coaming that was strong and would allow for bending the coaming into place. The way this worked was to drill countersink holes in the coaming where the coaming anchor was. The coaming was then positioned and epoxied into place over the coaming anchors and three 3 1/2" silicon bronze Frearson head screws were screwed into the coaming anchors.
The next step was to screw and epoxy the coaming into place. My father helped me with this step but one person could do it. We started at the back of the cockpit and worked forward. First he would paint the top of the decking and the bottom of the coaming with pure epoxy. Then he would spread epoxy thickened to the consistency of ketchup. Next, he would grab the coaming at the front of the cockpit and bend it until it was in postion, flush with the edge of the decking. I then drilled a countersink hole in the bottom of the decking under the coaming and screwed in a #10 1 1/2" silicon bronze Frearson head screw. Screws were sunk every six inches. The entire process was repeated for the other side coaming piece.
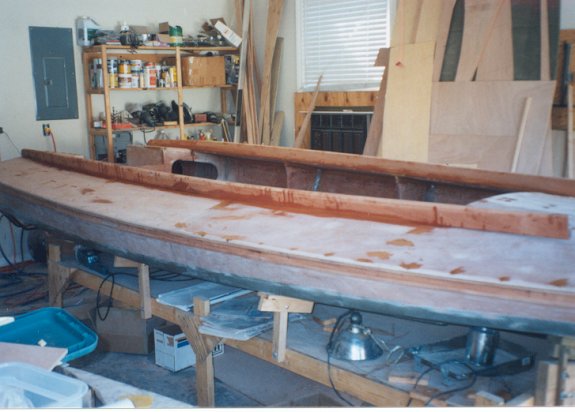
After both side coaming pieces were installed I trimmed off the excess at the front of the cockpit, leaving one inch extending beyond the cockpit. This extra inch would eventually be occupied by the front coaming piece. The next step was to take some scrap 1/8" Luan plywood and cut a piece about 6" tall wide enough to just fit between the two side coaming pieces at the front of the cockpit. I held the piece of Luan level flush to the storage bulkhead. Using a pencil I marked the curve of the decking on the Luan using the decking as a guide. I then slid the Luan up, keeping it level, three inches and marked it again. Using my jigsaw I cut out a template for the front coaming piece. This template was shorter than what the actual piece needed to be. I used it to trace the outline of the coaming on my piece of 1"x6" Mahogany. Because the template was too short the lines were extended several inches. I cut the Mahogany 1"x6" with a jigsaw. Getting the final fit with the coaming piece was trial and error using a mitre saw to cut the excess off. The complex angles of the fit between the front coaming and the side pieces was of no concern. Epoxy has excellent gap filling properties. The next step was to sand the top and bottom of the front coaming piece. The top of it was then rounded with the router as was done for the side coaming pieces. The front coaming piece was then epoxied into place with epoxy thickened to the consistency of peanut butter after painting the bonding surfaces with pure epoxy.
The final steps in the coaming installation process were to fillet the coaming/deck joints with peanut butter and to use the router to round-over the underside of the decking below the coaming. After drilling the hole for the gas tank fill I was ready to fiberglass sheath the deck.