BBSB Rehab Help

Latest Update:

-Remaining ribs removed
-All flotation foam removed
-Forward ribs installed
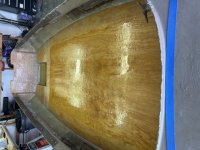
-Lots of grinding completed, much more to do..

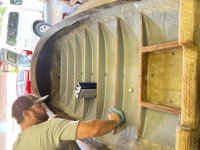
Originally, I was disappointed to see the top/bottom hull seam separation at the stern, but turns out it will make transom removal much easier. Notice the shim material under the ply transom. They appear to be some kind of synthetic material, maybe resin filler. It's either shims for poor fitment, or possibly a layer to keep the ply off the bottom. Either way the ply layers were not glassed to the transom or otherwise separated from the saturated foam.


IMG_3893.jpegIMG_3906.jpegIMG_3899.jpegIMG_3898.jpegIMG_3900.jpeg
 
Last edited:
Progress has been slow, but we are getting there.

-Finished building and installing ribs (minus last rib, going to spit it and frame in a small "bilge" area that accommodates the fuel tank against the transom)
-Removed and replaced transom.
-Cleaned and prepped hull flanges for reassembly

The best I can guess, we are adding 60-80lbs to this boat. The new mahogany ribs total weight is approx 25lbs, 1708 is 12lbs, 36lbs of epoxy, 1/2" ply floor, tape, etc, minus what we removed. We are definitely adding more than we removed. Double layer of 1708 soaked up A LOT of epoxy. I knew it would, but having never messed with it before, I had no idea how much. The ribs could have been smaller/thinner, but the payoff should be a tough hull.

Hopefully she will carry the extra weight well. We will soon find out..


IMG_4049.jpegIMG_4057.jpegIMG_4063.jpeg
 
Chad

Your work is outstanding. I see some very nice glass work and improvements far better than what was originally there. Keep up the good work.

Eric
 
No need to worry about hull flex or making a fiberglass "Taco" with all that teak glassed in!

Cant wait to see it back on the water
 
Wow, thanks for the compliments; that means a lot coming from y'all. We just hit the split in our duck season and are hoping to complete enough to get a few hunts out of her before the season ends. With slow epoxy cure times and only working weekends, progress is slower than we'd like. Fingers crossed!

.
 
We replaced and glassed the transom in, however we have not done the top of the transom. I do not know what material to use that will conform to the shape/sharp edges. The transom is covered, front/back with 8oz cloth and held in place with cabosil/epoxy fillets and 12oz biaxial tape.

What should I use to wrap the top? I want to go around the sides tying the transom to the coaming and then go over the top tying the back of the transom to the front..complete epoxy and glass encapsulation. We are using epoxy exclusively and have some 1708, 12oz biaxial and 8oz E-glass on hand. Would CSM work for this application?
IMG_4061.jpeg
 
Chad

I'm unclear on where you are wanting to put more glass. But in general woven cloth bends to a tight radius.

Eric
 
I'm talking about the very "top" of the transom, where the motor sits. The "motor notch" and the raised section to either side is still raw wood. I glassed the flat surfaces of front "face" and back of plywood transom before installation. Now that the transom is installed, I need to glass the motor notch area of the "top" of the transom.

The area is relatively flat, but has hard corners breaking over the back of the boat.
 
Fiberglass tape will work. You can make your own from with a fiberglass sheet and a utility knife with a straightedge. If the edge is "hard" a router with a 3/8" radius round-over bit will prep it for glass. You can do the same with a RO sander and a few minutes of work.

Eric
 
Once again, thanks for the advice.

We ended up widening the "motor notch" at the top of the transom. The stock notch was too narrow for the Yamaha, so we made a template and took another 1.75" out. We were able to get the top of the transom glassed in, however it took multiple attempts and looks terrible. Once the epoxy cures very well, we'll clean it up and see where we're at. I'm thinking another layer of glass and eventually an aluminum cap.. maybe.

We also finished building the well/bilge area at the transom and got it all glassed in. Glassing small areas of inconsistent/constantly changing shapes is tough. It looks terrible, but should work well.

The areas port and starb of the "bilge" will be covered with the floor. I agonized whether to add drain holes to those rear ribs, but ultimately decided to seal it up and hope for the best. Two layers of cloth, 3 coats of epoxy and eventually two coats of bilge paint should permanently seal it off. Fingers crossed..

The last major hurtle accomplished is the floor. It is shaped, beveled and glassed on one side. More to come..


IMG_4195.jpegIMG_4218.jpegIMG_4199.jpegIMG_4200.jpegIMG_4202.jpeg
 
Last edited:
Chad~


Wonderful workmanship all around. Nothing quite like putting stuff into "better than new" condition.


All the best,


SJS

 
Thomas added a new son to the family and moved into a new house, so progress on the ole' Madoc stalled out for a few months while he settled in. However, we are back on it now and made a bit of progress this weekend.

After adding 2 base layers of 1708, new ribs, overlapping layers of tape and two coats of epoxy, Thomas added two coats of bilge paint before we installed the floor. The bottom and ribs are very well sealed.

The floor is 1/2" marine grade fur ply. It's the best we could do without spending a ridiculous amount for shipping. None of the local supply houses had, or could get through their distributors, proper bs ply. The ply we used was beveled on all edges to meet the hull and was then fully encapsulated in 6oz cloth. Next, we andded two additional coats of epoxy, top and bottom. We installed the floor with thickened epoxy on top of all ribs and around the entire perimeter. Good squeeze out was observed. Once dry, all perimeter edges were feathered and the floor was bonded to the sides of the boat with 3 staggered/overlapping layers of biaxial tape.

We still have some cleanup and addition layers to add in the transom/bilge area, but at least we are moving again.
 

Attachments

  • IMG_5614.jpeg
    IMG_5614.jpeg
    332 KB · Views: 30
  • IMG_5616.jpeg
    IMG_5616.jpeg
    275.1 KB · Views: 29
  • IMG_5619.jpeg
    IMG_5619.jpeg
    346.2 KB · Views: 29
Chad

You guys have done an awesome job on the repairs. I have very much enjoyed seeing the transformation.

Thanks a million for all the advice! We are getting closer!

So far, with the exception of the transom doubler, we haven't used any screws/fasteners. There are no screws holding the floor to the ribs, only copious amounts of thickened epoxy and perimeter fillets and tape.

Perhaps I'm over thinking it, but is this a mistake? Should we add some screw through the floor into the ribs or is the epoxy bond strong enough?
 
Well, construction and test run complete. Test run went great. The empty boat will run 18mph with the 15hp motor. We'll play with the trim some more but Thomas was very happy with performance. The handling was much more predictable and "stable" now they the bottom isn't collapsing under the water pressure.

Since the last update we added another layer of 1708 glass to the bilge and transom. We glassed over the factory drain hole in the bottom of the boat and added a drain plug to the transom. We laid a 10" "abrasive" strip of 1708 on the "cutwater" then reinforced and added a bow eye.

Thomas did an "old school" camo job using Parker's. What's left? Grass rails, coaming reinforcement, hydro turf and electrical. Electrical will be a new switch panel, small light bar, bow/stern navigation and interior lights along with a bilge pump. I believe he is also going to have a custom dodger made. Hopefully we can get it all done before our general season starts.

IMG_1703.jpegIMG_6020.jpeg
IMG_6026.jpeg
 
Last edited:
Well, construction and test run complete. Test run went great. The empty boat will run 18mph with the 15hp motor. We'll play with the trim some more but Thomas was very happy with performance. The handling was much more predictable and "stable" now they the bottom isn't collapsing under the water pressure.

Since the last update we added another layer of 1708 glass to the bilge and transom. We glassed over the factory drain hole in the bottom of the boat and added a drain plug to the transom. We laid a 10" "abrasive" strip of 1708 on the "cutwater" then reinforced and added a bow eye.

Thomas did an "old school" camo job using Parker's. What's left? Grass rails, coaming reinforcement, hydro turf and electrical. Electrical will be a new switch panel, small light bar, bow/stern navigation and interior lights along with a bilge pump. I believe he is also going to have a custom dodger made. Hopefully we can get it all done before our general season starts.

View attachment 59004View attachment 59005
View attachment 59008
Chad~

Wonderful job all around! Congratulations!

re your next steps: As much as I am a Dyed-in-the-Wool Traditionalist - and think grass rails (aka thatch rails) look superb on any gunning vessel, I have come top appreciate webbing as a very practical alternative. Here is some on a Wrangler I did a couple of years back....

sm Wrangler 8 - Shooting frames up.jpg

A closer look - with Salt Hay:

sm Wrangler 11 - Thatch in webbing.jpg

I use heavy-duty 1-inch polypropylene (not nylon) webbing. It is fastened with s/s panhead machine screws or self-tappers through 1-inch s/s fender washers. The screws and washers are cleaned in acetone then sprayed with Rustoleum Self-etching Primer. They could/should also be top-coated with any camo spray as a final step. They are fastened every 10 or 12 inches. I prefer to use the machine screws with washers and nuts IF the underside of the deck can provide easy access. Self-tappers appear adequate otherwise. Depending upon what you will be using for "thatch" you can fasten the webbing tight to the deck - as for Salt Hay - or a bit looser for bulrush, cattail et cetera.

BTW: At the ends, I seal the cut edge with heat then fold them under (about1.5) inches. I "bore" the holes for the fasteners with a red-hot 16-penny finishing nail. (held in a Vise-Grip). Poke it through and wiggle it around a bit to get the right diameter hole. I can usually do 3 or 4 holes before I need to re-heat the nail with my torch.

Advantages of webbing over traditional thatch rails are: less weight; much less work; less cost; no risk of rot - and probably less grass (or whatever vegetation you are using) - so less weight on the vessel altogether. BTW: A friend has told me of webbing on a Marsh Hawk that has lasted at least 17 seasons.

Hope this helps!

SJS
 
Chad

I was hoping we'd get another update. That turned out fantastic. Seeing it in the water it looks to have a hull design that makes it rough water capable. What are your impressions of its handling abilities? Earlier in this thread @Thomas Riley mentioned the boat was a Madoc. Do you have any info on it? I looked through my small collection of old catalogs and couldn't find it but seem to remember seeing a similar boat years ago in a brochure or maybe in the back of Wildfowl Magazine.

I just went and looked in the Resources at the old Duckboat Specs section that Gary Morrison created back in the earliest days of duckboats.net (if you haven't looked in that section there is some neat stuff) and found the below picture. It seems to resemble your boat pretty closely.

oldguide.jpg
 
Chad~

Wonderful job all around! Congratulations!

re your next steps: As much as I am a Dyed-in-the-Wool Traditionalist - and think grass rails (aka thatch rails) look superb on any gunning vessel, I have come top appreciate webbing as a very practical alternative. Here is some on a Wrangler I did a couple of years back....

View attachment 59010

A closer look - with Salt Hay:

View attachment 59011

I use heavy-duty 1-inch polypropylene (not nylon) webbing. It is fastened with s/s panhead machine screws or self-tappers through 1-inch s/s fender washers. The screws and washers are cleaned in acetone then sprayed with Rustoleum Self-etching Primer. They could/should also be top-coated with any camo spray as a final step. They are fastened every 10 or 12 inches. I prefer to use the machine screws with washers and nuts IF the underside of the deck can provide easy access. Self-tappers appear adequate otherwise. Depending upon what you will be using for "thatch" you can fasten the webbing tight to the deck - as for Salt Hay - or a bit looser for bulrush, cattail et cetera.

BTW: At the ends, I seal the cut edge with heat then fold them under (about1.5) inches. I "bore" the holes for the fasteners with a red-hot 16-penny finishing nail. (held in a Vise-Grip). Poke it through and wiggle it around a bit to get the right diameter hole. I can usually do 3 or 4 holes before I need to re-heat the nail with my torch.

Advantages of webbing over traditional thatch rails are: less weight; much less work; less cost; no risk of rot - and probably less grass (or whatever vegetation you are using) - so less weight on the vessel altogether. BTW: A friend has told me of webbing on a Marsh Hawk that has lasted at least 17 seasons.

Hope this helps!

SJS
Wow, thanks for the great info! We will look at the webbing. That may very well be the solution I've been looking for on my fiberglass dodger.

The past few years I've been using garden netting with synthetic grass tied to it. I cut the netting to the shape and basically made a ghillie suit for the boat. Grassing the boat for the season consists of rolling the netting over the boat and fastening it down to the grass rails with zip ties. At the end of the season it's a simple matter of cutting a few zip ties, rolling the netting up and tossing it in storage until next season. It takes a half half hour or so put it on and take it off. It's not traditional but works well for the areas we hunt.

That's the direction we were headed with the Madoc but the strapping may be a great option too.
IMG_1394.jpegIMG_1413.jpegIMG_1535.jpeg
 
Chad

I was hoping we'd get another update. That turned out fantastic. Seeing it in the water it looks to have a hull design that makes it rough water capable. What are your impressions of its handling abilities? Earlier in this thread @Thomas Riley mentioned the boat was a Madoc. Do you have any info on it? I looked through my small collection of old catalogs and couldn't find it but seem to remember seeing a similar boat years ago in a brochure or maybe in the back of Wildfowl Magazine.

I just went and looked in the Resources at the old Duckboat Specs section that Gary Morrison created back in the earliest days of duckboats.net (if you haven't looked in that section there is some neat stuff) and found the below picture. It seems to resemble your boat pretty closely.

oldguide.jpg

I don't have any info other than what you have here. The Old Guide Duck Boat looks to be the same mold. When Thomas first bought this boat, Duckboat Specs was the first place I looked. Interesting tidbit, I'm actually in there under Mash boats with my Duckhunter. 20 years sure flew by..

Since starting this project, we've located two other Madoc boats. One of them belongs to a gentleman in Mass and he has the same boat as "ours." It's an H Model. Thomas actually flew to Mass on business and while there, met this gentleman in person. Very hospitable and showed Thomas a great time, taking him crabbing and fishing. The duck boat community is awesome.

Just the other day, another gentleman posted on Facebook with an "S" Model. This one is rigged for sailing complete with factory mast. That one appears to be in great shape. The s model posted on Facebook is serial 65-005. Thomas's boat is 65-004. Pretty cool coincidence. There are obvious variations and models, but I can't find any literature on them.
 
Back
Top