Black Brant Mod

Eric Patterson

Moderator
Staff member
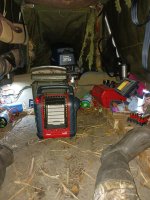
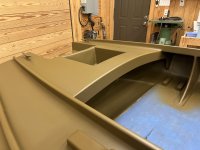
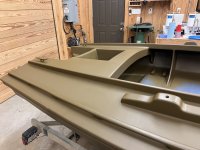
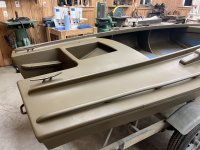
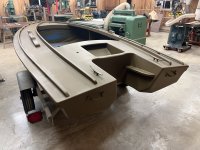
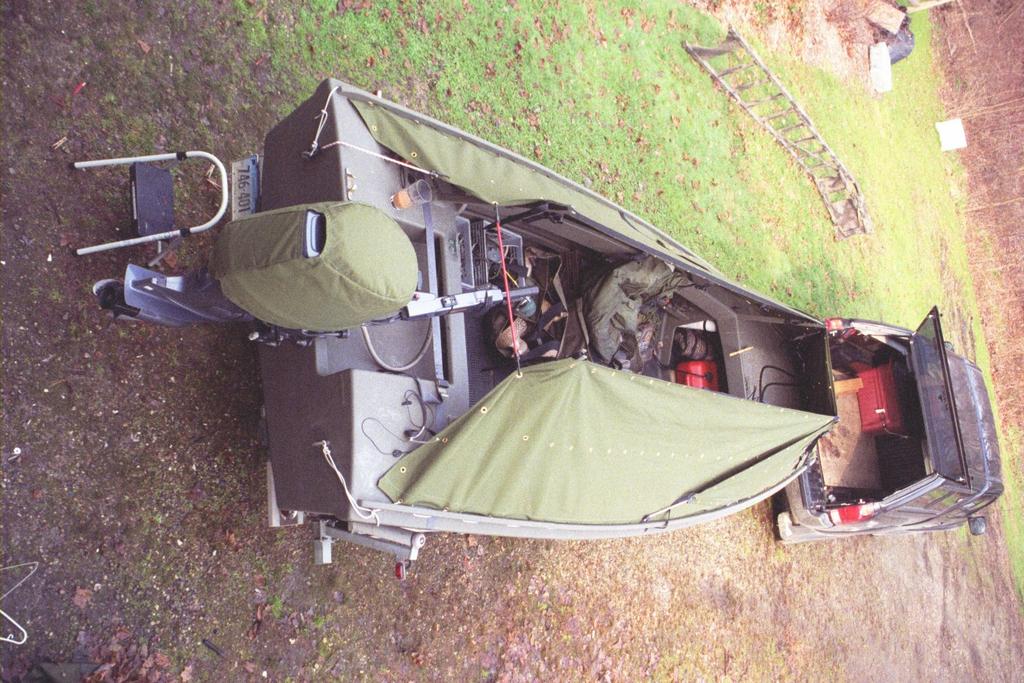
I spent the weekend playing with an idea for my Black Brant I've had for several years. That being adding a rear deck and splash well. With a friends help I was able to cut and fit all the main components that form a 20" front-to-back deck. We put the motor back on the transom and checked clearance. There is some interference if the motor is turned all the way and you raise the tilt to a high position. If you keep the motor straight there is no interference. I don't think this will be an issue. Next step is to disassemble, then sand and prep the areas that will receive epoxy. Then I'll epoxy the components in place and install the deck followed by glassing and finally paint, with a lot of sanding between all of those steps.

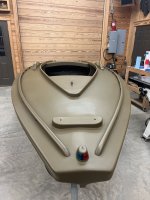
I'd love to hear from any Black Brant owners if they think they'd like or dislike a rear deck. My son doesn't like the idea because it removes room preventing a third gunner sitting low in the cockpit and he thinks it will make picking decoys up from the rear of the boat harder. I'm liking the additional storage and place to sit similar to the rear deck on my Broadbill. I'm also liking the idea of greatly reduced chance for a following sea splashing over the transom. The rear deck will eliminate that possibility in any sea I'd ever hunt.

What do you Black Brant owners think?

Eric


IMG_6006.JPG


IMG_6007.JPG


IMG_6008.JPG


IMG_6009.JPG


IMG_6010.JPG
 
Good morning, Eric~


I have no Devlin experience - other than reading his books cover-to-cover and admiring his Snow Goose especially. When you mentioned all that sanding, though....


One practice I have adopted when working with epoxy is to do as much "finishing" as I can with a freshly-sharpened scraper before going to sandpaper. It removes the high spots and runs - and saves lots of paper. And, it's kinder on my lungs.


I also finish off most coats with a foam brush or roller - to minimize the need for sanding as compared with a chip brush or the like.


I'm guessing you probably "discovered" these 2 ideas long ago - but, if not, I hope this helps!


All the best,


SJS


Steve


Thanks for those tips. I've used both in the past but had forgotten about the scraper trick. I can see using that one on this project. You also reminded me I'm out of foam rollers. Need to pick some up this week. Below is an Instagram story of the mod I'm making. Videos are only up for 24 hours and this one has been up since last night... Thanks.


Eric
 
Last edited:
Eric~


regarding the potential interference in shallow drive: Would these "prop guards" help? I had them made for South Bays but have not yet installed my first pair. They are 1/8-inch 316 s/s - intended to be "glued on" with 3M 5200 inside the notched stern - no mechanical fasteners or skin punctures. All the holes are designed to grab the 5200.


Balabus - Prop Guards.JPG


If you'd like to try a pair, just let me know and I'll mail them South.


All the best,


SJS

 
Steve

We are om the same wavelength in regard to the metal plates for protection. I think I have something that will work, but if not, I'll let you know. Thanks.

Eric
 
[font "Arial"]Couple things...[/font]

I have the splash well on the snowgoose drain with a single giant limber-hole through the transom. The splash-well board is aggressively cupped where it meets the transom to ensure self draining at all angles. When the well fills up with green water, having it go out, rather than into the bilge is nice.

Second, the snowgoose is larger, but I've used it in some pretty large seas, to that sort of evens things out... I'd suggest that the overall length of the well could be a bit shorter and still work well. Shortening up the length (increasing the angle) a bit and adding as large of a shelf at the front as would allow the motor to tilt fully would be what I'd do. When water comes over the transom it just keeps moving, having the shelf to catch it and send it the other direction is nice - plus it it nice to sit on.

Here is an old pic...
[font "Arial"]
JJkuGDB.jpg
[/font]
 
Last edited:
Tod

Thanks. That picture helps quite a bit. The bottom of my splash well is based on what I need for motor clearance we determined by mounting the motor and tilting/turning it. I'm working with leftover scraps and am not sure if I have a piece large enough to replicate your splash well, but I might. I am planning on a 7 - 9" wide deck in front of the well. I hadn't considered adding a lip the the top of the well like you have but really like that and will have to incorporate one into mine if I have enough plywood. Not sure I'll ever see water come that high but it would certainly turn away water headed for the cockpit.

Also, I had an idea for the front of the deck. I think I will make it overhang the bulkhead a couple inches and double thickness by epoxying a 2" strip underneath. This will give a nice fingerhold if I'm driving while sitting on the deck and I can attach a LED strip light underneath for some cockpit light for those early morning decoy deployments.

Almost forgot, if you look at my pictures above you'll see a black sharpie line on the floor underneath the new bulkhead. I'm thinking about removing the floorboard from there back to the transom. This will give me increased height for a little more storage which might help in certain situations, and it will give me access to the bilge and drain the cockpit area. As it is now the rear hatch has to be removed to get water out of the cockpit if the boat is launched.

Really appreciate the help.

Eric
 
Progress on the rear deck addition has been slowed by cold weather and competing interests but I've made some progress. All the components are epoxied in place and deck attached. The splashwell is underneath the deck at this point but soon the deck over it will be cut out with a router. More sanding, some glass, and more sanding again in my short term future. IMG_6092.jpeg IMG_6091.jpeg
 
Looks like I'm too late but I agree with your son. What I did to prevent following sees from coming in. PS; Not sure why the photos posted sideways. I did a drag and drop from my computer files.
20180516_172127.jpg
20180520_190914 (1).jpg
 
Dave

I found your solution while contemplating my rig. The one thing I've had problems with is when reversing hard with a weed fouled prop water boils over and in the area your solution wouldn't fix. It comes right in around the motor mount. Plus it gives a nice seat to sit on. I decided, given I have the Broadbill a third person can sit in, the benefits of the rear deck were attractive to me. Time will tell. But Thomas is firmly in your camp.
 
Last edited:
Dave

I found your solution while contemplating my rig. The one thing I've always had problems with is when reversing hard with a weed fouled prop is water boils over in the area your solution wouldn't fix. It comes right in around the motor mount. Plus it gives a nice seat to sit on. I decided, given I have the Broadbill a third person can sit in, the benefits of the rear deck were attractive to me. Time will tell. But Thomas is firmly in your camp.
Eric,
For me, the lower splash guard actually solves most of the back wash problem, but I do understand what you are saying. I was getting rain water draining into the cockpit, which was the driving force for the upper guards.

Lets just say, Thomas has a good head on his shoulders. :)
 
Dave

You hunt mostly solo, correct? What do you use that space for? For me it is mostly dead space that the tiller sweeps back-and-forth over. The one thing I do think I might not like is un-fowling the prop since you can't get as close as before, or maybe picking up decoys by backing straight into them. But then again the rear deck of the Broadbill doesn't give me grief. Time will tell.
Eric,
Yes, almost exclusively solo. The space allows me to reach the prop, retrieve decoys (I do use a pole for that) and rinse my pee cup. My blind set up is a tall blind which restricts access over the sides. The sides remain up even going down the highway. I remove the front and back panels except for when actively hunting.

I also use this boat for fishing. My electric trolling motor is mounted on a board secured thru the rear grab handle. Reaching and operating said trolling motor is already at the limit sitting about as close as I can to the transom. I use a bucket chair for a seat both fishing and hunting.

(still can't figure out the steps to rotate the photos)
 

Attachments

  • 20231019_111449.jpg
    20231019_111449.jpg
    370.2 KB · Views: 19
  • 20231101_063830.jpg
    20231101_063830.jpg
    281 KB · Views: 19
  • 20231015_120220.jpg
    20231015_120220.jpg
    306.8 KB · Views: 18
Click what I have circled in red. That will enable you to edit the image. I am thinking this tool isn't on mobile platforms. At least I can't find it on my iphone.
 

Attachments

  • EditImage.jpg
    EditImage.jpg
    352 KB · Views: 12
Dave

I can see your situation with the high side blind. I use camo under grass rails and it sounds like our rear deck needs are very different.
 
It may seem like the Black Brant rear deck mod and refurb was forgotten but that's not the case. Cool temps really hampered working with epoxy and progress took longer than I originally anticipated, but I've been working on it during duck season. In fact I've had multiple shop projects underway this duck season so all are crawling at a snails pace.

But alas, the Brant is almost done. All I have left is electricals and some of that is already done. The below pictures show the boat after the rear deck was epoxied in place, glassed over, primed and painted. With 20 days left in the season and the places we've been hunting not requiring a boat I'm not sure if I will user her this season, but going forward she's the new version I've had in my mind for some time.

IMG_6164.JPG
 

Attachments

  • IMG_6161.JPG
    IMG_6161.JPG
    218.3 KB · Views: 24
  • IMG_6162.JPG
    IMG_6162.JPG
    252.9 KB · Views: 21
  • IMG_6163.JPG
    IMG_6163.JPG
    256.3 KB · Views: 23
  • IMG_6165.JPG
    IMG_6165.JPG
    294.6 KB · Views: 24
  • IMG_6166.JPG
    IMG_6166.JPG
    268.1 KB · Views: 27
  • IMG_6167.JPG
    IMG_6167.JPG
    348.8 KB · Views: 26
  • IMG_6168.JPG
    IMG_6168.JPG
    280 KB · Views: 27
Last edited:
Eric. It came out beautiful! Excellent glass work, very impressive. I think it will accomplish al the intended goals.
 
It may seem like the Black Brant rear deck mod and refurb was forgotten but that's not the case. Cool temps really hampered working with epoxy and progress took longer than I originally anticipated, but I've been working on it during duck season. In fact I've had multiple shop projects underway this duck season so all are crawling at a snails pace.

But alas, the Brant is almost done. All I have left is electricals and some of that is already done. The below pictures show the boat after the rear deck was epoxied in place, glassed over, primed and painted. With 20 days left in the season and the places we've been hunting not requiring a boat I'm not sure if I will user her this season, but going forward she's the new version I've had in my mind for some time.

View attachment 53666
I've been following along on IG, really like that. I think you are going to really enjoy that. Seeing that work is getting me excited to refurb the snowgoose for the last stage of our life in Wyoming. Needs some sanding and paint and a little electrical work. Won't happen for a few years.
 
Back
Top