Mold Making - still learning......

Dave Diefenderfer

Well-known member
Sponsor

I have been messing with this off and on for a few years now. Some work good, some not so good. Still learning how to orient and mold so that the casts come out clean, and don't leak!

As the materials are not cheap, I try to make sure I have enough staged to use the entire kit within a few days to a week.....

These are not all mine. Some are plugs carved by others, making molds for them. Some are for me to increase my library of heads to be cast..... my shop therapy, and side hustle that supports my decoy and boat addictions......

IMG_6305.JPG

15 plugs are sanded, filled, and as good as can be (within reason). Multiple coats of lacquer are built up to get a "plastic" like finish. Just before the Rebound 25 silicone is applied, a release spray is applied.

IMG_6314.JPG

At this point 4 or more layers have been built up. After the first 2 coats are applied straight, a thickener is added to the silicone so that it does not flow and builds up faster. Getting it applied on undercuts and vertical surfaces, without introducing air bubbles is a challenge.

IMG_6363.JPG

After the silicone is cured, I wrap the molds in Saranwrap. Then the cardboard is set to support the first half of the mothermold. The saranwrap is a new step. I found that the epoxy would flow into creases and become shards that stab and puncture.

IMG_6379.JPG

Here the 2 halves of the mothermold are curing.

IMG_6414.JPG

Cardboard removed, molds trimmed while epoxy is still "green"

SWFX4485.JPG

Plexiglass base plates are made in case foam will be cast. This contains the foam and makes a denser casting. A pour hole is drilled in the plexiglass and it is either clamped or bolted to the fiberglass mothermold.

IMG_6441.JPG

These are some of the molds being filled. I used Feather Lite which is a 2 part filled resin that does not expand, so the fiberglass is only used to support the mold.


IMG_6440.JPG

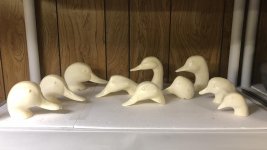
These are the "first" casts from each new mold. The 3 hooded merg heads where carved by Bob Romstadt. The left is a Herters goose, and the right is some magnum head a friend sent me.

IMG_6413.JPG

In this picture more "firsts".... Herters 72 diver, puddler, a Super mag diver, in the middle are a couple mallard/black heads, then a Restle brant, and an odd brant in the backrow. The Lake Champlain Whistler and the Woodduck heads are carved by John Bourbon, and finally the Herters 63 coot.
IMG_6442.JPG
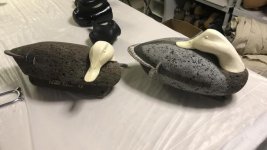
I picked up 17 of these cork bodies in Bolivar, OH last year, there were only 4 heads. 3 sleepers and one drinker like on the left. I picked the best 2 and used them as the plugs for this mold. I cast all the heads in the new molds with Smooth-on Feather-Lite, which I have used for all the heads I have cast thus far. It is too expensive and heavy for the really big heads, but some of these were made for others with the understanding that I can make a mold for my use/reproduction. So I wanted a robust plug to keep in my library. Having used up all my material, I just found out that due to supply chain issues, Feather-Lite maybe in short supply. I have both 4lb and 8lb foam on hand, so I will learn the swish coating and foam process on the bigger molds.

I also have 5 or 6 body molds to make next, so plenty of shop time now that the season is done.

Yesterday, I brought in all the decoys, so the shelves are full again, and the bags are standing near the dehumidifier to dry before they get binned and stored until next Fall.

Something I was instructed to do was to grind up the scraps and old molds and use the grindings as filler in the 3rd or more coats, after the detail coats have set up, to extend the Rebound 25. So I will break out the sausage grinder and give it a go on the bodies as they have little detail anyway.
IMG_6413.JPG
 
Last edited:
Just trying to follow along so by the picture
1 The plug carved wood covered with a black release material?
2 Plug covered with pink rubber?
3 Mold attached to cardboard is the plug still there or is the mold now in 2 pieces?
4 Mold covered with fiberglass?
5 Mold with more fiberglass?
6 Is that a clear sheet of kydex type material?
7 Mold covered with the kydex and fiberglass?
8 Foam heads
About how many hours work to do all that you have done?
Nice Job.
 
Dave , Have you any experience with molding a one piece head and body mold? I have built head molds like yours . Im considering a low head GWT as a one piece design. Not sure if its practical but would appreciate your thoughts. my goal is a large rig of 300 teal for a fixed location in LA.
 
Bob, a one piece will certainly work, so long as you consider the number/extent of undercuts, and build up the silicone appropriately. If the silicone is thin enough to stretch the decoys are easy to release. I will be making a couple molds for the INVADM "Flattie" decoys. This is 1 piece decoy where the head is tucked.
 
thanks i was thinking that i would have to pay attention to the release of the final product. Also i usually pour different densities in the head vs body so i might end up with a weak bill. im aware of the INVADM decoys . interesting project.
 
Very nice job of standardizing production technique, as well as illustrating your process. IF I understand you correctly, you are making the entire head via Featherlite? I assume you paint coat is Behr, are you using a primer? How does Featherlite hold paint over the long haul? How much does a solid resin head effect balancing the decoy?


Bob, if you keep the Rebound 25 layer at about 3/8" thickness it will stretch enough to clear the bill portion of the head the the tail portion of the body from the mold. Keep in mind that you will be making a resin pour first which will settle into the head bill area quite quickly if you don't shift the mold around to achieve a uniform coat. Two things can result, an off-balance decoy that is bill heavy or a very thin resin shell over your foam pour. I use an old hair drier to heal the mold exterior after the resin pour to aid in setting the bond when the foam pour is made. I use 8lb density foam which is about softwood density. You can make a straight-up 16lb density head, but I prefer a resin bill area to minimize eventual abrasion damage and offset the dog or me stepping on a head and snapping the bill off. Since this is an exothermic reaction, the more decoys you pour the less elasticity the mold will still retain. I clear the tail first and then peal the mold forward to offer me the most options as I clear the head and bill.

If you end-up with an air pocket under the resin skin, drill a pour hole and use Gorilla glue injected to fill it. If you add a little water it will foam and expand, making a very solid repair.
 
Last edited:
Good morning Rick, For these first pours I did you Feather Lite, solid heads, which are too heavy for anything as large as the 72s and larger. Too expensive too.... For all the smaller/63s, lifesize heads, the Feather Lite has served me well. It does take some prep to make paint stick. I first scrub with hot water, a scotchbrite, and simple green until the water no longer beads up. Then I paper towel dry, flash with a torch, wipe with acetone, and then spray with etching primer while still warm. After a couple days cure, I restle and paint.

I'll be ordering more Feather Lite today, along with the Onyx black..... fast cure I assume? I have 8lb foam and 4lb on hand.
 
For some historical perspective check out images of
KD decoys from MN
Rose folding decoy
JW renyolds
I think the goal at the time was weight savings from the wood blocks of the day
 
really cool Dave. Yet another project that has bounced around in my head for years has always been making foamers from a mold of a decoy I carved, but like most of them is tabled due to lack of time !
 
Bill Embacher said:
really cool Dave. Yet another project that has bounced around in my head for years has always been making foamers from a mold of a decoy I carved, but like most of them is tabled due to lack of time !

See Bill, you are the artist, I am the engineer! As a Process Engineer, I get into the figuring out the right combinations, and improving my methods.... the thought of carving the original is very overwhelming for me.
 
Dave Diefenderfer said:
Good morning Rick, For these first pours I did you Feather Lite, solid heads, which are too heavy for anything as large as the 72s and larger. Too expensive too.... For all the smaller/63s, lifesize heads, the Feather Lite has served me well. It does take some prep to make paint stick. I first scrub with hot water, a scotchbrite, and simple green until the water no longer beads up. Then I paper towel dry, flash with a torch, wipe with acetone, and then spray with etching primer while still warm. After a couple days cure, I restle and paint.

I'll be ordering more Feather Lite today, along with the Onyx black..... fast cure I assume? I have 8lb foam and 4lb on hand.

That has been my only issue; paint retention, which seems to vary from batch to batch. I now use lacquer thinner, then an acetone wash, Scotch-brite green pad used to exhaustion and then another acetone wash. Is auto adhesion promoter the same as etching primer? I use a brad point bit to drill the eye sockets out and replace with epoxied-in glass eyes-8mm to 10mm mostly from shoepfereyes.com purchased when on sale. I just ordered foam to make some mallard heads from a plug I carved. I have fourteen black cork magnum bodies that are really nice, fine granule, black cork that I want to finish. These will have tail boards with inletted wood primaries to help protect them they will be epoxy sealed.
 
Last edited:
Back
Top