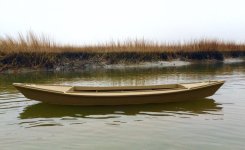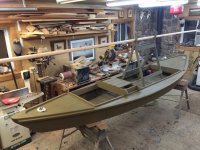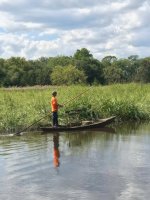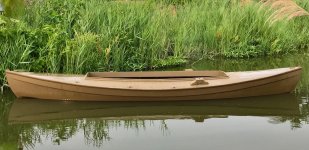

Newest double ender

That's a really nice finish Jode. Do you roll, brush, or squeegee the resin? I know you said you did a lot of sanding and fairing in between coats.
Thanks. I belt sanded entire hull twice, mainly to fill all of nail holes and to fair out a few high and low spots.

When it came time for glass the 4" tape and 60" 6 OZ fabric was done at one time, wet out together. No epoxy on the hull prior to this. I think the wet on wet layup gives the best bonding. The epoxy was poured on and worked around with 6 inch squeegee. My goal is always to saturate the cloth but not have any extra. After the first coat dried a second coat was rolled on. I used a foam roller. It was about 12 hours later while the first was still "green".
I let the second epoxy coat dry well and then scuffed sanded it good with a 6" RO and 120 grit. Paint went on after that.
 
Last edited:
Looks like a photo that should be in a magazine, with the fireplace and decoys hanging it gives a sense of a good workspace to ease the mind through the therapeutic craftsmanship.

Great work Jode as always.
Thanks Ben, The shop is defiantly filled with "tools of the trade" it is a great place to work.
 
Thanks. I belt sanded entire hull twice, mainly to fill all of nail holes and to fair out a few high and low spots.

When it came time for glass the 4" tape and 60" 6 OZ fabric was done at one time, wet out together. No epoxy on the hull prior to this. I think the wet on wet layup gives the best bonding. The epoxy was poured on and worked around with 6 inch squeegee. My goal is always to saturate the cloth but not have any extra. After the first coat dried a second coat was rolled on. I used a foam roller. It was about 12 hours later while the first was still "green".
I let the second epoxy coat dry well and then scuffed sanded it good with a 6" RO and 120 grit. Paint went on after that.
I do it the same way. You must be a more patient guy than I, as my boats always end up with a bump here, a drip there. :)
 
You are a better photographer as well. (y)
That comes from many years of trying find best angle to take pictures of Decoys! Lol

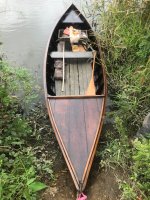
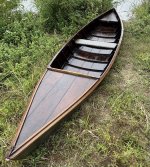
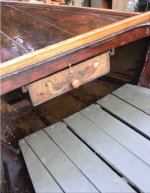
Quick recap of tonight's work. My son and I got her flipped over. I chose a farrier's rasp to take down the edge of overhanging fiberglass where it exceeded the gunnel. I guess all those years of filing laminate layups in the cabinet shop have paid off!

After the bulk of the trimming was done, I then used a belt sander to round over edges, clean up overhangs, and fair up the tops of the gunnels as best as possible.

During a previous refit, the fiberglass had been wrapped over the gunnel edge. This trapped a lot of water. It led to dry rot, wet rot, and poor overall condition of that area.

I cut out the worst spots and fit in new Cedar patches.

For those areas that were not damaged enough to require a patch you will see a few areas of tape "dams" to retain a the fiberglass putty which I will then sand and fair.

The side deck nail holes were filled, and then the decks given a coat of epoxy.

I will let everything dry well. I will give it a good sanding and then put on a final coat of paint on the inside and the side decks.

-Areas yet to be done, include the rub rail, new removable floor, and a gunners seat.
 

Attachments

  • IMG_9460.jpeg
    IMG_9460.jpeg
    624.3 KB · Views: 21
  • IMG_9461.jpeg
    IMG_9461.jpeg
    522.3 KB · Views: 20
  • IMG_9462.jpeg
    IMG_9462.jpeg
    348.7 KB · Views: 21
  • IMG_9463.jpeg
    IMG_9463.jpeg
    309.4 KB · Views: 21
That comes from many years of trying find best angle to take pictures of Decoys! Lol

Quick recap of tonight's work. My son and I got her flipped over. I chose a farrier's rasp to take down the edge of overhanging fiberglass where it exceeded the gunnel. I guess all those years of filing laminate layups in the cabinet shop have paid off!

After the bulk of the trimming was done, I then used a belt sander to round over edges, clean up overhangs, and fair up the tops of the gunnels as best as possible.

During a previous refit, the fiberglass had been wrapped over the gunnel edge. This trapped a lot of water. It led to dry rot, wet rot, and poor overall condition of that area.

I cut out the worst spots and fit in new Cedar patches.

For those areas that were not damaged enough to require a patch you will see a few areas of tape "dams" to retain a the fiberglass putty which I will then sand and fair.

The side deck nail holes were filled, and then the decks given a coat of epoxy.

I will let everything dry well. I will give it a good sanding and then put on a final coat of paint on the inside and the side decks.

-Areas yet to be done, include the rub rail, new removable floor, and a gunners seat.
Good morning, Jode~

As it happens, I will be installing a U-bolt/bow eye on my Top Secret Tuckerton Vessel (code name: Model 26) later this morning. In your third photo, it looks like you have a similar piece of hardware right inside your stem. I am wondering if it is a conventional U-bolt - backed up with nuts and washers (or a backing plate) for which you back-bored through the stem - or is it a really big staple ? - driven into the stem ?

Finally, what wood will you use for the rubrails?

All the best,

SJS
 
Good morning, Jode~

As it happens, I will be installing a U-bolt/bow eye on my Top Secret Tuckerton Vessel (code name: Model 26) later this morning. In your third photo, it looks like you have a similar piece of hardware right inside your stem. I am wondering if it is a conventional U-bolt - backed up with nuts and washers (or a backing plate) for which you back-bored through the stem - or is it a really big staple ? - driven into the stem ?

Finally, what wood will you use for the rubrails?

All the best,

SJS
Good morning Steve, that sounds like a cool project! I can't wait to see the unveiling.

There was a bow eye existing in the front of this boat. It was a bronze threaded U-bolt bored into the stem and bolted through the inner stem.

I wanted to add one to the Stern as well. It just so happened I saved an Identical one off the last Barnegat project that I had to scrap.

It also had the threaded ends.

However, the stern mahogany stem was in fine condition and I did not want to bore into it for the bolts. So in this case, I simply drilled an appropriate size hole and fastened this eye with thick epoxy.

As rail boats are generally towed from the front I figured the rear bolt just being bedded with epoxy would be plenty strong enough. Hopefully, I am right.


For the rub rails, I am planning on 16 foot single piece white cedar.

I know it may not be as durable as something like ash or sassafras. But I have a source who can cut me a single long length. And I prefer not to have any joints if possible in this detail.

I have not had good luck with them in the past.
 
A big thanks to Sharp eyed Bobby Keeney for the lead on my latest resto candidate.

An early Alvin Beal ( Canton NJ) rail skiff. All mahogany and white cedar. She needs some TLC but should be a nice worker in the rice.

All mahogany and white cedar construction. She was found by the seller behind a barn only 2 miles from where she was originally built in Beals shop. I'm planning on having her in shape for Septembers Tuckerton show.
Spent the day painting decoys in 102° shop. 🔥🔥

It Wasn't terrible with the fan blowing, but boy even the oil paint was drying fast!

A whole 10° cooler this evening so I spent a couple hours working on the skiff.

It received the final coats of paint and varnish. I also built the removable cedar floor. The Floor underside is painted, I will do the top another day.

To Build the gunners seat will be the final step, then she's ready for water trials.
 

Attachments

  • IMG_9478.jpeg
    IMG_9478.jpeg
    528.7 KB · Views: 22
  • IMG_9479.jpeg
    IMG_9479.jpeg
    382.7 KB · Views: 22
Spent the day painting decoys in 102° shop. 🔥🔥

It Wasn't terrible with the fan blowing, but boy even the oil paint was drying fast!

A whole 10° cooler this evening so I spent a couple hours working on the skiff.

It received the final coats of paint and varnish. I also built the removable cedar floor. The Floor underside is painted, I will do the top another day.

To Build the gunners seat will be the final step, then she's ready for water trials.
Good morning, Jode~

Gorgeous - congratulations!

Of course, I have a question: Which (as my landlubber friend would ask about any canoe....) is the "front bow" and which is the "back bow"? I am guessing the stern is to the left in your photo. And, I did not see the "curb" (toe rail) in your BEFORE photos. What is its purpose/how is it used? Does it help the poler brace his/her feet?

All the best,

SJS
 
Good morning, Jode~

Gorgeous - congratulations!

Of course, I have a question: Which (as my landlubber friend would ask about any canoe....) is the "front bow" and which is the "back bow"? I am guessing the stern is to the left in your photo. And, I did not see the "curb" (toe rail) in your BEFORE photos. What is its purpose/how is it used? Does it help the poler brace his/her feet?

All the best,

SJS
Hi Steve, you have a well trained eye! Yes, the stern is to the left in the photos.

And the toe rail is essential for bracingwhile pushing.

It was not present on the original craft.

However, for thick rice and heavy work, I find it to be a necessary addition
 
Wow. That's an incredible transformation.
Thank you, Eric.

She is starting to take her shape nicely.

I'm looking forward to making the seat which will incorporate several of the design features. I have learned over the years. It will have a shell holder as well as an area for bagged birds.
 
Jode,

My goodness the progress on this vessel from "Then to Now" in such a short period of time is amazing. There is something about a boat shop in the heat of Summer that is like no where else. The sights, the sounds, the aromas & smell not to mention the longer days of sunlight it just all blends in a natural way. Obsession has it's rewards...AYY.

Best regards
Vince
 
A big thanks to Sharp eyed Bobby Keeney for the lead on my latest resto candidate.

An early Alvin Beal ( Canton NJ) rail skiff. All mahogany and white cedar. She needs some TLC but should be a nice worker in the rice.

All mahogany and white cedar construction. She was found by the seller behind a barn only 2 miles from where she was originally built in Beals shop. I'm planning on having her in shape for Septembers Tuckerton show.
July 4 update!

I spent a couple hours this morning before it got too hot working on the gunning seat. This is probably my most enjoyable part of the build.

Its general design was shared to me from two seasoned Rail birding friends. Frank Bennett and Rick henderson.

It is movable, therefore, it allows one to move the gunner for better weight distribution, depending on their size.

It also has side compartments. One for bagged game, the other for shotgun shells or a drink.

The bottom of the seat will be enclosed with quarter inch hardware mesh. That allows any blood, rice or water to drain through while still keeping things secure.

We are having a small get together today and my wife requested Shop space for drinks and food serving.
When my son and I moved the boat outside, I was pleasantly surprised that she is extremely light for a wooden boat of her size. Probably between 110 120 pounds.( I am thinking she is towards the lighter end of the spectrum.)

I didn't used to mind things like vessel weight. But the older I get the more I am conscious of it.

I kept this in mind throughout the build and generally chose lighter woods, like white cedar and sassafras for any replacement work.

The last touches are to paint the seat and to install the rub rail. The 16 foot clear cedar should be sawn this week from standing dead wood.
 

Attachments

  • IMG_9494.jpeg
    IMG_9494.jpeg
    443.2 KB · Views: 19
  • IMG_9495.jpeg
    IMG_9495.jpeg
    569 KB · Views: 19
Jode,

My goodness the progress on this vessel from "Then to Now" in such a short period of time is amazing. There is something about a boat shop in the heat of Summer that is like no where else. The sights, the sounds, the aromas & smell not to mention the longer days of sunlight it just all blends in a natural way. Obsession has it's rewards...AYY.

Best regards
Vince
Vince, you are right! After a long day of painting Decoys, it was nice to decompress and just play around with some Boat work.

I would love to have one in the shop all the time.

What is that saying about when you love what you do...........?
 
July 4 update!

I spent a couple hours this morning before it got too hot working on the gunning seat. This is probably my most enjoyable part of the build.

Its general design was shared to me from two seasoned Rail birding friends. Frank Bennett and Rick henderson.

It is movable, therefore, it allows one to move the gunner for better weight distribution, depending on their size.

It also has side compartments. One for bagged game, the other for shotgun shells or a drink.

The bottom of the seat will be enclosed with quarter inch hardware mesh. That allows any blood, rice or water to drain through while still keeping things secure.

We are having a small get together today and my wife requested Shop space for drinks and food serving.
When my son and I moved the boat outside, I was pleasantly surprised that she is extremely light for a wooden boat of her size. Probably between 110 120 pounds.( I am thinking she is towards the lighter end of the spectrum.)

I didn't used to mind things like vessel weight. But the older I get the more I am conscious of it.

I kept this in mind throughout the build and generally chose lighter woods, like white cedar and sassafras for any replacement work.

The last touches are to paint the seat and to install the rub rail. The 16 foot clear cedar should be sawn this week from standing dead wood.
Jode~

Ahaaa....everything is now falling into place. I had wondered about the cockpit shape but now see that the parallel-sided opening allows the seat to be placed anywhere along its length.

I was surprised at the scantlings of the seat frame - they seem heavy. However, I can imagine that the AWC needs the thickness for the strength to support a shooter - swiveling hard to port and starboard in an endless barrage at continually flushing Soras, Virginias and Clappers.

BTW: Does your shooter usually shoot from the seat? or does he/she stand sometimes?

pushing-for-rail-thomas-eakins.jpg

Great job all around!

SJS
 
Jode~

Ahaaa....everything is now falling into place. I had wondered about the cockpit shape but now see that the parallel-sided opening allows the seat to be placed anywhere along its length.

I was surprised at the scantlings of the seat frame - they seem heavy. However, I can imagine that the AWC needs the thickness for the strength to support a shooter - swiveling hard to port and starboard in an endless barrage at continually flushing Soras, Virginias and Clappers.

BTW: Does your shooter usually shoot from the seat? or does he/she stand sometimes?

View attachment 77361

Great job all around!

SJS
Hi Steve, yes Beal boats are somewhat atypical in there deck stylings. But it does have some advantages like seat positioning.

The seat framing is heavy 5/4. Yes, I left thick to hold up better to shooter weight.

I thought about using mahogany but decided the lighter white cedar I had on hand was my preference.

Sitting or standing is up to the Gunner.

Early season rice that is very tall necessitates standing. However, some of my older friends prefer the secure feeling of sitting during the late season when possible. Easier on the knees and less chance of taking a swim!

I don't mind either way, as Rail Hunting is a gentlemanly undertaking and producing maximum bag limits is never the goal.
 
Last edited:
Back
Top