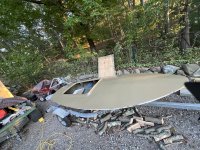
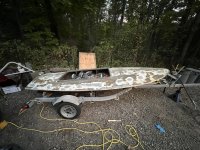
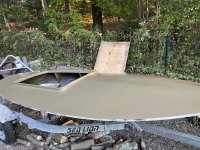
I have classic barnegat I’m fixing up all the wood was rotted off. Any ideas for a synthetic rub rail that won’t break the bank. Or does anybody know what wood was used it’s from the mid 90’s.
You are using an out of date browser. It may not display this or other websites correctly.
You should upgrade or use an alternative browser.
You should upgrade or use an alternative browser.
Rub rail
- Thread starter Kennyt004
- Start date
Steve Sanford
Well-known member
Kenny~I have classic barnegat I’m fixing up all the wood was rotted off. Any ideas for a synthetic rub rail that won’t break the bank. Or does anybody know what wood was used it’s from the mid 90’s.
Nice workmanship!
I have made rub rails from White Oak, White Ash, treated (Southern Yellow Pine) lumber, Philippine Mahogany, PVC "lumber" (e.g., Azek) and Pine half-round molding. I have not purchased the black PVC rubrail used on so many factory boats.
Do you need a tough rubrail - as in banging into docks et cetera? Or do you want to provide a finished look to your "feather edge" - that won't rot?
I used Mahogany on CANVASBACK.

Half-round molding on SWEET GHERKIN

Treated lumber on JAMES CAIRD.

For your vessel, I would consider Azek (or similar). Unfortunately, it is expensive and usually comes only in 18-foot lengths. I used it on my re-built porch - between the deck and the ground so it would never rot or need paint.

However, you could also use it for a toe rail on your foredeck to hold the lower edge of a spray dodger (aka breakwater).
Note that I used panheads and did not countersink - because this "lumber" has little strength. I snapped my first attempt at the centerline where the radius was tighest. (Note no screw dead center on this one!) PVC will however take the small screws /studs needed to attached the hem of the dodger.

BTW: I do not recommend Trex. I used it once at a customer's request (for thatch rails). It is very heavy and seems somewhat brittle.
BTW2: If you opt for treated, I recommend inch (finished 3/4"). Look for boards that are virtually clear and where there is little "run out" in the grain. Pre-drill for your fasteners (s/s flathead screws) and bed the rails in 3M 5200.
Hope this helps!
SJS
Thank you my intention was to have a nice look and protect the fiberglass hard edge the way this cap is designed. My intent was you use Ipe which I made the back rest/driving bench out of but I cannot get it to bend might try to thin it out some more. Prob going to go with white oak strips just need to find decent lengths.
How far forward is the top of the dogger front the cockpit opening on the vertical. I bought one of Diane’s small dodgers from NJ I’m hoping to find a fiberglass rod “tent pole” “fish stick” instead of using a stick to hold up the peak.
How far forward is the top of the dogger front the cockpit opening on the vertical. I bought one of Diane’s small dodgers from NJ I’m hoping to find a fiberglass rod “tent pole” “fish stick” instead of using a stick to hold up the peak.

Steve Sanford
Well-known member
Good morning, Kenny~
Good for you! I was going to advise you - with whatever material you chose - to begin fastening up forward, at the tightest bend, then work aft.
Spray canvas looks great as well. Here is how I make my struts - to hold it up.

Bottom is notched to fit snugly onto toe rail. You could attach a small chock on your foredeck for this purpose. The hole is for my forefinger so I can pull up on the strut to release it.

I usually have to trim the notch by trail-and-error before I get just the right snugness. I do not want it popping out under way.

To deploy or release the strut, I push the bottom into or out of place from the left or right - not straight in or out.

I have a bow (made from conduit) on my upper edge - which provides a bit more protection by holding the canvas further out than a traditional spray canvas (breakwater). So, the upper end of the strut is notched to fit the bow .
Since you have a hole and grommet in your canvas, you could make a strut out of flat lumber (as I have) and insert a 1/2-inch dowel in the end. With the lower end cut just the right length, you can make your dodger nice and taut.

A pocket in the canvas holds it in place.

BTW: Do you plan any deck hardware? I will be installing 6-inch cleats fore and aft on a South Bay later today. They always get backed up below decks with a piece of half-inch AC plywood - plus s/s fender washers and nylocks. I want to be able to lift the whole vessel by the cleats alone if necessary (and I often do in the shop) - and they are always handy around a dock.
Keep up the fine work!
SJS
Good for you! I was going to advise you - with whatever material you chose - to begin fastening up forward, at the tightest bend, then work aft.
Spray canvas looks great as well. Here is how I make my struts - to hold it up.
Bottom is notched to fit snugly onto toe rail. You could attach a small chock on your foredeck for this purpose. The hole is for my forefinger so I can pull up on the strut to release it.
I usually have to trim the notch by trail-and-error before I get just the right snugness. I do not want it popping out under way.
To deploy or release the strut, I push the bottom into or out of place from the left or right - not straight in or out.
I have a bow (made from conduit) on my upper edge - which provides a bit more protection by holding the canvas further out than a traditional spray canvas (breakwater). So, the upper end of the strut is notched to fit the bow .
Since you have a hole and grommet in your canvas, you could make a strut out of flat lumber (as I have) and insert a 1/2-inch dowel in the end. With the lower end cut just the right length, you can make your dodger nice and taut.
A pocket in the canvas holds it in place.
BTW: Do you plan any deck hardware? I will be installing 6-inch cleats fore and aft on a South Bay later today. They always get backed up below decks with a piece of half-inch AC plywood - plus s/s fender washers and nylocks. I want to be able to lift the whole vessel by the cleats alone if necessary (and I often do in the shop) - and they are always handy around a dock.
Keep up the fine work!
SJS
I have one cleat on the bow deck just forward of the dodger that is way off center apparently..(was already there) ….Iam thinking some vertical cam cleats to tension the dodger.
I anchor typically with the bow hook and there are stainless handles in the transom I tie of to.
What is that push pole from?
I anchor typically with the bow hook and there are stainless handles in the transom I tie of to.
What is that push pole from?
Steve Sanford
Well-known member
Kenny~
Cleats
I usually have 4 cleats on a duckboat:
- 1 6-inch cleat (galvanized) on centerline of foredeck - about half-way forward
- 1 6-inch cleat (galvanized) on centerline of sterndeck - about half-way aft
- 1 4-inch cleat (galvanized or nylon) amidships on both port and starboard decks
For the 6-inch centerline cleats, it's important - in my view - to have them very strong and backed up below decks. I use 1/2-inch AC plywood for backers and I use s/s fender washers and nylocks on the machine screws. I want to be able to lift the entire vessel by these cleats - and commonly do when in the shop. (NOTE: I show the cleat mounted through a thatch rail but you can mount right to the deck.) At a dock etc I use 1/2-inch (or sometimes 3/8) line to secure the boat.

The amidships cleats allow me to "anchor" sideways to the bog whilst gunning. I tie from the oarlock stanchion (pipe in the photo below; on the inside face on the wooden oarlock stanchions shown on my Sneakbox in my previous post).
As you can see, I drive a "staub" (marsh spike, bog stake etc) into the marsh. I leave it in place throughout the hunt and tie off to the boat with 1/4-inch line - thus the reason for just 4-inch cleats amidships.

Push Pole
The push pole is an 11-foot length of closet pole - usually 1-5/16-inch diameter. On the bottom end I mount a Herter's Duckbill Pushpole Head - or modern equivalent: https://www.hhlure.com/products/duckbill-head-attachment?variant=5974690180

I tie a Turks Head on the upper end to let me know when I've run out of pole.

I secure the push pole with my "chock and bail" system. The bail is heavy galvanized wire covered with a 12-inch length of fuel line to prevent chafe (and rattling). It is mounted up forward on the deck and allows the gunner - even when standing at the helm - to push the upper end of the pole through a generously-sized "target".

The chock is mounted aft on the deck and allows the gunner - even when standing at the helm - to drop the lower part of the pole into it. The radius of the slot in the chock is about 1-3/8-inch - a bit larger than the diameter of the pole itself.
The loop of shock cord is used only when trailering or crossing the bay. It keeps the pole from inching backward. I have lost 2 poles because I was not paying attention and my wake caught the head and dragged the whole push pole aft without me noticing. (One pole was returned to me, however, when the "beachcomber" who found it washed ashore saw my brand and tracked me down.)

Hope this helps!
SJS
Cleats
I usually have 4 cleats on a duckboat:
- 1 6-inch cleat (galvanized) on centerline of foredeck - about half-way forward
- 1 6-inch cleat (galvanized) on centerline of sterndeck - about half-way aft
- 1 4-inch cleat (galvanized or nylon) amidships on both port and starboard decks
For the 6-inch centerline cleats, it's important - in my view - to have them very strong and backed up below decks. I use 1/2-inch AC plywood for backers and I use s/s fender washers and nylocks on the machine screws. I want to be able to lift the entire vessel by these cleats - and commonly do when in the shop. (NOTE: I show the cleat mounted through a thatch rail but you can mount right to the deck.) At a dock etc I use 1/2-inch (or sometimes 3/8) line to secure the boat.
The amidships cleats allow me to "anchor" sideways to the bog whilst gunning. I tie from the oarlock stanchion (pipe in the photo below; on the inside face on the wooden oarlock stanchions shown on my Sneakbox in my previous post).
As you can see, I drive a "staub" (marsh spike, bog stake etc) into the marsh. I leave it in place throughout the hunt and tie off to the boat with 1/4-inch line - thus the reason for just 4-inch cleats amidships.
Push Pole
The push pole is an 11-foot length of closet pole - usually 1-5/16-inch diameter. On the bottom end I mount a Herter's Duckbill Pushpole Head - or modern equivalent: https://www.hhlure.com/products/duckbill-head-attachment?variant=5974690180
I tie a Turks Head on the upper end to let me know when I've run out of pole.
I secure the push pole with my "chock and bail" system. The bail is heavy galvanized wire covered with a 12-inch length of fuel line to prevent chafe (and rattling). It is mounted up forward on the deck and allows the gunner - even when standing at the helm - to push the upper end of the pole through a generously-sized "target".
The chock is mounted aft on the deck and allows the gunner - even when standing at the helm - to drop the lower part of the pole into it. The radius of the slot in the chock is about 1-3/8-inch - a bit larger than the diameter of the pole itself.
The loop of shock cord is used only when trailering or crossing the bay. It keeps the pole from inching backward. I have lost 2 poles because I was not paying attention and my wake caught the head and dragged the whole push pole aft without me noticing. (One pole was returned to me, however, when the "beachcomber" who found it washed ashore saw my brand and tracked me down.)
Hope this helps!
SJS
Bob M
Well-known member
5 years later......I haven't broken a Trex rail yet and I can't say that about your other rails !Kenny~
Nice workmanship!
I have made rub rails from White Oak, White Ash, treated (Southern Yellow Pine) lumber, Philippine Mahogany, PVC "lumber" (e.g., Azek) and Pine half-round molding. I have not purchased the black PVC rubrail used on so many factory boats.
Do you need a tough rubrail - as in banging into docks et cetera? Or do you want to provide a finished look to your "feather edge" - that won't rot?
I used Mahogany on CANVASBACK.
View attachment 59626
Half-round molding on SWEET GHERKIN
View attachment 59627
Treated lumber on JAMES CAIRD.
View attachment 59628
For your vessel, I would consider Azek (or similar). Unfortunately, it is expensive and usually comes only in 18-foot lengths. I used it on my re-built porch - between the deck and the ground so it would never rot or need paint.
View attachment 59629
However, you could also use it for a toe rail on your foredeck to hold the lower edge of a spray dodger (aka breakwater).
Note that I used panheads and did not countersink - because this "lumber" has little strength. I snapped my first attempt at the centerline where the radius was tighest. (Note no screw dead center on this one!) PVC will however take the small screws /studs needed to attached the hem of the dodger.
View attachment 59630
BTW: I do not recommend Trex. I used it once at a customer's request (for thatch rails). It is very heavy and seems somewhat brittle.
BTW2: If you opt for treated, I recommend inch (finished 3/4"). Look for boards that are virtually clear and where there is little "run out" in the grain. Pre-drill for your fasteners (s/s flathead screws) and bed the rails in 3M 5200.
Hope this helps!
SJS
Last edited:
Steve Sanford
Well-known member
Sir~5 years later......I haven't broken a Trex rail yet and I can't say that about your other rails !
Yikes! I thought some of those Trex rails had delaminated at the splice(s). No?
See you next Saturday at Cedar Beach?
SJS
Bob M
Well-known member
All the splices popped the first year with the Gorilla glue but Six 10 epoxy has held up great. The rails themselves look brand new Steve.Sir~
Yikes! I thought some of those Trex rails had delaminated at the splice(s). No?
See you next Saturday at Cedar Beach?
SJS
IDK yet about the show Steve.
Best
Bob
Steve Sanford
Well-known member
Good to know - thanks!All the splices popped the first year with the Gorilla glue but Six 10 epoxy has held up great. The rails themselves look brand new Steve.
IDK yet about the show Steve.
Best
Bob
SJS
Where are you getting an 11foot closet pole from?Kenny~
Cleats
I usually have 4 cleats on a duckboat:
- 1 6-inch cleat (galvanized) on centerline of foredeck - about half-way forward
- 1 6-inch cleat (galvanized) on centerline of sterndeck - about half-way aft
- 1 4-inch cleat (galvanized or nylon) amidships on both port and starboard decks
For the 6-inch centerline cleats, it's important - in my view - to have them very strong and backed up below decks. I use 1/2-inch AC plywood for backers and I use s/s fender washers and nylocks on the machine screws. I want to be able to lift the entire vessel by these cleats - and commonly do when in the shop. (NOTE: I show the cleat mounted through a thatch rail but you can mount right to the deck.) At a dock etc I use 1/2-inch (or sometimes 3/8) line to secure the boat.
View attachment 59804
The amidships cleats allow me to "anchor" sideways to the bog whilst gunning. I tie from the oarlock stanchion (pipe in the photo below; on the inside face on the wooden oarlock stanchions shown on my Sneakbox in my previous post).
As you can see, I drive a "staub" (marsh spike, bog stake etc) into the marsh. I leave it in place throughout the hunt and tie off to the boat with 1/4-inch line - thus the reason for just 4-inch cleats amidships.
View attachment 59805
Push Pole
The push pole is an 11-foot length of closet pole - usually 1-5/16-inch diameter. On the bottom end I mount a Herter's Duckbill Pushpole Head - or modern equivalent: https://www.hhlure.com/products/duckbill-head-attachment?variant=5974690180
View attachment 59806
I tie a Turks Head on the upper end to let me know when I've run out of pole.
View attachment 59807
I secure the push pole with my "chock and bail" system. The bail is heavy galvanized wire covered with a 12-inch length of fuel line to prevent chafe (and rattling). It is mounted up forward on the deck and allows the gunner - even when standing at the helm - to push the upper end of the pole through a generously-sized "target".
View attachment 59808
The chock is mounted aft on the deck and allows the gunner - even when standing at the helm - to drop the lower part of the pole into it. The radius of the slot in the chock is about 1-3/8-inch - a bit larger than the diameter of the pole itself.
The loop of shock cord is used only when trailering or crossing the bay. It keeps the pole from inching backward. I have lost 2 poles because I was not paying attention and my wake caught the head and dragged the whole push pole aft without me noticing. (One pole was returned to me, however, when the "beachcomber" who found it washed ashore saw my brand and tracked me down.)
View attachment 59809
Hope this helps!
SJS
I used a carbon arrow shaft to support the dodger for this year. I just screwd the dodger to the deck maybe next year I’ll do the azek with a heat gun. need and extra set of hands to figure it out the deck has some sharp angles.
Steve Sanford
Well-known member
Good morning, Kenny~Where are you getting an 11foot closet pole from?
I used a carbon arrow shaft to support the dodger for this year. I just screwd the dodger to the deck maybe next year I’ll do the azek with a heat gun. need and extra set of hands to figure it out the deck has some sharp angles.
My local lumber yard has long closet pole stock. It is a regional chain (used to be family-owned) - but not a "big box" store. I pick through what's on hand and eyeball them for "almost straight" - and reasonably straight grain. Of course, I may need to buy longer than I need - but I always find a use for the cutoff.
BTW: The closet pole I've seen is always a Pine - not sure which species - maybe Western White?
Hope this helps!
SJS
Neal Haarberg
Active member
If you can't find a closet pole long enough you can always join two together. I have a 19' push pole that I made by scarfing multple pieces together. Started off ataching two pieces together to make a 15' pole then when I added a poling platform I added an additional 4'. I used a W splice on the first joint and a V splice on the second instead of a traditional straight scarf. A reasonably tight fit and some thicked epoxy and you can make your push pole as long as you want. This type of joint is regularly used in bow building to attached the top and bottom limbs togather at the handle and is very strong.