Steve Sanford
Well-known member
I have noticed a certain behavior among many of my Long Island friends of late. It seems that the almost-worn-out decoys are produced - usually preceded by a last minute, "Oh, by the way...." and a sheepish glance - at the end of a conversation, just before I head north. I usually head north with an assortment of "patients" - decoys needing somewhere between TLC and ICU.....
This is just one bird - a Bean's Coastal Pintail Drake - not a whole rig. And, I either never took a "before" photo or simply cannot find it on my hard drive. So, I can only offer this image of it after some rehabilitation had begun. As it came to me, it had no eyes and the head was loose.

The process had been started by its owner. Most of the big voids in the refrigerator cork had been filled with foam - most probably an insulation foam from a can - a method I have used myself at times.

The "sprig tail" was a piece of tubular plastic that seemed both pliable and tough. Alas, it displayed an unfortunate droop. One can only imagine picky hens avoiding the company of this particular drake.

The first task was to re-attach the head. I actually did this months ago - when I had an open tube of 3M 5200 handy. It then sat on the bench until late last week.

Before I put new eyes in it - 10 mm pinpoint pupil Brown - I carved around the eyes and a shallow "eye channel". I cleaned out and enlarged each eye socket with the Dremel.

After setting the new eyes, I burned the rear edge of the bill - just as an aid to painting. The factory paint had the bill too high on the forehead.

I also rounded off the edges on the keel - to minimize scuffing of other decoys.

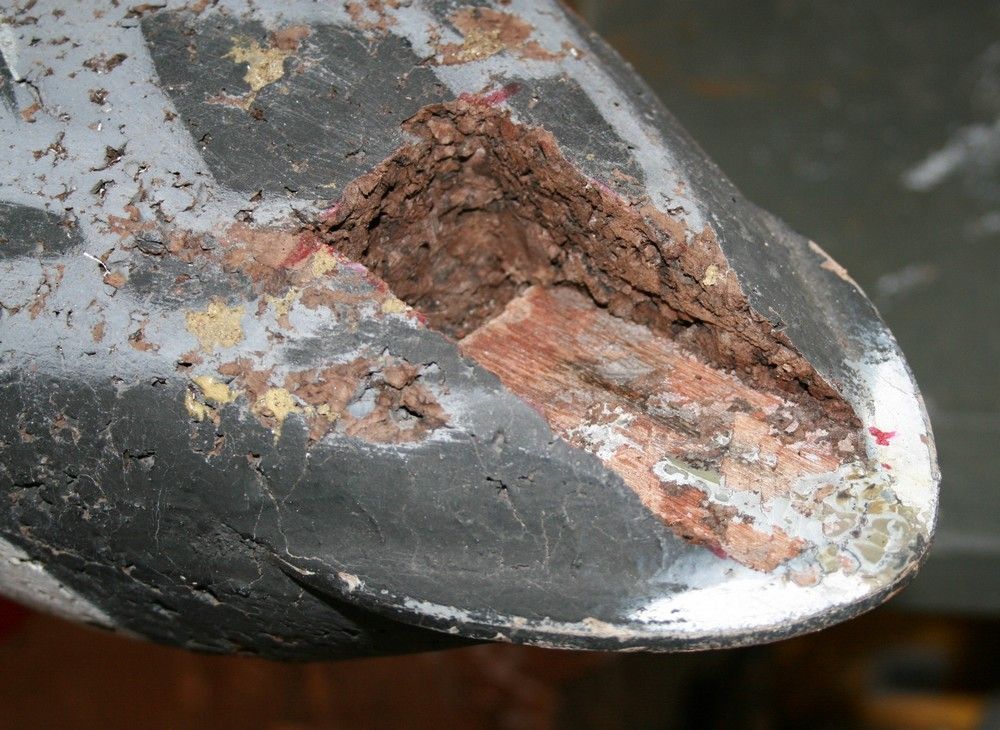
The tail next took my attention.

I removed the cork with a knife and cleaned up the tail insert with a chisel.
The new tail was cut from a piece of curved "rubber" - from beneath the front bumper of my son's 2002 Jetta wagon.

I set everything in epoxy + fairing mix (cabosil and microballoons) + graphite powder (for the black color) and clamped it overnight.

A saw, a rasp and sandpaper faired the cork. I added some shape to the tail with a knife. The tail is well-sanded so sealers and paints will stick to it.

The bird was thoroughly coated with spar varnish and hung up and out to dry. These hooks are on the south side of my shop for just such a purpose. The "hoods" over the windows keep out the hot summer sun.

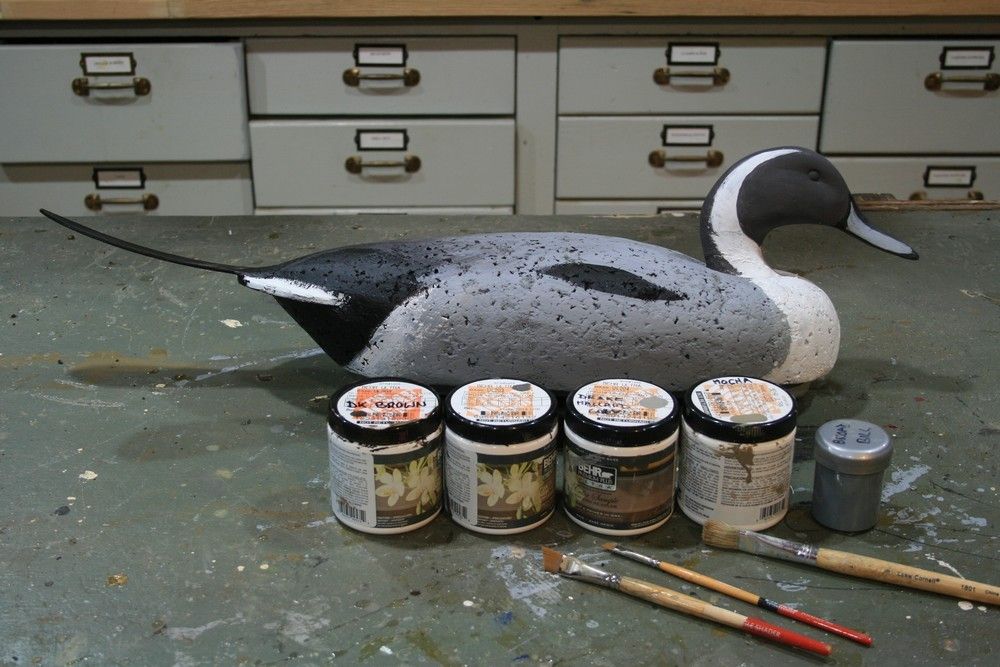
Next was priming - with flat oils. I prime in finish tones so the usual wear does not reveal a starkly contrasting undercoat. It would certainly hunt well enough in this "plumage".


But, I need to get the colors just right....mostly my usual Behr Ultra sample jars from Home Depot.
I always work from the tail forward. The Flat Black oil needed no more topcoat so I just painted the outer tail feathers - Mocha Accent (720-D).

For the flanks, I added some Yellow Oxide (tube acrylic) to some White. It was a bit too pale so I brightened it up with some straight Yellow Oxide. Probably a bit too strong now - but I doubt it'll flare any birds. Note that the flank patches extend much further aft than the factory paint - and so the black tail section is much smaller.

The back was graded - from Elephant Skin (PPU 18-16) up forward - into Intellectual (PPU-18-19) aft, covering the tertials and primaries. These greys are much warmer than the primer - which is just a black + white grey - a "cool" color.
I drooped the tertials over the sides AFTER the sides (Elephant Skin) had dried to the touch. I maintained crisp edges on the "black crescent" so it would stand out.

I add just enough White accents to suggest the drooping of the tertials and scapulars and their coverts.

The "racing stripes" on the bill use the same blue-grey I use for Drake Broadbill. It's a little sample jar I picked up a while back from Benjamin Moore. You can mix it with White + Ultramarine Blue + Raw Umber.

The face is done with Espresso Beans (PPU-6-1). I always bring the white neck stripe forward on the curve of the head - an egregious misrepresentation of the Natural Order of Things - but I like the way it looks. The breast got a final coat of White latex. And, I painted the lower eyelid a pale Grey - just for fun. It always adds apparent depth to the eye.

Here it is ready once again for a winter on Great South Bay.

BTW: If you are painting a rig of Pintails, I have a simple Hen paint job on my site at: http://stevenjaysanford.com/pintail/
Hope this helps,
SJS
This is just one bird - a Bean's Coastal Pintail Drake - not a whole rig. And, I either never took a "before" photo or simply cannot find it on my hard drive. So, I can only offer this image of it after some rehabilitation had begun. As it came to me, it had no eyes and the head was loose.
The process had been started by its owner. Most of the big voids in the refrigerator cork had been filled with foam - most probably an insulation foam from a can - a method I have used myself at times.
The "sprig tail" was a piece of tubular plastic that seemed both pliable and tough. Alas, it displayed an unfortunate droop. One can only imagine picky hens avoiding the company of this particular drake.
The first task was to re-attach the head. I actually did this months ago - when I had an open tube of 3M 5200 handy. It then sat on the bench until late last week.
Before I put new eyes in it - 10 mm pinpoint pupil Brown - I carved around the eyes and a shallow "eye channel". I cleaned out and enlarged each eye socket with the Dremel.
After setting the new eyes, I burned the rear edge of the bill - just as an aid to painting. The factory paint had the bill too high on the forehead.
I also rounded off the edges on the keel - to minimize scuffing of other decoys.
The tail next took my attention.
I removed the cork with a knife and cleaned up the tail insert with a chisel.
The new tail was cut from a piece of curved "rubber" - from beneath the front bumper of my son's 2002 Jetta wagon.
I set everything in epoxy + fairing mix (cabosil and microballoons) + graphite powder (for the black color) and clamped it overnight.
A saw, a rasp and sandpaper faired the cork. I added some shape to the tail with a knife. The tail is well-sanded so sealers and paints will stick to it.
The bird was thoroughly coated with spar varnish and hung up and out to dry. These hooks are on the south side of my shop for just such a purpose. The "hoods" over the windows keep out the hot summer sun.
Next was priming - with flat oils. I prime in finish tones so the usual wear does not reveal a starkly contrasting undercoat. It would certainly hunt well enough in this "plumage".
But, I need to get the colors just right....mostly my usual Behr Ultra sample jars from Home Depot.
I always work from the tail forward. The Flat Black oil needed no more topcoat so I just painted the outer tail feathers - Mocha Accent (720-D).
For the flanks, I added some Yellow Oxide (tube acrylic) to some White. It was a bit too pale so I brightened it up with some straight Yellow Oxide. Probably a bit too strong now - but I doubt it'll flare any birds. Note that the flank patches extend much further aft than the factory paint - and so the black tail section is much smaller.
The back was graded - from Elephant Skin (PPU 18-16) up forward - into Intellectual (PPU-18-19) aft, covering the tertials and primaries. These greys are much warmer than the primer - which is just a black + white grey - a "cool" color.
I drooped the tertials over the sides AFTER the sides (Elephant Skin) had dried to the touch. I maintained crisp edges on the "black crescent" so it would stand out.
I add just enough White accents to suggest the drooping of the tertials and scapulars and their coverts.
The "racing stripes" on the bill use the same blue-grey I use for Drake Broadbill. It's a little sample jar I picked up a while back from Benjamin Moore. You can mix it with White + Ultramarine Blue + Raw Umber.
The face is done with Espresso Beans (PPU-6-1). I always bring the white neck stripe forward on the curve of the head - an egregious misrepresentation of the Natural Order of Things - but I like the way it looks. The breast got a final coat of White latex. And, I painted the lower eyelid a pale Grey - just for fun. It always adds apparent depth to the eye.
Here it is ready once again for a winter on Great South Bay.
BTW: If you are painting a rig of Pintails, I have a simple Hen paint job on my site at: http://stevenjaysanford.com/pintail/
Hope this helps,
SJS
Last edited:
") Thanks for taking the time & effort to share these tutorials with us. Always enjoy your posts.
Thanks for taking the time & effort to share these tutorials with us. Always enjoy your posts.