What's on your WORK BENCH - June 2020

Jim Cricket said:
Hi Dave. Nice bowl there. How do you like the Grizzly lathe? I've used a Grizzly bandsaw (17") that compares very favorably to my $$ Italian saw. Hard to beat the price. Just curious how the lathe stacks up.
Thanks!
Jim Cricket

Jim,

This is the first bowl I've turned on this lathe start to finish. Previously I did a little finish turning just to make sure everything was functional immediately after setup.

(A) First impression unpacking the unit; Good fit and finish, everything fit as should, edges deburred and smooth, quality paint job.

(B) Initial no load break-in run; No instructions for a break-in period but I ran it for about 20 minutes at a modest speed of around 350 rpm. Noticed a slight "ticking" after inspection tightened a set screw on the motor drive pulley.

(C) Trial cuts; Did a little light cutting just to get a feel for everything. No bearing noises, spindle and live center running true with no perceptible runout.

(D) Lets see what this thing will do. [cool] ; Loaded a chunk of seasoned Hickory onto the worm screw secured in the chuck. (Nova G2) . Fired up the spindle at 250 RPM and gingerly cleaned up an area for the live center. That right there was a major improvement over my old lathe which only had 3 set speeds with the lowest being 900RPM.

(E) Loaded and locked in; Now that the log could not go anywhere, (finger's crossed) started cranking up the speed. Did not get very far before the shaking started. A couple times the lathe RPM took off and just kept climbing, forcing me to hit the stop button. This left me scratching my head a bit. (more on that later.) Decided to move ballast from the old lathe to the new one. Big improvement (no chit Sherlock [w00t])

(F) Let's make a cut; Started with light cuts gradually progressing to being more aggressive. Was still well within the "light cut" spectrum when the lathe just lost momentum and coasted to a stop. Hummm, the GFI had tripped on the outlet I was plugged into. Reset and tried again, same results. Hummm, maybe the inverter unit used on this lathe will not play well with a GFI.

(G) Plugged into a non-GFI outlet; Better results, could take a bit heavier cuts and more cuts. Now with no GFI to trip, when I'd exceed the cutting torque specs, the invertor would now "cutout" and the lathe would slow to a stop.

(H) Conclusion;
Nothing wrong with the lathe itself. Works as it should. I had simply maxed out or even exceeded it's capabilities with my expectations. The load in the chuck was fine, I just wanted to remove more material, faster than what the lathe was capable of. I don't believe any other lathe in the same size class, would have done any better.

Overall I'm very happy with my purchase. It is a huge improvement over the old Sears Craftsman Lathe I had been using. Quite frankly, I could not have completed this project on my old lathe. Even tho I had, as the old TV commercial used to say, "trying to haul 2 ton of fertilizer on a 1 ton truck" the lathe had performed well.

Two notes of interest; (a) before starting on the large log, the ticking noise I had heard early on, came back. Upon further inspection I found that the set screw I had previously tightened was a "locking screw" above the actual one that needed tightened to the motor shaft. Once the screws were properly tightened and locked down, that resolved the issue.

(b) The times the lathe, lost it's mind, and started to uncontrollably speed up, I determined to be caused by the shaking of the unbalanced load. At that point in time I had no ballast weight in place. After adding the ballast to control excessive shake, the speed control issues went away. My conclusion is the unbalanced shaking, caused the speed sensor to lose it's reading, effectively telling the invertor, that the spindle speed was zero RPM. Thus the invertor would respond by feeding more power to the motor, to achieve the called for RPM. All the while never receiving any feed back from the speed sensor on the spindle. Again, not a defect or fault of the lathe.
 
Great lathe review Dave. Thanks for taking the time to break it down for me. I'm going to look at that lathe. Can't buy one now, but hopefully in the future...Windsor chair making is something I'm quite interested in, and a lathe opens that world up quite a bit.
Jim


View attachment Mallards DB.JPEG


I wrapped up the other 3 swing weight mallards and have started on a couple more heads. Will be going back to a wooden keel on the next set, I didn't get the weight savings I was hoping for and want to see how the swing weights hold up through a season of hunting before committing to more.

And the car topper to sneak boat project was cancelled when I picked up this mod v jon boat last weekend. Not much I need to do to the boat but there will be a lot of work in the garage, actually moving a workbench, to get the boat inside and still have access to tools.


View attachment New Boat DB.JPEG
 
That's a gorgeous bowl!!!! Anytime you need a bowl babysitter let me know [;)]
 
More progress on the model. We're almost caught up to real time. This one won't finish in June, for sure. I have to say that I've thoroughly enjoyed the variety of projects from everyone. The monthly workbench is a great idea, to show a lot of diversity in one thread. I guess these continuing projects can spill into the future monthly workbench threads?

I painted the floorboards, and glued those in permanently.
floorboards_in2.jpg.5a47fddf24b90d168c980b1e0b69563f.jpg


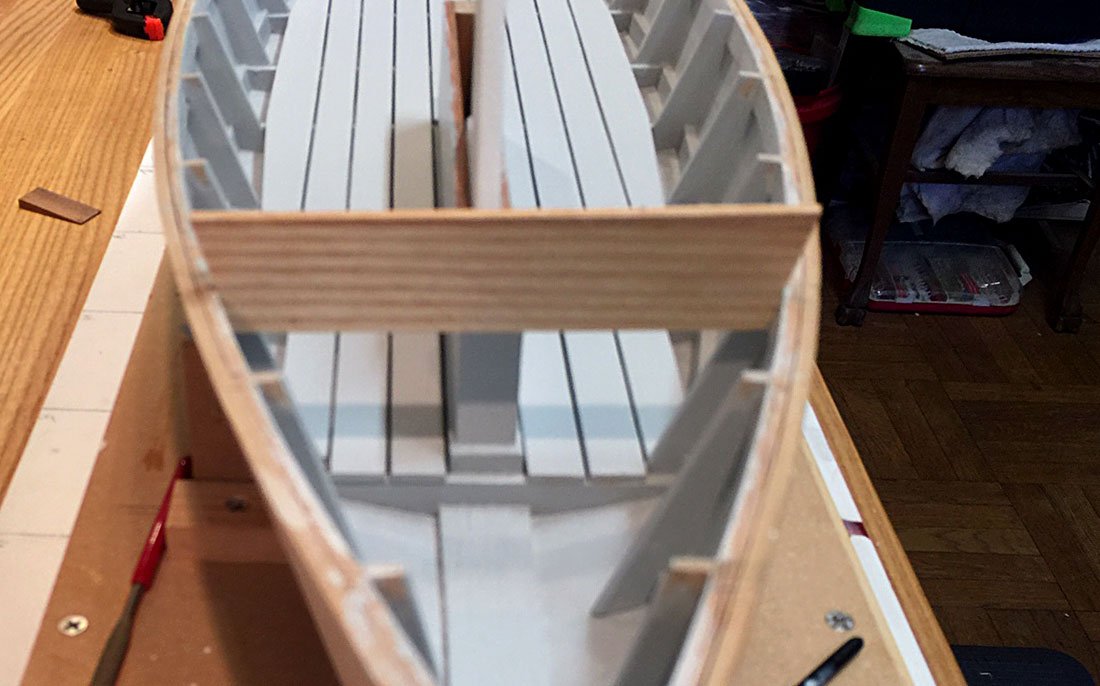
In the pic above, you can see that I sanded the paint off the top of the frame heads, where I'll glue in the deck beams. I approach the deck framing similarly to the side and floor framing, with an oversize piece fitted to the sheer first, and then the top and bottom camber marked out and cut. I used my deck curve template/sander to mark the camber, just pinching it to the raw frame by hand and marking it out, which worked well. The completed beam was then glued to the frame heads. The deck has a master curve, with all frames to the same radius. I cut the curve out of a piece of ply, and put sticky back sandpaper on it. By scrubbing back and forth, and side to side, the beams and sheer clamps get faired to the proper bevel/curvature, and flush to the sheer plank. I do the same thing on a bigger scale for 'real" boats.


deckbeam_fit2.jpg.a5485920effb7ae97176b9abd4b5fcf0.jpg


deckbeam_fit3.jpg.e9257fba451438fd96d20476d7dae3dd.jpg


My approach for fitting the short, partial washboard framing (side decks in sharpie parlance) is a little unorthodox, and would be wasteful of timber in a full size boat. I made and glued in an entire athwartship beam at 3 locations (where the angled deck bracing occurs), then sprung in a batten to lay out the cockpit opening curve, marked for the cuts, and fitted the angle braces. This assured that my inboard heights remained true, and that the beams would remain square to the hull.

carlin_fair2.jpg.5e26ccf7318a3692d273110989a1e1e5.jpg


deckbracce_fit4.jpg.80753d775438d1ef96032ce1501ad7c4.jpg


deckbracce_fit2.jpg.d9b56aaeb696dd7724acd10a99573294.jpg


After the braces were glued in, I cut the beams at the marked location and correct angle. Chapelle shows a plumb cut on the frame ends, but I like a little outward sloping angle to the finished coaming. That angle requires a wider piece of timber for the coaming to be cut out of, but it?s usually worth it, in my experience with actual boats.

Once the beam ends were cut, I fitted and glued in the carlins. I departed from Chapelle?s drawings again, and sprung in a continuous carlin, rather than sawing out multiple short pieces fit between the beams. I think that better assures fairness, in the long run. Doesn?t matter, once the decking is on, at any rate. Either way, there is a lot of end grain to long grain gluing, so the entire deck structure will be well braced with blocking, as Chapelle shows as well. At the extreme ends of the carlins, I fit a temporary brace to land the carlin on, and a prop underneath the beam to keep the carlin in plane. These I wrapped with scotch tape to keep the glue from sticking.

carlin_glue3.jpg.aae56b1985a34e092feb943bb53b7d8b.jpg


carlin_glue4.jpg.ee92f2d7e789d8b28329d59e25cac99e.jpg


Before going much further, there are a few things to do, like fit the mast step that I forgot before starting the deck. One more post, and we'll be caught up. Thanks for looking.
 
Did up some shadow boxes for a Miramichi Salmon Assoc. online auction:
ZZeQAWQ.jpg

onUi1at.jpg

3tsfnwD.jpg


Even did one for our camp (if the border ever opens again) of the "poster" that the Atlantic Salmon Fly International folks did for each tyer for that even a couple years ago:
VQCgLCN.jpg


I really enjoy taking rough cut lumber and turning it into framing material in my little shop and also enjoy playing with mat colors and turning those big sheets into mats for the frames.
Gary
 
Last edited:
I recently acquired 12 unattractive Canada Goose decoys. 5 had loose heads with one that had the head completely off. They came from a sale of the contents of a house in Sayville Long Island. 10 were made of life vest cork and 2 refrigerator cork. I "Klean Stripped" the decoy with the head off, Top layer of paint is alkyd exterior enamel and wrinkled right up. When I started rubbing off the loose paint I found that it was originally a Brant decoy that was repainted as a Canada. Head was originally doweled on with 6D finishing nails also holding it into the natural cork body. The heads are all root heads and nicely done. Bodies are typical early Long Island cork made up of pieces from life vests held together with wood wedges. I would guess these are 1930-s decoys. The over paint is probably 50 years old. Now I have 11 more to do.View attachment IMG_3194 (1).jpgView attachment IMG_3194.jpg
 
Frank - They came out of Bayport / Sayville / Bluepoint area. All have root heads. One appears to have always been a Canada Goose just by the shear size of it. The original lot was 13. One went to a friend as a finders fee.

Where is Len from?


Joe Daly
 
Joe....Len was from West Sayville.....one of our club members when he was a kid would help find root heads in the woods for him to use..... I also shared your posting with Dick Richardson who also believes they are Tucker?s
 
You have a really nice historical find for the Island's south shore. Take one of the canadas and strip carefully, just to see what is under the present layer. This restoration will at least get you back to the maker's original paint.
If you plan on repainting for use, AT LEAST keep two with the original paint visible and put on a shelf. The rest will deserve to be hunted, after cleaning and restoration.
You have a fun task ahead of you for the summer![;)]
 

George - That is the plan. I have about 50% of the original paint left on the first one that I can use to pattern and match colors. I plan on stripping the house paint off the rest and painting to the original pattern. It is a simple pattern but it will make an effective Brant decoy. I bought a smoker this year with the expectation that I can make Brant palatable.

Joe
 
Good morning, Joe~


Those birds caught my eye, too. John Verbeke knew Lem (as in Lemuel) Tucker growing up in West Sayville - and has a bunch of his birds. We got John on camera in our When the Broadbill was King on Great South Bay video - a great guy!


Here is a Brant - in-use re-paint it seems. As you know the so-called "root-heads" mostly used not the roots but knots from the branches that jutted out from the trunks of Pitch Pines - and were harvested from rotted trees long on the ground.


View attachment Lem Tucker Brant - John Verbeke collection.JPG


Here is a sweet little Whistler.


View attachment IMG_7467.JPG


Here is Lem at his shop (I misspelled Lem in my caption!).


View attachment AV18 Len Tucker with Hen Shelldrake decoy.jpg


And working on the Bay. Note how Lem got out on the ice via Scooter - and brought his ice saw with him.


View attachment AV19 Len Tucker clamming through ice.jpg


I cannot lay my hands on the LI Decoys book published by LIDCA - but I'm sure there is a brief bio in there.


Congratulations on a great find!


SJS


Steve - appreciate the information. Especially correct first name.

Not sure that Brant you posted photo of is a repaint. The one I Klean Stripped had the same white highlights on the side. The back color is identical to what I found. Could be a Lem Tucker repaint. on his own decoy.

Joe
 
Back
Top