AA Blackjack Floor Repairs

I would not use coosa board for stringers. I don't believe it's modulus of rupture comes anywhere close to that of wood. I believe wood sealed and glassed properly will be just fine in this situation.
yes, i agree to a point. you can't just compare the physical properties number for number.

the overall strength and stiffness of the wood stringer is its cross section alone.

with a composite member, you have to take into account the relative stiffnesses of the materials. so for example, a stringer made up of a foam core and wrapped in fiberglass cloth and epoxy resin, 99.5% of the strength and stiffness is the FRP shell. The foam just goes along for the ride.
With a wood or coosa type material, it is more like 80/20 or 90/10 type ratio.

concrete and steel reinforcing has a modulus ration of about 10.

The only benefit I see to coosa is the inheret no-rot and dimesional stability of the material.

I am also toying with making my own stringers by using blue/pink foam as a core and laminating it myself, vaccum bagging my making a 'bag' out of polyethelene sheeting.

as always, work gets in the way of play :(
 
Dennis

I would pursue making my own just out of fun for the discovery process. I think there are many ways to go and end up with a satisfactory result. I just wouldn't discount wood in favor of Coosa for some perceived superiority because I don't know that one exists and wood is so widely available, cheap, and proven if properly encased in glass and epoxy.
 
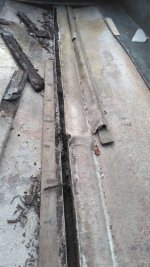
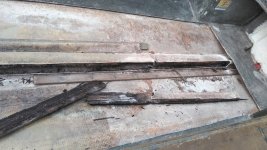
I'm going to get this going again because I am in the middle of the same thing. Difference is, there is only one stringer in my blackjack, which is a phoenix pokeboat build. I also have a well in the back of the deck at the stern where there is a drain hole. While I don't have a photo of the section in front, the floor deck ends just underneath the bow deck and there is small depression there for the contour of the hull after the floor deck ends and a hole in that. It drains to the hole in the well. But what I didn't realize was that there is no tube that drains it, it just goes under the deck. So that is why the stringer rotted and why the foam was water logged and why the plywood floor rotted. I'm not sure why they would have made a tubular section adjacent to the stringer, you certainly didn't need it since there wasn't a tube in it. I didn't figure that all out until I had cut away the glass on the top and the open side of the stringer so I could kind of peel the glass off and save it.lengthwise.jpg
This picture is taken looking forward and you can see the tube shape if you zoom in.

This next picture is taken from the side and on the right you can see the well near the stern. You can also see there are not two other stringers. The floor deck was glassed to the sides of the hull.
center.jpg

At this point I think I will just close off the drain holes front and rear,I don't want water flowing underneath the floor. I'll fill the void with life jacket foam, and just keep a sponge in the bow for the little depression that could catch a little water if it got up there. I'm also going to cut that tubular section out as it serves no purpose. I will take a picture of that area tomorrow to show the depression in front of the floor. I don't think keeping the current set up makes sense as it will just start rotting the stringer again.
 
At this point I think I will just close off the drain holes front and rear,I don't want water flowing underneath the floor. I'll fill the void with life jacket foam, and just keep a sponge in the bow for the little depression that could catch a little water if it got up there. I'm also going to cut that tubular section out as it serves no purpose. I will take a picture of that area tomorrow to show the depression in front of the floor. I don't think keeping the current set up makes sense as it will just start rotting the stringer again.
I am bringing this back up instead of starting a new thread. Blackjack project got sidelined for a bit, time, monye, space... I am back at it.

Greg- did you seperate your top and bottom halves? I saw in you other post that your pieces were riveted tobether. I think mine are glued.

The part that I am going to embark on next is the transom- though I am not sure on how I am going to clamp it with the overhang.
Dennis, buy some SS, square drive screws and use them to temporarily clamp everything. I dry fit everything, including screwing it tight, then when I have the epoxy mixed up, I know it will go right where I want it and don't have to fiddle with clamps. After it cures, I removed the screws and fill the holes with thickened epoxy I used the same screws for yrs.
 
Dennis, buy some SS, square drive screws and use them to temporarily clamp everything. I dry fit everything, including screwing it tight, then when I have the epoxy mixed up, I know it will go right where I want it and don't have to fiddle with clamps. After it cures, I removed the screws and fill the holes with thickened epoxy I used the same screws for yrs.
Dave, I love your suggestion and have attempted to do the same many times while building. My question and the part I struggle with is entirely filling the screw hole with thickened epoxy without an air pocket that prevents filling entirely. Wondering if perhaps a screw left in place isn't the lesser of two evils.
P.S. I have had better luck drilling the hole out to accommodate a vet suringe and filling from the bottom of the hole, but it is alot of messing about. Richard
 
Hi Dennis-I was going to separate them, took off the rub rail, drilled out the rivets, then found there was nowhere that I could get any type of blade between the two halves. It was still sealed extremely tightly after 30 some years and I realized that I would be foolish to create a problem I didn't have.
I did have someone do the transom for me. You will likely just need to do just the center portion as that is separate from the two side that slant in. That was done with the top on.
As far as my deck goes, I had some family things that took precedent over the duck boat last fall then it got and stayed too cold throughout the winter to use epoxy in an unheated garage for me to finish it. So that is on my plate now and I will hopefully get to that and get it finished. I will seal the two drain holes at the front and at the rear in the well. They are just openings, there is no tube that funnels the water, and I know why the foam came out soaked and weighing like 60 lbs., there was pretty much always a little water sitting in there. There was only 1 stringer in this model in the center, and it was only glassed in on one side, so I will replace that(even I can figure out how to do that) and then the foam supports the rest of it. I could probably just put foam in and forget the stringer, it was totally rotted to powder so it wasn't doing much of anything for several years anyway. I think I am just going to use the insides of old life preservers for flotation, saw that somewhere else here. It will take 6 or 7 to do the job and I am pretty sure that will give me more flotation than has been in there for long time, and should be overkill.
One other thing since you are doing this. Roy Brewington made a good suggestion for the flotation boxes at the stern, open them up, dig the foam out, and then put something in and seal them again. The foam will be saturated.
I estimate I have taken at least 75 lbs. of saturated foam out of the boat and now I know why it felt so heavy, because it was. Good luck and hope this helps.
 
Back
Top