Rail Skiff Build

SJ Fairbank

Well-known member
Supporter
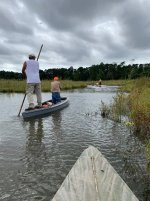
Over the years, a few of us on the site have discussed rail hunting. The little birds comprising a half dozen species that live in our duck marshes, sometimes heard but rarely seen unless at the top of a flood tide or an actual flood in a river when they can't run. The traditional way to hunt them, going back into the 19th century is from a poled skiff, with a shooter seated amidships enjoying the day while the grunt poles from the stern. Rail hunting has been described as a "sport of kings", probably because the shooter enjoys a throne while his vassal poles him about. Friends and I have also walked them up in marshes where the bottom permits, in shorts and old sneakers because the birds are normally moving through in mid September to early November. As an old fart, walking them up is less attractive than poling, although both require serious effort.

There are as many rail skiffs as there are boatbuilders, the one common trait being near flat bottomed and narrow for ease of pushing through grass in a flooded marsh. The same skiffs might be used later in the season to pole creeks for ducks, or put to other important uses such as sight fishing striped bass in shallow bays.

I've built several rail skiffs, no two being the same. Because there aren't famous, classic designs like a BBSB, I feel free to employ artistic license in a build. I do however, appreciate the history of the sport, so when I decided to build one this year I took measurements off a boat in the care of a friend. Said friend is also a lurker on here on duckboats.net, who wisely perhaps, keeps himself out of the fray. This boat is a rail skiff built in about 1962 by a late waterman by the name of Oliver LaPlace. Oliver was quite famous along the lower Connecticut River, if you Google him a number or articles pop up along with at least one photo of him in this particular boat. In addition to poling sports for rail, he made a living guiding duck hunters, fishing and, famously, trapping snapping turtles for the market from the 1920's to the 80's.

A photo of Oliver's boat.
1000001395.jpg
1000001423.jpg

My technique for boat building is the old style chines and gunnels bent around molds mounted on a strongback. This boat is framed with Western Red Cedar and Phillipine Mahogany, to be sheathed in plywood and glassed on the exterior. The transom is 3/4 plywood, I couldn't get myself to spend more on this boat as the cedar and mahogany set me back almost a $1,000. The shed I'm building in is only 17' deep, so a 14' boat is a little tight as you can see in the photos. The waterline is 13'-3", LOA is 14'-2", depth inside 17". The photos are a progression, I set the molds up two weeks ago and installed the fairing strips to check the lines and then went on vacation. The build progress to date was completed since Saturday afternoon, so it's coming along quite quickly. I'm working fast because I also have home renovations to complete by the end of the summer, if I don't get that stuff done I'm in trouble. To move things along, I used Gorilla glue to fasten the frame, along with a healthy number of screws. The sheathing will be glued with epoxy, the same to be utilized for the glass.

1000001376.jpg
The first photo is just the molds and fairing strips, to check the lines.
In this series of photos, you can see that the lines deviate from the LaPlace skiff. I had to lengthen it about 6" because the wood wouldn't take any more bend without steaming. I think a pointy bow is a good thing in the grass. 1000001392.jpg
1000001394.jpg

1000001400.jpg
More photos to come today.
 
Last edited:
SJ

Fantastic! This build should go in the Resources section similar to what @Richard Lathrop is doing for his sneakbox build. I can set up an area similar to what I did for him if you want to put it there. Basically, I make you the author of that section and you fill it up with text and pictures. The advantage is as time goes by it will be easier for folks to find and refer to.
 
That would be cool Eric. I need to work out the photo orientation problem before I post more. For some reason they want to rotate 90 CC, I never had this problem before.
 
I took these pics today of last nights progress. Lots of cleanup and fairing required before sheathing.

The bow framing consists of several pieces, I didn't have a big block for a solid bow and didn't want to glue one up. I like the sharp profile and rake, it should cut through the grass.
1751999193274.jpeg

1751999361672.jpeg
This photo is the rear of the bow assembly, the blocks were placed to keep things stable during glue cure. Once the boat is sheathed and flipped, I will probably place a vertical board behind the framing for aesthetics. Note the keelson overhead, this will serve to stiffen up the 1/2" floor even though the beam is only 40"+-.
1751999275930.jpeg
The molds are visible in this pic, they're built of old 5/4" pine I had lying around. The boat comes up and over after sheathing. At this point in the build, the frame is no longer screwed to the molds except at the stern which of course stays in the boat. The forward weight is supported by the bow on the strongback. The 3" of fore-aft rocker is visible, flat port-starboard.
1751999419746.jpeg
The chine logs are planed, it's pretty close to ready. The chine logs were screwed to the molds 3/4" proud above the top of the molds to allow the keelson to pass. Keelson is 3/4" Phillipine Mahogany. Chine logs are 5/4" x 2" Western Red Cedar, infused with gold according to the lumber yard. Sheers are 1-1/2" deep WRC. The keelson was screwed to the molds to true them up, now it's been released and is free floating roughly 1/32" vertically above the top line of the molds. Screwing it when sheathing will pull it tight to the plywood.
1751999393652.jpeg

Simple knees, 5/4" x 3-1/2" WRC.
1751999506985.jpeg
Best View I can get from above the stern, the camera is against the back wall and ceiling.
1751999552494.jpeg

Next up, attempting to scarf plywood. This boat gets 3/8" sides, 1/2" bottom. I've had limited success scarfing, tonight after work we employ the Tim the Tool Man technique. MORE POWER! Power planer making it's debut, we'll have to see how we do.
 
That would be cool Eric. I need to work out the photo orientation problem before I post more. For some reason they want to rotate 90 CC, I never had this problem before.
I think this is a great build! I'm looking forward to following along. You know I am a rail bird and Skiff aficionado
 
I think this is a great build! I'm looking forward to following along. You know I am a rail bird and Skiff aficionado
I was thinking of you when I started. Glad you like it, hope it turns out nice. Every first attempt at a boat design I've built, I look back and think....shoulda done that, not this. :oops:
 
I was thinking of you when I started. Glad you like it, hope it turns out nice. Every first attempt at a boat design I've built, I look back and think....shoulda done that, not this. :oops:
It should be nice and stable. My favorite skiff has a beam of 38. And it's very stable.

40 is even better.

Once you get down below 36 they get a little tippy
 
It should be nice and stable. My favorite skiff has a beam of 38. And it's very stable.

40 is even better.

Once you get down below 36 they get a little tippy
Agreed, I'm trying to avoid a swim. I still enjoy walking them up in waist deep water on a really hot day, but for the most part I'd like to keep it civilized by staying in the boat.
 
Enjoying this thread. Somehow I've never hunted rail, but it is one of my goals to explore with the boat I'm building. Who knows, maybe I'll need to build a second boat for the purpose!
 
Enjoying this thread. Somehow I've never hunted rail, but it is one of my goals to explore with the boat I'm building. Who knows, maybe I'll need to build a second boat for the purpose!
Pretty simple boat to build. With luck I'll have it sheathed by tomorrow night. Less than five days, mostly evenings, from placement of the first structural member.
 
Here is a picture of the one the guys I go with use. They are very tippy, I would say at least every other time we go somebody goes in. It's often the pushers. The boats do push through the rice and other flora pretty well. The good news is most of the time you are in very shallow water-unless you are crossing a creek, which is when I sit down. These boats are very old and have been repaired many times. But they work!
 

Attachments

  • on the way.jpg
    on the way.jpg
    54.7 KB · Views: 20
Here is a picture of the one the guys I go with use. They are very tippy, I would say at least every other time we go somebody goes in. It's often the pushers. The boats do push through the rice and other flora pretty well. The good news is most of the time you are in very shallow water-unless you are crossing a creek, which is when I sit down. These boats are very old and have been repaired many times. But they work!
I've hunted from similar boats. I don't recall coming home dry, but it was years ago. I'm leaning toward a shooters stool for this boat, it keeps the shooter stable and up high enough to see over the grass. The stool is mounted on a sliding base so COG can be adjusted fore/aft to keep the boat level. A swim is still likely. ;)
 
More progress...

Scarfed and glued the 3/8" for the sides on Tuesday. The scarf joint is 4", so a roughly 10/1 scarf. The 1/2" is also 4" so 8/1. Note the high tech custom clamping system, complete with about 50 pounds of sand and lead in each bucket. Scarfing is the most tedious part of boat building for me, and the one I'm least proficient at. The power planer did help, with a sander and hand planer you wonder if you'll ever get done. With a power planer you have to be careful not to let it become too aggressive. It worked best at the minimum cut setting. Finished off the scarf with the belt sander. I give this one a grade of B, and that might be generous. I'll be glueing the 1/2" floor tonight. The painters plastic works well to prevent unwanted adhesion, it doesn't stick to the epoxy (or vice versa) at all.
Scarf Glueup.jpg

I usually make a pattern to cut the sides, rather than wrestle with a half sheet of plywood. This Builders Board is good stuff. My one caution is to make a good pattern, but leave the plywood a bit proud until after final fitting on the boat. I did this at lunch today, half an hour and done.

20250709_103931.jpg20250709_105557.jpg

The same pattern fit both sides (mirror image). I left a solid 1-1/2" all around when cutting to avoid a major oh shit. I cut the two sides last night, clamped, drilled and temporarily fastened them for final scribing. In some builds, I've had luck using a router with a panel cutting bit to clean up the edges, tried it on here and epic fail. It doesn't like the angle of the side. I'll take them off later today, use the jigsaw to carefully cut along the scribe lines. I'm also going to run the sander across the scarf a little, it's got a very minor bulge that I think will come right out.

20250709_190329.jpg

That all looks like a Kindergarten class worked on it. :) The sides will be affixed with 1-1/4", #8 wood screws and a liberal slather of epoxy. This last view from above gives the sense of the lines. Narrow and pointy.

20250709_190354.jpg
 
Last edited:
More progress...

Scarfed and glued the 3/8" for the sides on Tuesday. The scarf joint is 4", so a roughly 10/1 scarf. The 1/2" is also 4" so 8/1. Note the high tech custom clamping system, complete with about 50 pounds of sand and lead in each bucket. Scarfing is the most tedious part of boat building for me, and the one I'm least proficient at. The power planer did help, with a sander and hand planer you wonder if you'll ever get done. With a power planer you have to be careful not to let it become too aggressive. It worked best at the minimum cut setting. Finished off the scarf with the belt sander. I give this one a grade of B, and that might be generous. I'll be glueing the 1/2" floor tonight. The painters plastic works well to prevent unwanted adhesion, it doesn't stick to the epoxy (or vice versa) at all.
View attachment 66956

I usually make a pattern to cut the sides, rather than wrestle with a half sheet of plywood. This Builders Board is good stuff. My one caution is to make a good pattern, but leave the plywood a bit proud until after final fitting on the boat. I did this at lunch today, half an hour and done.

View attachment 66957View attachment 66958

The same pattern fit both sides (mirror image). I left a solid 1-1/2" all around when cutting to avoid a major oh shit. I cut the two sides last night, clamped, drilled and temporarily fastened them for final scribing. I'll take them off later today, use the jigsaw to carefully cut along the scribe lines. I'm also going to run the sander across the scarf a little, it's got a very minor bulge that I think will come right out.

View attachment 66959

That all looks like a Kindergarten class worked on it. :) The sides will be affixed with 1-1/4", #8 wood screws and a liberal slather of epoxy. This last view from above gives the sense of the lines. Narrow and pointy.

View attachment 66960
Your making excellent progress.
 
Back
Top