I was thinking about trying that. I tested with the fairing strips. Probably yes, but I chickened out, as the 3/8" x 1 1/2" strips that terminate unsupported at the chine are waving in the breeze. There's no rigidity to maintain the shape until a fillet is applied, unlike more common 3/4"-1" x 4" planking. By the time I could confirm whether it would work, a whole bunch of strips would already be glued and nailed down. Call me a coward.Ive enjoyed your progress and had some ideas on the feather edge. Since the boat will be glassed why not add a heavy filet on the inside, covered in glass tape, and then on the outside. This would keep that feather edge . You would have to lay the filet in before you get to far up the deck to ease the process.
You are using an out of date browser. It may not display this or other websites correctly.
You should upgrade or use an alternative browser.
You should upgrade or use an alternative browser.
BBSB Pond Box Build
- Thread starter SJ Fairbank
- Start date
Richard Lathrop
Well-known member
Enjoying watching the build. Will you be using plastic nails to attach strips?
Biggest issue I have with local mills for AWC is most don’t have lengths needed. I use Schaier Brothers Sawmill in Egg Harbor for my AWC needs.
Biggest issue I have with local mills for AWC is most don’t have lengths needed. I use Schaier Brothers Sawmill in Egg Harbor for my AWC needs.
Bronze boat nails are expected today. With luck the first strips go on tonight. I have family visiting for LD week, I want to be done with the bottom so I don't feel the need to visit the shed.Enjoying watching the build. Will you be using plastic nails to attach strips?
Biggest issue I have with local mills for AWC is most don’t have lengths needed. I use Schaier Brothers Sawmill in Egg Harbor for my AWC needs.
Thanks for the lead on cedar.
I believe I have the feather edge worked out, to the extent it's possible with 1 1/2" W planks. The 1/2" chine log stays, but I substituted traditional ribs for the thinner strips I had planned. I didn't want to do it this way because it reduces inside depth in the boat. The ribs are 3/4" x 1" mahogany sawn on the same 36" outside radius (35" inside) and temporarily screwed to the molds.
Another reason I don't like the ribs, is that when sawn vs. bent they are subject to splitting. These are only 1" thick, caution will be required while glueing/nailing. I should build a steam box. One more thing to do. I don't have room for extra stuff anymore, as the family house with multiple barns where I always built has been sold.
The molds are encased in green glue-resistant tape in anticipation of planking. The tape will no doubt need repair when planing and sanding of the ribs is complete. The bow assembly and molds 1 & 9 are permanent so they aren't taped. (9 is the stern facing the camera)
You can see in the photo that the ribs are cut along the chord line where they contact the chine log. Corresponding short sections which support the deck will mate from the top when the boat is flipped, together with a cleat tieing them together. When flipped, the molds go with the boat by simply unscrewing them from the vertical supports on the strongback. That way the molds can be used to form the deck timber contours without wasting a lot of wood. The strongback is removed and the boat sits atop the larger strongback beneath, at a good working height to get at the inside.
If I think of it, I'll get a photo of the molds at the bow and stations 1 & 2. I think I mentioned that the Megargee plans have a little jink in them in that location. It was always a problem on the 4 full size boats I built from those plans. The exact same thing happened on this one after the offsets were entered into a computer using the plan measurements, extrapolated and scaled. If you ever build one, expect some fussing at that point. It has something to do with #1 and the bow, but I can't describe exactly what. Maybe the transition from radius to flat-ish at the bow. My solution on this boat was a power planer on #1, which is constructed of 3/4" plywood.
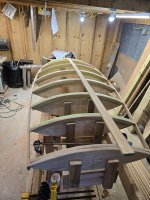
Another reason I don't like the ribs, is that when sawn vs. bent they are subject to splitting. These are only 1" thick, caution will be required while glueing/nailing. I should build a steam box. One more thing to do.
The molds are encased in green glue-resistant tape in anticipation of planking. The tape will no doubt need repair when planing and sanding of the ribs is complete. The bow assembly and molds 1 & 9 are permanent so they aren't taped. (9 is the stern facing the camera)
You can see in the photo that the ribs are cut along the chord line where they contact the chine log. Corresponding short sections which support the deck will mate from the top when the boat is flipped, together with a cleat tieing them together. When flipped, the molds go with the boat by simply unscrewing them from the vertical supports on the strongback. That way the molds can be used to form the deck timber contours without wasting a lot of wood. The strongback is removed and the boat sits atop the larger strongback beneath, at a good working height to get at the inside.
If I think of it, I'll get a photo of the molds at the bow and stations 1 & 2. I think I mentioned that the Megargee plans have a little jink in them in that location. It was always a problem on the 4 full size boats I built from those plans. The exact same thing happened on this one after the offsets were entered into a computer using the plan measurements, extrapolated and scaled. If you ever build one, expect some fussing at that point. It has something to do with #1 and the bow, but I can't describe exactly what. Maybe the transition from radius to flat-ish at the bow. My solution on this boat was a power planer on #1, which is constructed of 3/4" plywood.

Richard Lathrop
Well-known member
SJ,
I think the jink in the plans is due to the curvature of the bottom planking. In Widgeon he has mold 1 tapered to accommodate the bend. Also since the bow and the molds 1 & 2 are closer spaced you need to take into account the curvature of the bottom. The planksat the rear of the boat sit almost flat against the molds
My thoughts.
Rick
Steve Sanford
Well-known member
SJ~I believe I have the feather edge worked out, to the extent it's possible with 1 1/2" W planks. The 1/2" chine log stays, but I substituted traditional ribs for the thinner strips I had planned. I didn't want to do it this way because it reduces inside depth in the boat. The ribs are 3/4" x 1" mahogany sawn on the same 36" outside radius (35" inside) and temporarily screwed to the molds.
Another reason I don't like the ribs, is that when sawn vs. bent they are subject to splitting. These are only 1" thick, caution will be required while glueing/nailing. I should build a steam box. One more thing to do.I don't have room for extra stuff anymore, as the family house with multiple barns where I always built has been sold.
The molds are encased in green glue-resistant tape in anticipation of planking. The tape will no doubt need repair when planing and sanding of the ribs is complete. The bow assembly and molds 1 & 9 are permanent so they aren't taped. (9 is the stern facing the camera)
You can see in the photo that the ribs are cut along the chord line where they contact the chine log. Corresponding short sections which support the deck will mate from the top when the boat is flipped, together with a cleat tieing them together. When flipped, the molds go with the boat by simply unscrewing them from the vertical supports on the strongback. That way the molds can be used to form the deck timber contours without wasting a lot of wood. The strongback is removed and the boat sits atop the larger strongback beneath, at a good working height to get at the inside.
If I think of it, I'll get a photo of the molds at the bow and stations 1 & 2. I think I mentioned that the Megargee plans have a little jink in them in that location. It was always a problem on the 4 full size boats I built from those plans. The exact same thing happened on this one after the offsets were entered into a computer using the plan measurements, extrapolated and scaled. If you ever build one, expect some fussing at that point. It has something to do with #1 and the bow, but I can't describe exactly what. Maybe the transition from radius to flat-ish at the bow. My solution on this boat was a power planer on #1, which is constructed of 3/4" plywood.
View attachment 68196
Great progress! Of course, I have yet another "day late" suggestion....
When I have contemplated such builds - especially like so many Barnegats where one master curve (radius) is used for all frames - I would laminate them. For thatch rails on my spray shields, I use 3 layers (laminae....) of Philippine Mahogany set in epoxy.
Lots of c-clamps overnight and packing tape to protect the mold. I usually clean the edges after the cure on my table sander. Then I knock off the hard corners with my smallest block plan. (Of course, an eight-inch round-over bit on the router table would give a fine effect.) Everything gets hand-sanded with 80-grit paper. I seal with spar varnish prior to installation or painting.
(Sorry for the blurry image!)
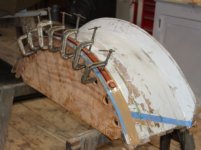
Because they are not solid lumber, I would cant them fore or aft as needed so that they met the planking square - and ignoring the ages-old practice of plumbing frames - and thus avoiding most of the beveling during planking.
Maybe you can file this for your next arc-bottom vessel - or in your ever-growing "Sanford's Hare-brained Ideas" folder.....
All the best,
SJS
I've laminated ash (a long time ago) for beaver drying hoops and crude snowshoes, never for a boat. It's a good solution rather than steaming, which I need to get set up for. Room is at a premium.SJ~
Great progress! Of course, I have yet another "day late" suggestion....
When I have contemplated such builds - especially like so many Barnegats where one master curve (radius) is used for all frames - I would laminate them. For thatch rails on my spray shields, I use 3 layers (laminae....) of Philippine Mahogany set in epoxy.
Lots of c-clamps overnight and packing tape to protect the mold. I usually clean the edges after the cure on my table sander. Then I knock off the hard corners with my smallest block plan. (Of course, an eight-inch round-over bit on the router table would give a fine effect.) Everything gets hand-sanded with 80-grit paper. I seal with spar varnish prior to installation or painting.
(Sorry for the blurry image!)
View attachment 68209
Because they are not solid lumber, I would cant them fore or aft as needed so that they met the planking square - and ignoring the ages-old practice of plumbing frames - and thus avoiding most of the beveling during planking.
Maybe you can file this for your next arc-bottom vessel - or in your ever-growing "Sanford's Hare-brained Ideas" folder.....
All the best,
SJS
I'm happy to hear your thoughts on installing timber flush to the bottom rather than square to the frame. I've considered trying it, but have not figured out the solution yet. The problem (I think) is that by turning the timber, the stationing is altered from a plan view to an oblique build. The boat form will be slightly different than the plan unless it is considered in the plan. How much, or whether it matters, is what I don't know. I do have a fancy shmancy computer so maybe for next weeks boat build.
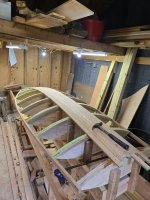
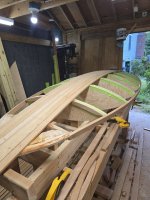
In an attempt to stay on schedule, the planking started at 4 yesterday, knocked off at 7:30. The goal is to have the bottom planked tonight. Planks are 1 1/2" x 13/32 Spanish Cedar strips attached to Phillipine Mahogany ribs installed at the last minute. The chine log is 1/2" SC.
The ribs and plywood frame are coated in epoxy before the plank is affixed. The nails are #15 - 3/4" bronze boat nails. I like the way the Spanish Cedar bends and lays on the ribs, very similar to White Cedar but more fine grained. It is a hardwood, think of Mahogany grain with White Cedar-ish flex. I have planked with Phillipine Mahogany, it is noticably more difficult to bend. Of the planks I installed, I did not split a single board which is amazing.
A few progression photos:
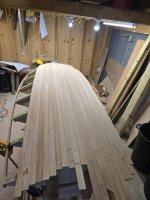
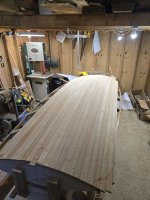
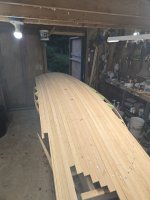
A couple of build notes:
1. This build was an experiment in scaling down plans and simplifying the build. The objective in using thin, narrow strips similar to canoe planks, is ease of planking. Specifically to eliminate the need to plane/ease planks to make the curve without binding. Result- Fail. The last couple of planks on either side need to be eased. Everything took the bend with acceptable bind until then. I think I could force and clamp them, but the internal stress created is just begging the boat to tear itself apart. It's not a huge deal because I needed to fit a spacer strip anyway, which you can see on the left side of the last picture. This maximizes the overhang of the final outboard plank in an effort to construct the mythical feather edge. Success or failure on that endeavor will remain a mystery until the boat is flipped..
2. Don't trust plywood. I knew it was a bad idea, but I left the plywood in the bow assembly. The screws visible in the final photo are temporary, required to help the nails hold it together while the epoxy sets. I'll leave them in until the boat is flipped and epoxy fillets are installed to secure the joint.
3. Sawn ribs made of anything but oak break when nailed. Proven again last night, the station 8 starboard side rib failed 6" inboard of the chine log. A sister was screwed and glued in place, but no more planking was done on that side so the epoxy could set up. I didn't really have a good alternative short of screwing everything together, which was not in the plan. I knew all this from lots of past experience, but I'm older, wiser, and a better wood butcher now so I can outsmart Physics, right? Denied
With a little luck I'll finish the bottom tonight and can take the next week off without looking out the window at the shed.
The ribs and plywood frame are coated in epoxy before the plank is affixed. The nails are #15 - 3/4" bronze boat nails. I like the way the Spanish Cedar bends and lays on the ribs, very similar to White Cedar but more fine grained. It is a hardwood, think of Mahogany grain with White Cedar-ish flex. I have planked with Phillipine Mahogany, it is noticably more difficult to bend. Of the planks I installed, I did not split a single board which is amazing.
A few progression photos:


A couple of build notes:
1. This build was an experiment in scaling down plans and simplifying the build. The objective in using thin, narrow strips similar to canoe planks, is ease of planking. Specifically to eliminate the need to plane/ease planks to make the curve without binding. Result- Fail. The last couple of planks on either side need to be eased. Everything took the bend with acceptable bind until then. I think I could force and clamp them, but the internal stress created is just begging the boat to tear itself apart. It's not a huge deal because I needed to fit a spacer strip anyway, which you can see on the left side of the last picture. This maximizes the overhang of the final outboard plank in an effort to construct the mythical feather edge. Success or failure on that endeavor will remain a mystery until the boat is flipped..
2. Don't trust plywood. I knew it was a bad idea, but I left the plywood in the bow assembly. The screws visible in the final photo are temporary, required to help the nails hold it together while the epoxy sets. I'll leave them in until the boat is flipped and epoxy fillets are installed to secure the joint.
3. Sawn ribs made of anything but oak break when nailed. Proven again last night, the station 8 starboard side rib failed 6" inboard of the chine log. A sister was screwed and glued in place, but no more planking was done on that side so the epoxy could set up. I didn't really have a good alternative short of screwing everything together, which was not in the plan. I knew all this from lots of past experience, but I'm older, wiser, and a better wood butcher now so I can outsmart Physics, right?
With a little luck I'll finish the bottom tonight and can take the next week off without looking out the window at the shed.
Richard Lathrop
Well-known member
Steve,
Interesting approach. I have seen the bending form similar to that in the Rudder plans for building a sneakbox.
SJ,
Do you predrill prior to nailing? Overkill but I predrill prior to nailing to try to prevent splitting.
Rick Lathrop

Interesting approach. I have seen the bending form similar to that in the Rudder plans for building a sneakbox.
SJ,
Do you predrill prior to nailing? Overkill but I predrill prior to nailing to try to prevent splitting.
Rick Lathrop
SJ
Did you bevel the ribs to meet the planks flush? I see shavings on the floor but can't quite see if there are gaps between the ribs and planks. Maybe they fall close enough on their own.
Did you bevel the ribs to meet the planks flush? I see shavings on the floor but can't quite see if there are gaps between the ribs and planks. Maybe they fall close enough on their own.
I didn't predrill. These are #15 nails, they're so tiny it takes minimal effort to drive them. Yet I still managed to break a rib. Every time this happens I swear to myself, never again. Use screws next time. I'll never learn.Steve,
Interesting approach. I have seen the bending form similar to that in the Rudder plans for building a sneakbox.
SJ,
Do you predrill prior to nailing? Overkill but I predrill prior to nailing to try to prevent splitting.
Rick Lathrop

Yes, to the extent I could. Because they were late to the party, the ribs are screwed to the molds (temporarily). Typically there would only be three or four molds. Ribs would be placed at empty stations, then the molds removed and ribs placed in those locations. The mold edge impedes the ability to fully bevel the rib, but I got them pretty close. In general, the bevel is on one side of the rib, as they either slope fore or aft viewed from the side. The rib at station 5 is pretty much flat. I'll add an epoxy fillet along the ribs on the inside when the boat is flipped. That'll cover any sin in addition to structural strength.SJ
Did you bevel the ribs to meet the planks flush? I see shavings on the floor but can't quite see if there are gaps between the ribs and planks. Maybe they fall close enough on their own.
Really enjoying following this build, and love the shape!
SJ
Thanks for clarifying. I want to mention I really appreciate the pictures you are posting, not only of the boat, but of the strongback too. That seems like a really functional structure to build on. It's stuff like this that really helps a future builder. Some people didn't grow up around boat construction and pictures like this go a long way towards making a project seem within reach.
Thanks for clarifying. I want to mention I really appreciate the pictures you are posting, not only of the boat, but of the strongback too. That seems like a really functional structure to build on. It's stuff like this that really helps a future builder. Some people didn't grow up around boat construction and pictures like this go a long way towards making a project seem within reach.
Thank you. I try to come up with stuff like the strongback to make a build as accurate, easy and quick as possible. That strongback (the rectangular one made of 2x6's on top of the big one) required less than an hour to assemble. Getting things set up correctly at the start speeds up the actual construction. Speaking with buddies, what deters them from building a boat is what they perceive as a months or years long commitment. They want a boat to hunt out of this season. Me too.
You've been on a boat building tear this summer. After this project have you got more lined up?
I'd like to build a second one of this same design. It's fun to hunt with a buddy. My problem now becomes temperature, it'll be too chilly to glue and glass soon so it probably needs to wait til spring. This one may still have kinks to work out, primary among them being my lack of dodger sewing knowhow. My grandmother was a fine seamstress, she did the sewing in the old days. She tried to teach me how to sew, I think I was too young and preoccupied for it to sink in. Since my grandmother died over 35 years ago, I've had canvas made by someone else.You've been on a boat building tear this summer. After this project have you got more lined up?
Why do you think I went with a hard dodger? That's a big part of it. I could make it myself and not suffer through explaining to a local canvas shop what was in my mind's eye.
As boat builders, suffering is what we do.I could make it myself and not suffer through explaining to a local canvas shop what was in my mind's eye.
Steve Sanford
Well-known member
SJ~I've laminated ash (a long time ago) for beaver drying hoops and crude snowshoes, never for a boat. It's a good solution rather than steaming, which I need to get set up for. Room is at a premium.
I'm happy to hear your thoughts on installing timber flush to the bottom rather than square to the frame. I've considered trying it, but have not figured out the solution yet. The problem (I think) is that by turning the timber, the stationing is altered from a plan view to an oblique build. The boat form will be slightly different than the plan unless it is considered in the plan. How much, or whether it matters, is what I don't know. I do have a fancy shmancy computer so maybe for next weeks boat build.
I understand your point about canting the frames changing the designed hull contours. My laptop is both fancier and schmancier than I know how to use. However, my analog (aka Old School) approach would be to tack on the central plank (or a heavier proxy) - make sure it has that sweet, fair curve we all love - then use it as the reference point for the degree (literally) of cant needed for each station. I would clamp the frame tight to this jury-rigged keel - then trim and secure the ends.
But - keep your eye on the prize! Watching that hull take shape is magical.
SJS
