2025 Devlin Snow Goose Thread

Quick update - completed my wiring layout and got that all removed and stored. Shelf bases and battery stands/boxes cut and dry fit.
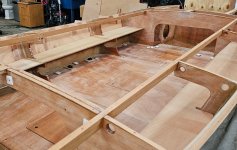

View attachment 75784
Henry~

Congratulations on the fine progress!

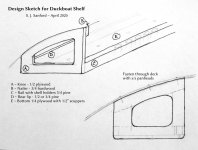
A couple of thoughts on shelves. I generally add a lip (more properly a "fiddle") and some scuppers - to keep valuables in and nuisance water out.


Shelf detail 2 small.jpg


sm Shelf - Design Sketch    4-2020.JPG

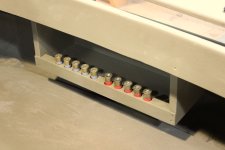
I usually add some shell holders in the fiddle on my shorter shelves.

sm Shelf 1.JPG

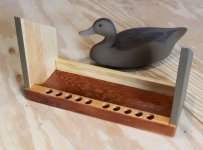
Because such shelves are largely out of the weather, I often use a bit of varnish to yachten (?) up the vessel.

sm 2 Tuffin South Bay - dry shelf.jpg

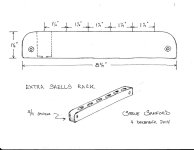
The shell sockets require careful boring on the drill press - so the brass (!) remains above the fiddle and each socket can drain.sm Shell Rack - post.jpg

All the best!

SJS
 
Henry~

Congratulations on the fine progress!

A couple of thoughts on shelves. I generally add a lip (more properly a "fiddle") and some scuppers - to keep valuables in and nuisance water out.


View attachment 75786


View attachment 75789

I usually add some shell holders in the fiddle on my shorter shelves.

View attachment 75788

Because such shelves are largely out of the weather, I often use a bit of varnish to yachten (?) up the vessel.

View attachment 75787

The shell sockets require careful boring on the drill press - so the brass (!) remains above the fiddle and each socket can drain.View attachment 75790

All the best!

SJS
Thanks Steve, I do plan on lips (but I'll start calling them fiddles now!) and really like your shell holders, so will incorporate some. Suppers are a good idea, too - thanks!
 
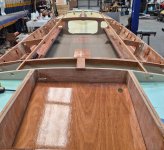
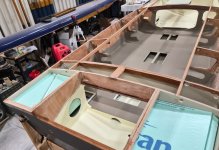
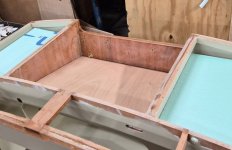
Battery hold-downs completed and installed, sole/hull joints glassed and faired, and final epoxy coat applied to sole, bulkheads, flotation compartments, bilge, and lower sides. The same areas primed and with a good base coat - gloss poly in the areas that will be covered (for easier cleaning and maintenance and better water protection), flat Parkers in the cockpit area.

IMG_20260524_084304.jpg

IMG_20260524_084241.jpg

IMG_20260524_084208.jpg

Now, off for our road trip to ME, CT, MA, and NY. On return will get shelves completed and installed and foam cut for installation in flotation compartments, then can finally get to work installing the decking I've prepped. I'd originally planned to get my wiring run before putting on the deck, but since I moved the runs out closer to the hull sides I'll wait until after decking is installed, fileted, sealed, and painted. Still a lot to do, but seeing the light at the end of the tunnel.

I haven't yet located a good used trailer and motor - if they aren't located soon after our return I'll have to get moving in ordering new.
 
Seeing the MA, NH, and ME coast and marshes I now have a much better understanding of your skinny/short marshes and why extremely hideable boats are needed. I also feel much better about choosing the snow goose - our marshes are so much taller that anything more hideable would be overkill. Spectacular beauty up here!
 
Seeing the MA, NH, and ME coast and marshes I now have a much better understanding of your skinny/short marshes and why extremely hideable boats are needed. I also feel much better about choosing the snow goose - our marshes are so much taller that anything more hideable would be overkill. Spectacular beauty up here!
Henry~

Much of Long Island's Great South Bay (and neighboring waters) are low saltmarsh - mostly Salt Hay (Spartina patens) with low-growth Cordgrass (Spartina alterniflora) near the edges. The Old School Sanford loves the flat-on-your-back grassboats of Yore for the hide - but the Old Man Sanford appreciates taller TDBs and such for the the sit-up comfort and ease of shooting.

Every boat is a compromise!
All the best,
SJS
 
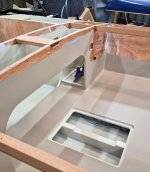
Plugging along since our return from the NE. Shelves epoxied and ready for install, additional base coat on sole and bilge, motorwell brass drains installed. Started cutting foam for flotation compartments while waiting for epoxy to dry. I'm using 1" insulation foam boards.

View attachment 76968

View attachment 76969
Henry~

Great work - as always!

As a devotee of brightly painted storage spaces, I appreciate the pale cream. May I ask which paint/color?

Also, on your motor well: Will the "floor" be filleted et cetera - or is it screwed from below and set in 3M 5200 or other adhesive caulk?

All the best,

SJS
 
Henry~

Great work - as always!

As a devotee of brightly painted storage spaces, I appreciate the pale cream. May I ask which paint/color?

Also, on your motor well: Will the "floor" be filleted et cetera - or is it screwed from below and set in 3M 5200 or other adhesive caulk?

All the best,

SJS
Hatteras Cream (Pettit EZ Poxy)

Planning to epoxy and fillet.
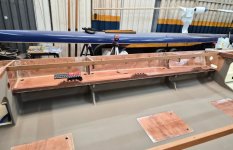
 
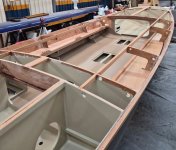
Not much in the way of visible changes since the last update, but shelves are installed and fileted in place. One process note to capture for the future resource... I took measurements for the shelves much as I did for the sole with a story-board/story-stick. After cutting them to the basic dimensions and cutting insets for the bulkheads, I did some minor tweaking by inserting them in place and eyeballing fit. I did NOT worry about getting them exact - in fact, final fit gave between 1/8" and 1/4" gap around the outer (hull side) edges - as I knew I'd be fileting them in so any gap would become epoxy.

Installation was easy - a little thickened epoxy at the bulkeads and the shelves were tacked in place. Once dry, I used packing tape from underneath along the edges - done intentionally, you can create a mold for a bottomside filet. Then I simply pumped in some thickened epoxy (catsup consistency) and just let it fill the gaps. Once that hardened, but still green, I mixed peanut-butter consistency epoxy and made the filets on top of the shelves. Once cured the packing tape pulled off easily. Also got some blocks mounted around the upper perimeter of the hull for attaching cable ties without drilling the hull.

IMG_20260702_162926.jpg

IMG_20260702_162856.jpg

Other work the last week includes designing and prepping pieces for my electrical switch mount and for a gps/fish finder mount. After playing with a few options, I've decided the latter will most likely attach to the coaming so it may be a while before I post on that.
 
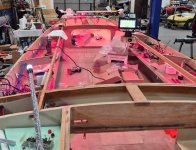
Wiring complete and tested.

IMG_20260720_165800.jpg

I have one last test to do on my charging system tomorrow and a touch left to do cleaning up and securing the wiring loom, then will cover the wiring with Visqueen and be ready to get rolling on the deck.

I'll grab photos of the electronic bits and connections for documentation (and to help my memory when something goes wrong in the future) once cleaned up.
 
Primarily adding pictures and details for the evential resource, but, as always, welcome any critique and advice.

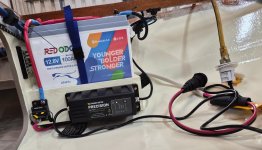
I've gone with lithium batteries, largely for weight saving but also because I think it is a better solution for the deep cell electronics and trolling motor battery (and didn't want to mix types). I went with Group 31 size for both so I could swap out to lead acid should I decide, but the weight savings is significant. The lithium starter battery is about 33 pounds and the deep cell about 22 pounds - vs lead acide group 31 batteries at 65-70 pounds each. Both batteries have BT for monitoring on my phone, and starter battery has self-heating that cuts on at 14° (and then turns off when internal temp hits 50°).

Screenshot_20260721_121736.jpg

The starter battery sits just in front of the port side rear flotation chamber, between 2 bulkheads. Cabling is such that I can pull the battery out and then disconnect where I have easier access - 1 pos cable to my switch, 1 neg cable to the HD bus you see above it. The motor will connect to the switch and the Neg bus.

IMG_20260721_132301.jpg

The switch (Blue Sea 6011 - turns both circuits on but keeps them isolated - with an option to combine if needed) is mounted on the bulkhead in front of the starter battery, and my main switch and fuse panel box will be just fore of that on the shelf. Tucked in behind that on the bulkhead is the Yandina Combiner.

IMG_20260721_132405.jpg

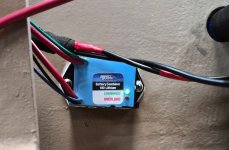
A better picture of the Yandina (now SmartShore) Combiner. It is tucked back as I don't really need to be able to see it or have much access to it, other than to periodically see the lights to check its status. This is a great little device that senses when either battery has reached full charge (by sensing voltage > a certain amount) and then passing the charging current to the second battery. Ie., when the motor is running and alternator is sending a charge, and the starter battery is full, it passes the charge to the house battery - and, in reverse, when using a charger on the house battery and it us full, the charge passes to the starter battery.

IMG_20260721_132132.jpg
 
Moving forward down the port side, I've put in 1 accessory panel with 2 USBs and 1 12v cig lighter style outlet just above the shelf in the rear of the front cabin bulkhead. You can also see one of the LED strips above.

IMG_20260721_132501.jpg

On the other side of that bulkhead, that will be below the front deck, is the house battery and on board charger. The 60a circuit breaker (lower left) feeds the trolling motor plug, that will be mounted in the deck. The charger plug will also be mounted in the deck. Again, the battery can be removed from its box for disconnecting its cables a little more easily than in situ.

IMG_20260721_132635.jpg

IMG_20260721_132544.jpg

The front well LED strip is on its own circuit, so the cockpit and well lights can be turned on/off independently.

IMG_20260721_132736.jpg

Wiring continues down the starboard side for the compass and plotter/GPS. The latter cabling comes from the rear to keep it as isolated as possible from the rest of the wiring, and the TM wiring in particular. I also ran it in TechFlex Flexo anti-static braided cable sleeving. The transducer cable also runs from the rear, and a network cable to connect TM and plotter from the front.

IMG_20260721_132801.jpg

The blue seen in various photos is simple braided cable sleeving for chafe protection - and I used a bit of pipe insulation at each cable tie and bulkhead penetration to protect from vibration and chafing at these points.
 
Last edited:
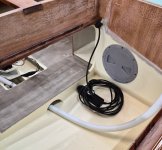
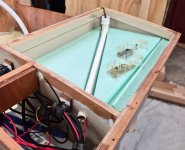
Last, a couple pictures from the stern areas. I wanted to capture any water that might sneak in through the stern light and prevent it from getting into the flotation chamber, thus the pvc pipe that will guide any such water forward to where it can drain.

IMG_20260721_132903.jpg

IMG_20260721_132955.jpg
 
Back
Top