Advice on sneakbox - AA Broadbill or MLB Wigeon

Bit more progress. I have the combing on for the spray dodger. The inside of the hull is sanded and just a few more touchups before I can paint the inside of the hull. Made a bit of a mistake with the 5200. I was sure I read that it was sandable somewhere. Left a couple of lumps here and there and it does not appear to be too sandable.

IMG_0112.jpg


I think I will add flapper boards and I'm laying out where the bits and pieces will go. I noticed that the chalks for the flappers are usually quite high and the bottom beveled so the top lays level. I'm thinking about using 3/4 plywood for the chalks. This is a lot lower than I've seen on other boats. I'm guessing this is because my deck is mounted at a lot lower angle than the decks of the other boats. Are there reasons what the flapper boards are usually elevated on chalks? Also, is there a reason that the caulk is beveled on the bottom so the top sits level? I'm thinking it might be so the flapper lays level and you can sit things on it when is down.

IMG_0111.jpg
Scott
 

Attachments

  • IMG_0111.jpg
    IMG_0111.jpg
    278.6 KB · Views: 5
Last edited:
It was crazy warm here this weekend. There was + 3 1/2' of snow in the yard on Saturday. I thought I had lots of time. My trailer, which was lost in the snow on Saturday appeared this morning - must of lost more than a foot of snow. Should be able to get a boat on the river this week. And I thought I had another month... need to get moving.
 
Bit more progress. I have the combing on for the spray dodger. The inside of the hull is sanded and just a few more touchups before I can paint the inside of the hull. Made a bit of a mistake with the 5200. I was sure I read that it was sandable somewhere. Left a couple of lumps here and there and it does not appear to be too sandable.

View attachment 65010


I think I will add flapper boards and I'm laying out where the bits and pieces will go. I noticed that the chalks for the flappers are usually quite high and the bottom beveled so the top lays level. I'm thinking about using 3/4 plywood for the chalks. This is a lot lower than I've seen on other boats. I'm guessing this is because my deck is mounted at a lot lower angle than the decks of the other boats. Are there reasons what the flapper boards are usually elevated on chalks? Also, is there a reason that the caulk is beveled on the bottom so the top sits level? I'm thinking it might be so the flapper lays level and you can sit things on it when is down.

View attachment 65012
Scott
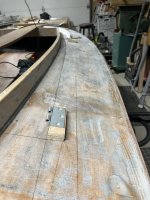
Good decoy shelf and keeps your brushing grass out of the water to a degree when flipped down.
 
I ended up making the grassing rails from plastic decking. I got it from a local producer and it is not a composite product with a coating. We'll see how it works out. I ripped it into 2 1/8" wide strips, and following Eric's build, drilled 5/8 holes down the centreline with a forester bit and ripped into 2 rails. Was not a perfect rip, but I think it will work.

IMG_0113.jpeg

Yesterday I washed the boat down with acetone and painted it with Wetlander drab olive topcoat. I used up most of a gallon of paint. Had enough left to do a couple of touch ups this moring, it would have been better to have another 1/2 quart of paint.

IMG_0117.jpeg

IMG_0127.jpeg


IMG_0124.jpegIMG_0126.jpeg
 
Scott

She is looking fantastic and I think you have her in better shape than any point in her life. The hard part is in the rear view mirror and now you get the fun part, rigging and customization. I expect a maiden voyage isn't too far off. What are you powering her with? I know from experience she will FLY with a 25 hp.
 
River opened up this week ... earlier than expected. I have a 21' canoe with a 15 Suzuki and I was able to get to the cabin for the weekend. I'd hoped to make that trip in the BlueBill. For now, I will use the 15 Suzuki. I might convert it to a 20 hp, but I'll wait and see how it handles with the 15.
 
River opened up this week ... earlier than expected. I have a 21' canoe with a 15 Suzuki and I was able to get to the cabin for the weekend. I'd hoped to make that trip in the BlueBill. For now, I will use the 15 Suzuki. I might convert it to a 20 hp, but I'll wait and see how it handles with the 15.
Scott,
How do you like your Bluebill? Seems not too many have built or own this Devlin design. Have the study plans, but still mulling it over before committing myself. Richard
 
Scott,
How do you like your Bluebill? Seems not too many have built or own this Devlin design. Have the study plans, but still mulling it over before committing myself. Richard
This one is not a Devlin design... it was a home built from a ClarksCraft (https://www.clarkcraft.com/cgi-loca...2352&cart_id=c0bf8e7cd28a0fbaf7f2313f1183450e.) Unfortunately, I cannot tell you how it handles. I bought it second hand last fall to hunt it. I put it on the water and made a very quick run - maybe 5 minutes. It handled very well and it felt good on the water... That's all I can tell you. I brought it home and the floor boards were attached to the frames. We have a lot of mug and sand here and I did not like that setup so I removed the floor boards thinking I'd figure out a way to make them removable. Removing the floorboards revealed serious problems. There were several large sections of the plywood hull that were saturated with water. This required a rebuild of the hull.

There are aspects of the design I did not like. Unlike Devlin's designs it is not a stitch and glue and is constructed over frames. The frames raised the floor 4"s and I thought it was too high. To lower the floor, I cut out the frames and with help from Eric and others, figured out how to rebuild the floor while maintaining the integrity of the hull. I am very happy with the rebuild. I think it is a lot stronger than the original design. My concern is that the door is attached to the frames. I built in limbers into the frames and I think I can wash out any mud that accumulates. I remain concerned about ice. If water gets left in the hull it will freeze and be impossible to get out until it thaws. I plan to have a couple of covers for it - will just have to be careful late season.

Along the way, I met a local boat builder. He suggested it would be easier and faster to build a new one. If I had my time back, I would have built a Devlin boat. I've had his plans for the Cackler and Snow Goose, just never gout around to building one. Now I have the bug, may I will build one someday.

This week I will flip her, put a finale coat of fibreglass on the repaired areas, fair and paint it. It takes 7 days for the paint to cure ... I will have it on the water the next day. I can give an update after II get some time on the water.

Scott
 
Another question. I'm copying Steve Sanford's use of pvc trim boards for the rail that holds the bottom of the spray dodger. I'm wondering if I ripped it down to 1/2" if pvc trim boards could be used for grassing rails. I was thinking about using webbing, but I like the look of the rails better. Any thoughts?
you can, I did, but it is not strong. If you step on it, it will break. I am now a BIG fan of using webbing.
 
Another option for holding your grassing is affixing it to plastic bird netting cut to cover areas you wish to cover. I run a stretch of 5/16" nylon bungee cord thru nylon pad eyes spaced about every 2' around perimeter of hull deck and another stretch across bow deck. Stretch a bit and tie a knot near stern allowing you to add tension if needed in subsequent years. Pad eyes either pop riveted or screwed to deck about 1/2 distance from your cockpit combing to hull edge. That stretch cord allows me to zip tie the plastic bird netting to hull by attaching to it. Also at end of season if needed simply cut those zip ties holding netting to bungee, Roll up grasses netting and store out of weather. Greatly increases lifetime of your grassing job to years instead of months. Also does good going down the highway for towing.
 
Dave/Roy,

I went with plastic lumber. It is not composite deck material, but solid plastic decking. I made the sections for grassing 8" long by 1/4" high. I don't think you can break it -- it has a bit go give, but very little over 8". If it does not work, I will use webbing. I'n struggling with attachment now. The front section of the deck is completely enclosed with 1/4" plywood and filled with floatation. The first 4 screws of the rails fall in this section of the deck and I have no way to attach a backer. I'm testing out a method using an epoxy saturated piece of sponge squished into a hole 4x the size of the screw. I have to wait until tomorrow to see how the epoxy sets up. If this does not work I may resort to these hollow door anchors that are designed for 1/4" material (https://toggler.com/products/toggler-plastic-toggle-anchors). Any other ideas?


IMG_0139.jpeg
 
Don,t know how deep you've inset your mounting hole on rail but can it be pop riveted with long shank aluminum pop rivets. I,d be afraid the thin plastic of those inserts would become brittle in cold temps .
 
Dave/Roy,

I went with plastic lumber. It is not composite deck material, but solid plastic decking. I made the sections for grassing 8" long by 1/4" high. I don't think you can break it -- it has a bit go give, but very little over 8". If it does not work, I will use webbing. I'n struggling with attachment now. The front section of the deck is completely enclosed with 1/4" plywood and filled with floatation. The first 4 screws of the rails fall in this section of the deck and I have no way to attach a backer. I'm testing out a method using an epoxy saturated piece of sponge squished into a hole 4x the size of the screw. I have to wait until tomorrow to see how the epoxy sets up. If this does not work I may resort to these hollow door anchors that are designed for 1/4" material (https://toggler.com/products/toggler-plastic-toggle-anchors). Any other ideas?


View attachment 65159
I would lay out all the holes. Then come back, excuvate the foam with the drill, swirl it around to make a cavity. Fill the cavity with thickened epoxy. After cured, predrill for the mounting screws.
 
Scott, The toggle anchor is not a horrible idea but I would not use plastic. I've seen metal toggle anchors of a similar design. I'm using a combination of Roy's and Dave's ideas. Although I love the looks of Steve Sanford's designs, I've decided to use plastic netting held down by webbing. Besides being practical it is super adaptable to any type of camo material. Richard
 
The foam in the bow compartment is not pour in foam - it is pieces of extruded polystyrene. The sponge saturated with epoxy might work, it did not get as hard as I had expected, I guess a lot of the epoxy was lost when I squished it into the hole. I was also thinking about metal anchors - but I don't want to use anything that rusts. There are some cast zing ones that I was thinking. might work. I did not go there yet.
 
Back
Top