BBSB Pond Box Build

A little more progress from this weekend. I got sidetracked building duck blinds at my club, or more accurately cutting grass for the blinds. We use switchgrass, which this year is absolutely polluted with poison ivy. I always wear shorts and a tee shirt since it's hot work. I expect wonderful news in the next couple of days. :(

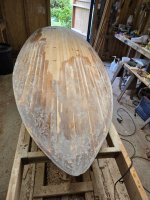
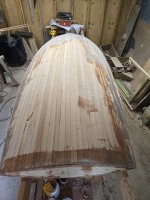
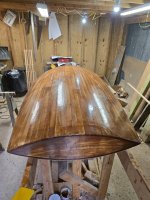
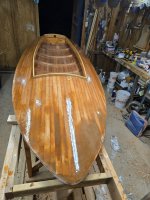
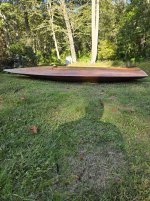
Most of what I accomplished was fairing the hull. The bow has been miserable, the kink just won't go away. The planked hulls I have built have all been fiberglassed, and I've had good luck fairing the entire hull with thickened epoxy. The procedure is to put a little unthickened epoxy down first, then fair over it. For this build I'm using wood flour as a thickener. The photos show areas where there was bleed through from the boat interior and I could then apply the thinnest layer possible along imperfections. After the photo, I went over the entire bottom so it's reasonably smooth pending final sanding.

20250914_144230.jpg

20250914_144217.jpg


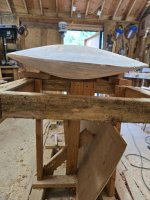
It took several applications and sanding sessions to get the bow close. You can see the kink four or five planks right and left of centerline. It results in a thicker profile in that location, which results in a slight sheer. I can probably work it out to an edge with a couple more fairing sessions. Before I build another on these molds, I need to rework the dimensions on station 1 to avoid this aggravation. Note that the boat is not secured to the bench, it is slightly rolled to one side rather than crazy misshapen. It's light enough so I can easily pick it up and flip it by myself. I'm guessing 60-70 pounds now, about the same as a sit on top kayak. The glass will add another 10 plus floor, dodger etc. Maybe 90 pounds complete?

20250914_144258.jpg

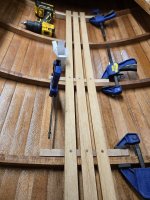
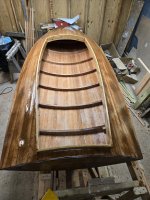
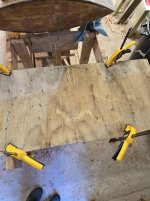
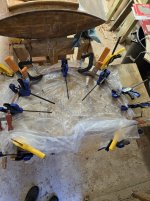
I also started on a removable floor. A removable section is pretty common in BBSB's, the photo shows how I construct one. The final product will have a couple of permanent planks outboard of the removable section. The removable section will be four feet long, the permanent section likely three. Being able to remove the center of the deck allows the hunter to retrieve stuff that tumbles under the deck (shells for instance), access the boat bottom to bail and allows easy repair if somebody steps in too hard and breaks a plank. Not sure who that might be.:whistle: There will also be a cleat toward the bow end where the backboard will snap in while gunning. Note that the floor ribs are clamped to the boat bottom ribs. What isn't clear is that there is a 1/16" spacer between the two ribs. If you don't build it that way, the wood can swell and the floor won't fit.


20250913_174656.jpg

The next question to ponder is how sharp the feather edge can be and accept glass tape. I don't think it will work with less than an 1/8" radius, but I'm curious if anybody has made it work on an edge like this boat.
 
Last edited:
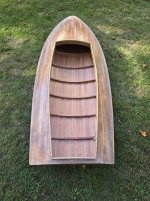
Getting a little closer. The bottom is glassed, one layer 8 oz, two coats epoxy. The glass extends to the feather edge and a tiny bit beyond in such a way that I'm going to attempt to mate deck glass to bottom glass without tape. Possibly with a tiny bit of help from epoxy thickened with cabosil. While planking with the 1 1/2" strips I didn't think it would work out near as well as it did, now the edge looks really cool so I want to keep it. I believe the worst that can happen should the edge get badly dinged, is the need to sand the sides to a small radius, add tape, and paint.

20250917_080304.jpg

Those aren't drips near the stern in this photo, they're streaks left over from the fairing process.

20250917_080319.jpg

Now the boat's flipped and the cockpit coaming needs to be installed before the deck is glassed. The coaming is going to be ash, well encapsulated in epoxy to resist rot. The plank is 3/4", to be planed down to 3/8 so it looks light, in scale with the size of the boat. The ash should work well for the coaming, providing strength for when somebody sits on it. I question whether the Spanish Cedar would support a person.

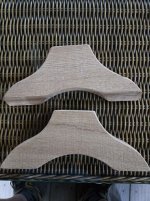
The bow and stern pieces are cut on the deck radius + 1" (so roughly 37 1/2"). I use the timber template (36" outside radius), then scribe along the outside of it using a piece of planking 1 1/2" wide as the spacer. The KISS method, rather than setting up a beam compass. Apologies for the poor photo, it shows the template and plank piece on the ash which has already been cut, all atop a piece of mahogany. I thought there would be more color contrast.

20250917_081723.jpg

Rough fitted bow piece before planing.

20250917_081620.jpg
 
One interesting (maybe) thing of note- the LOA is now 9' 3 1/2". The frame was right at 9', the plank overhang at the bow needed to create the feather edge added the 3 1/2".
 
SJ,

Enjoying your build. How did you get your floorboards to lay against the bottom with the bottom rocker?

Rick Lathrop
In the photo they're clamped down. They wanted to spring back. My technique to minimize the springback is to add bend during final assembly. The planks will be epoxied and screwed down to the removable timbers. When that happens, I place a large weight in the middle to hold it down....a 50 lb bag of corn (or 2) usually works.....then place a 2x4 under the ends to build in a little extra bend while the epoxy sets. Rarely does it result in enough permanent bend, but it helps. Depending on how much springback remains, a couple of rotating cleats may be required. Tough to predict.
 
In the photo they're clamped down. They wanted to spring back. My technique to minimize the springback is to add bend during final assembly. The planks will be epoxied and screwed down to the removable timbers. When that happens, I place a large weight in the middle to hold it down....a 50 lb bag of corn (or 2) usually works.....then place a 2x4 under the ends to build in a little extra bend while the epoxy sets. Rarely does it result in enough permanent bend, but it helps. Depending on how much springback remains, a couple of rotating cleats may be required. Tough to predict.
SJ~

Whilst you were answering, I was searching through my photos on "floorboards" and "turnbuttons".

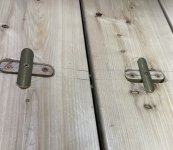
One thing I have done with springy floorboards is to hold them down amidships with turnbuttons. I typically use Locust - but I have also seen some very nice ones cast from bronze. (Brass would probably work...)

In my RED-LEG (Barnegat) - the central floorboard is screwed in pace - but the laterals are removable via turnbuttons: (photo is 2016 pre-restoration).

B Floorboards, turnbuttons, shelf, lap cover chocks - small.jpg

I cannot locate my photos, but for a one-piece slatted floorboard, I fasten a pair of turnbuttons to the ribs, either side amidships.

In my old gaff sloop WILLET - long before digital cameras - the center floorboard was held down by turnbuttons that sat below flush in shallow "sockets" - on the seam between both attached laterals and the free central board.

On my usual plywood floorboards - as for the South Bay I am working on right now - the turnbutton turns on a pad that is almost flush with the floorboard:

sm Floorboard Turn-Button and Gas Tank Curb.JPG

I am thoroughly enjoying your work!

All the best,

SJS
 
SJ~

Whilst you were answering, I was searching through my photos on "floorboards" and "turnbuttons".

One thing I have done with springy floorboards is to hold them down amidships with turnbuttons. I typically use Locust - but I have also seen some very nice ones cast from bronze. (Brass would probably work...)

In my RED-LEG (Barnegat) - the central floorboard is screwed in pace - but the laterals are removable via turnbuttons: (photo is 2016 pre-restoration).

View attachment 68930

I cannot locate my photos, but for a one-piece slatted floorboard, I fasten a pair of turnbuttons to the ribs, either side amidships.

In my old gaff sloop WILLET - long before digital cameras - the center floorboard was held down by turnbuttons that sat below flush in shallow "sockets" - on the seam between both attached laterals and the free central board.

On my usual plywood floorboards - as for the South Bay I am working on right now - the turnbutton turns on a pad that is almost flush with the floorboard:

View attachment 68931

I am thoroughly enjoying your work!

All the best,

SJS
Thank you. Your work looks great. My boats don't approach yours in fit and finish. Maybe if I ever get my butt into retirement I'll be willing to spend the extra time.

I like your turnbuttons. I've always called them rotating cleats, but turnbuttons is a better term. If needed the challenge will be configuring them to work with 1 1/2" planks, with less than a 1/2" gap between planks. Perhaps a half oval in two adjacent planks.
 
SJ~

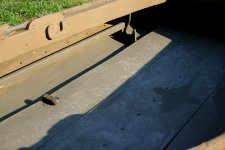
Whilst you were answering, I was searching through my photos on "floorboards" and "turnbuttons".

One thing I have done with springy floorboards is to hold them down amidships with turnbuttons. I typically use Locust - but I have also seen some very nice ones cast from bronze. (Brass would probably work...)

In my RED-LEG (Barnegat) - the central floorboard is screwed in pace - but the laterals are removable via turnbuttons: (photo is 2016 pre-restoration).

View attachment 68930

I cannot locate my photos, but for a one-piece slatted floorboard, I fasten a pair of turnbuttons to the ribs, either side amidships.

In my old gaff sloop WILLET - long before digital cameras - the center floorboard was held down by turnbuttons that sat below flush in shallow "sockets" - on the seam between both attached laterals and the free central board.

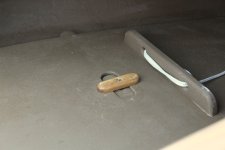
On my usual plywood floorboards - as for the South Bay I am working on right now - the turnbutton turns on a pad that is almost flush with the floorboard:

View attachment 68931

I am thoroughly enjoying your work!

All the best,

SJS
Steven,

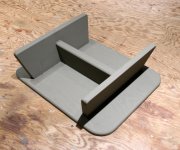
My work will not be at your level but I copied your turnbuttons. I initially used some oak half round but didn't like the feeling when sitting on them so I ordered some brass half oval from OnlineMetals and I made brass turnbuttons.

Rick Lathrop
 
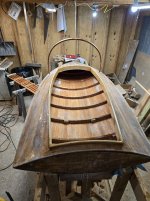
It's getting closer. The coaming is installed and the entire hull is now glassed, other than trimming the glass and cleaning up drips and blobs along the feather edge.

20250919_061811.jpg

20250919_061833.jpg

Next up is completing the interior. The floor and a shell shelf are in the works. Also a pair of oarlock holders, I can't get myself to put a paddle in a sneakbox. Pretty sure that would be worse than a banana. ;)
 
Back
Top