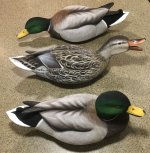
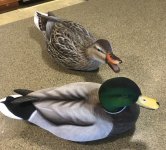
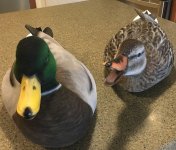
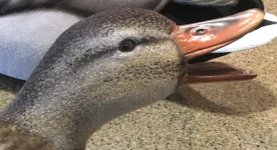
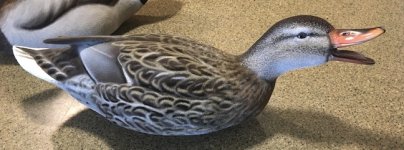
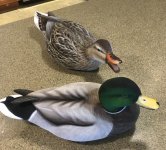
small spread mallards

Don Mintz

Member
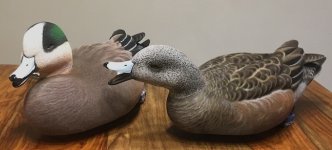
When it comes to decoys, I'm a minimalist. While lots of folks approach decoys with the accuracy by volume idea, I just don't like hauling lots of decoys and the older I get the less decoys I apparently need. Usually I'll only have a pair of mallards and six to ten divers. I had a lot of fun with these poses, I'm calling the hen "the nag" and the drake "hen pecked".

IMG_4365.JPGIMG_4366.JPGIMG_4368.JPGIMG_4370.JPGIMG_4371.JPG
 
Don, I also hunt with less decoys. I hunt small salt marsh and use 6-8 mallards and blacks. Some times 1-2 geese when they are handy. When I hunt big water with friends will take 10-12 brant also.
 
The painting on this trio is more than I typically do on gunning decoys. The decoy itself is the same as any decoys I make, but painting is not done in the normal production process that I use most of the time. The biggest reason is I made these decoys for myself and always go a little over the top just because it's fun and I'm not concerned about time. Whenever I do carvings for myself they go in what I call my signature series which is "ᎩᎦᎨ ᏲᎾ" or "Red Bear", my Cherokee name. I had no intention of selling these, but then there was this black lab puppy that became available recently that just melted my heart. He's about 11 weeks old now. I gave him to my 9 year old grandson, but will be trained by my son Caleb. My Chessie passed away 6 years ago and my son's lab is getting pretty old. It was time. Meet Hank.

465983001_122163208208106727_3331090914214695885_n.jpg
 
I'm fairly new here and really don't know exactly where to post stuff of the carved variety. I guess it makes sense to put it here.

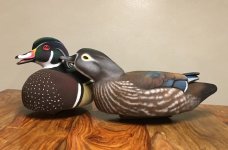
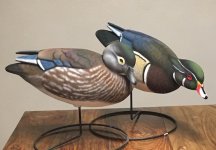
The mallard trio above has been in a series of similar poses. I'm not sure if I'll do another species, but the recent wigeons I posted were the third in the line of this type of pairs pose. It started as a smooching pair of wood ducks, then I changed the hen to the Nag. When I posted the wigeons on facebook, a lady kind of chirped at me about why does the hen have to be a "nag". I'm sorry, it just seemed appropriate at the time.

430695132_951720666654530_5178702400796365805_n.jpgIMG_4366.JPG471507450_1142665334226728_5057131347311647190_n.jpg
 
I'm fairly new here and really don't know exactly where to post stuff of the carved variety. I guess it makes sense to put it here.

The mallard trio above has been in a series of similar poses. I'm not sure if I'll do another species, but the recent wigeons I posted were the third in the line of this type of pairs pose. It started as a smooching pair of wood ducks, then I changed the hen to the Nag. When I posted the wigeons on facebook, a lady kind of chirped at me about why does the hen have to be a "nag". I'm sorry, it just seemed appropriate at the time.

View attachment 62661View attachment 62662View attachment 62663
Only time i have seen men nag each other is on the golf course, the bar, and in the duck blind. Seems the "HEN" just nags all the time for one reason or another. Seems appropriate to me lol.

When it comes to fowl, I have seen late season mallard really get after a hen though. Almost bully a single hen and its usually a few mallard drakes. I have also seen two drakes go after each other, and I mean beat the living snot out of each other while the hen is 5-10 yards away minding her own business. So, I guess I could a series of fighting or nagging drakes in the near future. But from a human perspective, I think it fits well.
 
You do good work, @Don Mintz. I would have difficulty hunting over those beautiful dekes, as I would be afraid I would tear up some very nice artwork.
The best part is the durability these style decoys. I’ve ABUSED my version of his process this season. I haven’t carried a single decoy this year, everything has been drug to the hole. In my, almost, 20 years of waterfowl, I have never had good luck with flocked decoys. My paint schedule is nowhere as good as Don’s talent, but his flocking process is the absolute best. I’ve broke a bill off a wood head this year and I’ve had a head fall off from when I was still figuring out how to get my heads to the body. But it was one of my very first decoys I made. Not a single issue with the paint and flocking and I mean, I have been so rough on mine, there’s not a waterfowler who could of been worse to a decoy this season.

Of course someone would find a way to destroy a decoy, but don’t fear the work of art. Decoys are built to hunt unless true designated shelf riders.
 
I always say I know people who can break an Anvil.

Thanks Steven and William. This carved foamer stuff has been 20 years in the making for us. There was virtually no information on how to make them and what was available was lacking. Back in 2003 I needed goldeneye decoys and you couldn't find them anywhere around here, so when I saw someone making an attempt to carve their own foam decoy I figured why not. I've been a self employed sculptor since 1980, a flat artist since 1970. A lot of woodcarving, sculpting in wax for the lost wax process in metal, not to mention about 35,000 hours of production airbrush painting. I like to make stuff, so I went in head first. It took a lot of years, but we've come up with a good durable process of making fully flocked carved foam decoys.
 
Hey @Don Mintz is it possible (if you have the time) to give a video demo on how durable your type of decoys are? I am now curious to the actual durability of them now that some have mentioned it. Being foam and flocking one would think they would be delicate but I like @William Reinicke stated that he has abused this style of decoy it peaked my interest.
 
Hey @Don Mintz is it possible (if you have the time) to give a video demo on how durable your type of decoys are? I am now curious to the actual durability of them now that some have mentioned it. Being foam and flocking one would think they would be delicate but I like @William Reinicke stated that he has abused this style of decoy it peaked my interest.
What are you wanting to see? I can abuse more of mine and film it. Season might be close to done for myself, have had some extreme warm ups and mallard leaving by the second right now. I had to take yesterday off because the ol' lady had a tire on the rim Sunday night. So I got to gain some brownie points and stay home to take care of some things. It was 55 yesterday morning at 7 am changing a tire.

This season decoys are 100% all getting replaced. I am likely to give these all away to that kiddo I hunted with the other day. But I went into this season to see how durable this flocking really was. Not too worried about the foam, as we are playing with other medias to strengthen the weakest parts of the foam. Its beyond durable and strong, but flocking has always been a failure in my waterfowl career. I mean that too, I am hard on my stuff and it only usually looks decent for 1 season, maybe 2 if I have a light year of hunting. After that, i pretty much have plastic decoys again.

My decoys this year are only bagged for transport/organization reasons. Those bags have not left the truck or the boat. They get unbagged and dragged. Through water (banging and ripped through tree lines), through mud, and through dry sand. Not a single flocking issue thus far. I have only cleaned them twice, and that was because I hunted very red mud and I took a soft brush and some water and scrubbed it all out. No issues still.

I plan on doing a video of pressure washing these ones at the end of season. I am wondering if I can get some flocking separation then. I would bet with a nozzle, hitting the same spot without moving, can burn a hole through a foam decoy. Again, a creator has to know their breaking points. I am also going to take 2 decoys (a hen and drake) and they are going to get kicked all over the shop this off season. Let them ride the concrete and I want to see if I can get flocking to wear off that way as well. Honestly though... I am hesitant to push out the flocking and durability. I have seen the success, I see how good they are holding up, but I want most to believe they are still too fragile to hunt. I am always looking for an upper hand. Don has been great and an open resource with all his knowledge. It would be completely unfair to get secretive now. It wasnt how I was taught, so it isnt the way I should be. I am a mentor at heart, I love helping when I can, so let me know what you want to see and the abuse you want them to go through and I will try and make it visually possible for you.
 
Durability was an issue when I started making carved burlapped foamers 20 years ago. Back then there was very little information and very few people were making carved and burlapped foamers. For many years I took the advice of others regarding paint and such, none of it was very durable. I needed to address the strength of bills and tails. At first I was sculpting bill and tails by adding apoxy sculpt which greatly improved the durability, but paint was still a problem and occasionally bills would break off. I kept pressing on and there was no one to ask for help.

I was pretty much flying blind with developing a process and all the while was getting rampant and ugly criticism from people from the wood and cork decoy world. That just became fuel. I continued to try things, of course in the carved foam world, there are no rules, only figuring how to make a strong durable decoy.

I began to have requests for crane decoys, I was making about 100 of them a year for several years and it became necessary to figure out a way to make things quicker and more consistent. I made a crane head out of wood and created a mold out of smooth on rebound 25 with the guidance of Tom Rowe. The heads were poured with smooth on onyx. I don't know what it would take to break onyx, I never have. Far superior in strength to wood, I often put them in decoy bags bill first. Once I saw the benefits of onyx strength, my mind started racing, what other uses could I find. One was making wing tips, then tails, even a foot. Lots of things were leaning more to the artistic and creative side of things, but it's no good if it's not durable.

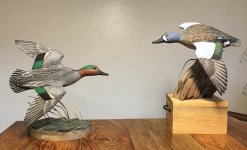
Although I've done a lot of woodcarving, it's never been part of the decoy world. I'd consider myself more of a multimedia sculptor and painter. When I carve wood it's purely decorative like these teal.426728561_940340377792559_8221564891922300014_n.jpg


I treat my decoys like nice wood decoys and carry them in slot bags, mostly to keep them clean, especially divers.

Now as to flocking, this was what I was seeing on line with flocking goose heads. Factory flocking is weak at best, but what I was seeing with home flocking guys was better, but the glue that flocking companies was poor. I tried every type of flocking glue and settled on rustoleum gloss. Then I went one step further and started double flocking and I knew we were on to something. It's like the ultimate thick coat of paint, super durable. On a side note, anything white will be flocked twice, but handprinted flat white rustoleum, it's not only easier to keep clean, but it's whiter than flocking white, and for this old diver hunter white and black are king.

I've made thousands of decoys and flocked 10's of thousands. I have no idea how many carved foamers I've made, but the only ones I have access to are the ones I just gave to my son for Christmas. I consider this last dozen the next level of durability with a nod to artistry. I'm not a decoy maker, I'm an artist. I put a lot more personality in most of my decoys than would ever be remotely necessary to decoy a duck, but I just can't help myself.

It's still onward and upward, who knows what we can come up with this coming year, but we are trying all kinds of new things.

These are the onyx crane heads.
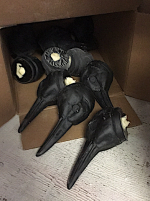
craneheads.png

These are a pair of carved foamer cranes with the onyx heads. I made over 600 of them. The upright was run over by a suburban and then repaired, then I sold them to Final Approach, I just wished they were better at painting the production decoys at the factory.
cranesx.jpg
 
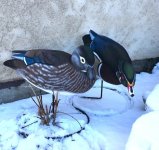
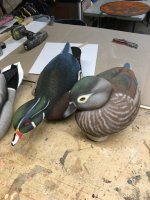
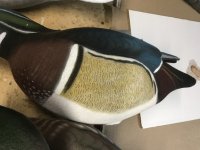
The idea of durability is pretty subjective, but these foamers are certainly not delicate. I'm probably not a good test case, I'm not hard on decoys, even when I was putting out my dad's plastics in the 60's and 70's. I've gone from decoy spreads of 200 decoys before I made decoys myself. Now it's rare I'd have out more than a dozen at a time and do far better with less decoys. Lots of times depending on species it might be 3 to 6 decoys. One thing I was more concerned about was colorfast, I want to get the color to hold up and stay vibrant. The best way I could think to test that was leave some out on my water feature on the west side of the house where the sun and heat is most brutal here in the desert. I put these wood ducks out late winter last year and picked them up on Halloween day, (I was concerned someone might steal them). The picture on the table is when they were new, the picture in the snow was when I finished them in february and the other pictures are when I pulled them the end of October. They saw snow, freezing rain, temps in the teens and temps of 110. The colors stayed strong, I was impressed with the paint durability. You aren't going to throw your wood and cork decoys up on the rocks, I didn't even do that to my plastics back in the day. I'm not sure I'd use a power sprayer to clean them and it's not necessary. I just use my shop since to rinse them off when necessary and a spray bottle of hydrogen peroxide to get the blood off and rinse. The white area are hand painted, so when I need to brighten that up I just get out a brush and the flat oil based rustoleum. William will have to talk about the dragging them around part, but it's kind of apples to oranges since his decoys are molded foam and mine are burlapped, there is a paint absorption factor with burlapped decoys that you don't have with molded foam.

Another issue with flocked decoys regardless whether or not they are plastic, foam, or even wood, (yes, I flocked my wood decoys), is freeze thaw. because flocking will hold water you don't want to leave them wet after a hunt when temperatures get super cold, the freeze will do damage. I never leave my decoys outside, they are always in the garage when not in use, so I've never had an issue. Guys who leave their decoys out in the truck or the boat when it's 10 degrees will have issues. Now these full bodies don't get wet unless it's raining or snowing and never had any issues when it was super cold. Take care of your tools.

New in february
465646602_1108363967656865_633616556725877228_n.jpg

first day out the end of february
430211354_953749973118266_6392402522304325135_n.jpg

Halloween day when I pulled them out
465348402_1108364174323511_6647460728720322489_n.jpg

even the vermiculation which was done with an oil based paint pen held up.
465118761_1108364284323500_5340286688255965344_n.jpg
 
Ive never burlapped anything, never intend to ever, and I am not a good enough eye to carve anything. So I will probably always cast foam, double flock, and airbrush. After the airbrushing, you can almost say there are 3 layers of paint and 2 layers of flocking. I guess I never really considered burlapping vs urethane foam to be apples and oranges in comparison Don. In my mind, the burlap process was to create the skin so it would hold paint so you could flock your decoys. Urethane foam comes out with a skin, and even when i shape them a little, the urethane foam still takes paint and flocking very well. Kind of just assumed both burlap and urethane foam would be in the same ball park after the first layer of flocking was put on. The rustoleum paint is good good stuff. Almost too good. Takes sandpaper sometimes for me to get it off my skin because if it dries on my skin, before I can wipe it off with some paint thinner, it just isnt coming off. Becuase its that tough, I thought by the time there was a second coat of flocking on your foam vs my foam, we would be at level playing fields for comparison reasons. It does make sense that burlap might hold paint a bit better though.

So I guess I forgot to mention, I havent always taken these decoys out of the boat. I get home from the hunt, and instead of unloading them into the decoy shed, I just put the boat cover over them and they stay in the elements. Oh shucks! I guess i will take that into consideration as well... IF..... I do a write up on how durable these decoys lasted this season. I am still wondering if I need to though. These last posts were proof enough for me to start this journey when I approached Don a year ago. What really caught my attention was when he mentioned storing decoys bill down because it was the toughest part of the decoy. I just realized I kind of forgot about that when we first got to talking. I have already snapped a wooden bill this year, and I would bet my entire life savings, I couldnt bust an onyx bill doing the same thing I was doing to break this bill. That stuff is a game changer. I store my mallards tail down, as the tails are made out of onyx. I will store my pintails face down, as I want a long nice looking pin on my decoys, and it wont sit right in the bag if I try tail down. Either way, I would bet there wont be any issues with either way stored.
 
I don't really think it makes much difference head or tail which goes in the bag first. I put the high head preening pintail in tail first since the head wouldn't fit in the slot. I put the wingtips in with a hammer so they are deep into the foam with a maximum amount of gorilla glue surface. If you ever wonder about how good that glue joint is, just try to remove those inserts. Wingtips and tails certainly aren't a weak point.
 
I don't really think it makes much difference head or tail which goes in the bag first. I put the high head preening pintail in tail first since the head wouldn't fit in the slot. I put the wingtips in with a hammer so they are deep into the foam with a maximum amount of gorilla glue surface. If you ever wonder about how good that glue joint is, just try to remove those inserts. Wingtips and tails certainly aren't a weak point.
I guess the only reason I am going pintail face down in the bag is because the point of the tail could potentially leave half the decoy out of the slot of the bag. I dont really know yet, but I will soon enough as they are the for sure next species of duck I will be tackling this off season.

You dont have to convince me on the strength of the onyx and how durable they are when glued in. It helps even more the seams are transitioned with apoxie sculpt and they get 2 layers of the rustoleum and flocking, plus the air brushing as a binder or sealer for the flocking as well. I mean, it does kind of feel like soft soft sandpaper when its all said and done. Not the soft fuzzy feel of flocking bought from major decoy companies.
 
What are you wanting to see? I can abuse more of mine and film it. Season might be close to done for myself, have had some extreme warm ups and mallard leaving by the second right now. I had to take yesterday off because the ol' lady had a tire on the rim Sunday night. So I got to gain some brownie points and stay home to take care of some things. It was 55 yesterday morning at 7 am changing a tire.

This season decoys are 100% all getting replaced. I am likely to give these all away to that kiddo I hunted with the other day. But I went into this season to see how durable this flocking really was. Not too worried about the foam, as we are playing with other medias to strengthen the weakest parts of the foam. Its beyond durable and strong, but flocking has always been a failure in my waterfowl career. I mean that too, I am hard on my stuff and it only usually looks decent for 1 season, maybe 2 if I have a light year of hunting. After that, i pretty much have plastic decoys again.

My decoys this year are only bagged for transport/organization reasons. Those bags have not left the truck or the boat. They get unbagged and dragged. Through water (banging and ripped through tree lines), through mud, and through dry sand. Not a single flocking issue thus far. I have only cleaned them twice, and that was because I hunted very red mud and I took a soft brush and some water and scrubbed it all out. No issues still.

I plan on doing a video of pressure washing these ones at the end of season. I am wondering if I can get some flocking separation then. I would bet with a nozzle, hitting the same spot without moving, can burn a hole through a foam decoy. Again, a creator has to know their breaking points. I am also going to take 2 decoys (a hen and drake) and they are going to get kicked all over the shop this off season. Let them ride the concrete and I want to see if I can get flocking to wear off that way as well. Honestly though... I am hesitant to push out the flocking and durability. I have seen the success, I see how good they are holding up, but I want most to believe they are still too fragile to hunt. I am always looking for an upper hand. Don has been great and an open resource with all his knowledge. It would be completely unfair to get secretive now. It wasnt how I was taught, so it isnt the way I should be. I am a mentor at heart, I love helping when I can, so let me know what you want to see and the abuse you want them to go through and I will try and make it visually possible for you.

Sounds like flocking is very durable from your explanation.

I have did my own flocking back when flocking came very popular over twenty years ago. It was on some Canada Goose full body heads. It did the proper prep per kit instructions. I do not recall the kit brand. But the flocking was not as tough as I thought it would be. Wore down a lot in some places and peeled off in others. I am sure it was a prep issue or the type of plastic I was putting it on. I have not done any flocking since then or owned any flocked decoys either since then. So I was more wondering how flocking has changed since then. I guess I am in the mindset that if flocking is not real durable on hard plastic that flocking would definitely not be durable on foam. But again I have very limited experience on flocking and durability. Back in the day everyone suggested that everything that was flocked had to go in special bags, incased in socks, and handled with care. Your plan of power washing would be cool to check out.

@Don Mintz your process and info is good to know and it sounds like you got it already dialed in and perfected better than anyone I know that flocks decoys. Your info you posted is gold as far as I am concerned. Especially about the Rustoleum paint and flocking. Your experiences 20 years ago is the same that I had on those goose heads I mentioned above. Those were the only thing I have done flocking or or even owned that were flocked. So your detailed explanation and William's info is about all that I needed to understand that flocking is way more durable than I experienced or knew about.

Thanks both of you.
 
Last edited:
That sounds like where I started flocking. I started with a kit, the glue was specifically made for flocking and was supposed to be the best of the best. The flocking came off the first time I took the decoys out, but holy cow they worked really well. That flocking was on burlapped foamers, but it just didn't stick. I was still trying to figure out how to paint decoys at that point, especially flocked decoy and it took awhile. It was 2006 when I started playing with flocking. I had no idea what I was doing.

After the failure of the kit flocking glue I tried a solvent based flocking glue and it was not great. Someone told me to try rustoleum and naturally I got flat rustoleum just seemed counter intuitive to use gloss. The flocking didn't stick well with the flat paint. I was flocking Ron Latschaw's feather flyers at the time and we ended up putting a white primer on his snow geese and it occurred to me that the primer took a long time to dry, while the flat was drying before I could even get the flocking on it, which led to a very thin coverage. It was probably good that I had to deal with 1000 feather flyers, that's where I really learned what worked and what didn't. Using gloss rustoleum changed everything, I was getting good adhesion on the first coat on everything except my burlapped foamers, the absorb the paint enough that the first coat was ok, but I could still see the burlap pattern, so I started adding a second coat of flocking and that was it, a super heavy cover of paint and flocking that is durable.

When we were flocking plastics, well over 20,000 of them over a four year period, we sandblasted them to gain a mechanical adhesion. So many plastics have varying amounts of contaminants and mold release residue it's impossible to predict which decoys will hold paint and which will not, the only option is to rough up the surface. I had a friend in the plastics and blow molding business who tested a plastic decoy for me from a company who touted their use of only virgin plastic. It tested out at 75% regrind, not pure at all and the surfaces were very inconsistent in regards to the factory paint.

Factory flocking is done with the hydrostatic process and often glued with water based glue, one way we used to get the flocking off was just to sit them outside for a few months and it would come off in sheets.

I mix rustoleum basic colors to come up with paint through the airbrush for the pretty stuff, totally unnecessary for hunting, but fun. I wanted my airbrush paint to be compatible with the flocking glue.

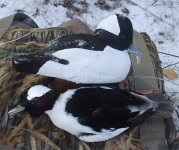
William is probably the only one who really knows and uses my process. I've looked at lots of youtube videos and it just makes me shake my head. It's not that complicated and it's not that easy, but it's well worth it. Even if the flocking fell off of my decoys after each hunt I'd reflock them for the next hunt, it makes that much difference. Here are a couple of photos that show the difference in black flocking verses painted black buffleheads. It's the same same decoy in both photos. When I saw the customer photo with the just painted bufflehead drake I knew I had to flock it even though it was a fully detailed and painted hollow wood decoy. That flocked bufflehead went on every hunt for years and years and never showed any wear or needed repainted. I use slot bags, but the little buffleheads were often three to a slot. I don't use many decoys, so a single six slot bag is all we carry.


the unlocked version of this decoy just wasn't black enough for me.
272957106_2055684851271201_2981438297621910219_n.jpg

This is the same decoy fully flocked, the only frost on the decoy is from me picking it up with frosty gloves, but it was still super black and super effective. I'm a diver hunter and black and white are super important to me.
51931715_1149034398602922_8772854831070052352_n.jpg


I would flock my decoys with this method even if it made no difference in decoying simply because it's more durable than the decoys I just painted.
 
Sounds like flocking is very durable from your explanation.

I have did my own flocking back when flocking came very popular over twenty years ago. It was on some Canada Goose full body heads. It did the proper prep per kit instructions. I do not recall the kit brand. But the flocking was not as tough as I thought it would be. Wore down a lot in some places and peeled off in others. I am sure it was a prep issue or the type of plastic I was putting it on. I have not done any flocking since then or owned any flocked decoys either since then. So I was more wondering how flocking has changed since then. I guess I am in the mindset that if flocking is not real durable on hard plastic that flocking would definitely not be durable on foam. But again I have very limited experience on flocking and durability. Back in the day everyone suggested that everything that was flocked had to go in special bags, incased in socks, and handled with care. Your plan of power washing would be cool to check out.

@Don Mintz your process and info is good to know and it sounds like you got it already dialed in and perfected better than anyone I know that flocks decoys. Your info you posted is gold as far as I am concerned. Especially about the Rustoleum paint and flocking. Your experiences 20 years ago is the same that I had on those goose heads I mentioned above. Those were the only thing I have done flocking or or even owned that were flocked. So your detailed explanation and William's info is about all that I needed to understand that flocking is way more durable than I experienced or knew about.

Thanks both of you.
If it helps, there was a gentleman we were helping that was going through far too much flocking for the project he was doing. I made these quick little videos, more to show how well a cheaper single strain sieve from the dollar store worked better compared to more expensive sieves. In the first video, it is me spreading a second coat of rustoleum gray over flocking. The first coat goes on like butter, no issues at all. Remember, I am not a carver so these are molded urethane foam.

Sidenote: I use Cammie 980 as a release agent and there is no prep needed at all. Rustoleum paint goes right on without any issues. It is a nightmare if wanting to restle coat with titebond3 though. Titebond falls right off and provides 0 adhesion at all to these urethane foam decoys I cast.

Once the first coat is done and dried (for a day or two), then the second coat is ready. you will see it still does not take me very long to get the paint spread over the first layer of flocking. I only did the mid body up to the chest in the video, as I do my heads and rumps in black flocking (for the second coat) on my drake mallard. I just wanted to show the difficulty (or lack of) on painting the second layer of rustoleum paint on the first layer of flocking.

Hope this helps. I also plan to redo all my 10 dozen dive bomb silos fully flocked this summer. Not sure if I will make them artistic or just do them in all black with the white cheek patch. Might do 50/50, but these are low low on the priority projects this summer. I will do this exact same process for those. Also, I learned on my old dakota plastic decoys. Again, I used this same process and have not had a single issue with durability. So if you have a bunch of old plastics laying around, do not hesitate to give this a go, as the paint binds to plastics just as well as foam.


Back
Top