What's On Your Workbench? - May

Looks good to me. Any way you can post a pic of your keel design? It looks like you have the eyebolt semi covered and protected. I am curious what this looks like. As far as the decoy goes, its got great contrast and I bet it tricks a few birds next season. This decoy will do decoy things. (y)
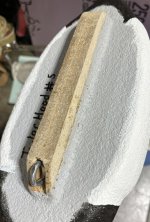
I’ve been using composite decking boards, ripping and planing them down to 2” wide with all flat sides. I use a 1” forstner bit to make a 1” cavity in the decoy and epoxy it in.

So far I’ve been eye balling the hole drilling from where the head and body meet downward and then marking that onto the keel and drilling that out to allow the eyebolt to hide a little inside the keel which I hope will help it not get beaten, turned, and ripped out as easily. The eyebolt threads are also epoxied into the head

I’ve also been using appoxie sculpt around the base of the keel to hopefully prevent it from rocking around any
 

Attachments

  • IMG_3518.jpeg
    IMG_3518.jpeg
    252.1 KB · Views: 12
  • IMG_3517.jpeg
    IMG_3517.jpeg
    185.5 KB · Views: 12
  • IMG_3519.jpeg
    IMG_3519.jpeg
    255.9 KB · Views: 12
I’ve been using composite decking boards, ripping and planing them down to 2” wide with all flat sides. I use a 1” forstner bit to make a 1” cavity in the decoy and epoxy it in.

So far I’ve been eye balling the hole drilling from where the head and body meet downward and then marking that onto the keel and drilling that out to allow the eyebolt to hide a little inside the keel which I hope will help it not get beaten, turned, and ripped out as easily. The eyebolt threads are also epoxied into the head

I’ve also been using appoxie sculpt around the base of the keel to hopefully prevent it from rocking around any
Ok now a few more questions....
-So the keels are epoxied to the bird? What epoxy/glue are you using?
-The eyebolt is the only way its really attached to the decoy? I do really like what you are doing with the composite board and its super clean looking.
-Any issues with keels coming loose after a rough season?
-How much is that composite board and where are you ordering from?

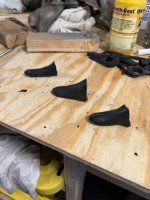
Ive been using these as keels.


They are stupid cheap but not sure I cant make a better keel. Since I am casting my foam, Ill take small blocks and put them in the mold and then the foam secures around it, allowing an anchor to drill a screw from the "keel" to these blocks. Also, I use loctite p3x construction glue (intended for urethane foam) to also glue the keel to the body. Its kind of bulky and the eye bolt is exposed. I might find a way to cut a slit in them though like you are doing to protect that eye bolt some. Its just so clean looking and I really like it.
 

Attachments

  • IMG_0423.jpeg
    IMG_0423.jpeg
    124.3 KB · Views: 10
  • IMG_0020.jpeg
    IMG_0020.jpeg
    137.8 KB · Views: 10
  • IMG_0021.jpeg
    IMG_0021.jpeg
    174.8 KB · Views: 10
  • IMG_0023.jpeg
    IMG_0023.jpeg
    152.5 KB · Views: 10
Last edited:
Ok now a few more questions....
-So the keels are epoxied to the bird? What epoxy/glue are you using?
-The eyebolt is the only way its really attached to the decoy? I do really like what you are doing with the composite board and its super clean looking.
-Any issues with keels coming loose after a rough season?
-How much is that composite board and where are you ordering from?

Ive been using these as keels.


They are stupid cheap but not sure I cant make a better keel. Since I am casting my foam, Ill take small blocks and put them in the mold and then the foam secures around it, allowing an anchor to drill a screw from the "keel" to these blocks. Also, I use loctite p3x construction glue (intended for urethane foam) to also glue the keel to the body. It’s kind of bulky and the eye bolt is exposed. I might find a way to cut a slit in them though like you are doing to protect that eye bolt some. It’s just so clean looking and I really like it.
I am probably wrong in using most of this haha… but

The epoxy is just 2 part JB weld I got from tractor supply. I’m not sure how it will hold up with water usage but I cover any exposed joints (where the keel meets the body, and where the head meets the neck) with apoxie sculpt to limit any water leaking in under the restle coat. I’ll put a picture

The eye bolt is the only thing besides epoxy holding the keel onto the decoy but I have the eye bolt probably 1.5”-2” epoxied into the head

This canvasback is only my fifth decoy. I started trying this after the ‘23-‘24 season.
I have rudimentarily tried to stress test them by throwing a wood duck at the ground many times in which it held up, but one drop onto the concrete of my garage cracked the restle coat. So I can’t guarantee the long term durability but I’m hopeful

https://www.menards.com/main/buildi...e-decking/1122771/p-1444441495888-c-13471.htm

This is the deck board I used. It’s real cheap and cuts like butter with a sharp plane

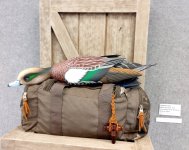
Also here’s a picture of a wood duck I did. I used a taller keel that stuck out of the body 2” but since then switched to having 1” stick out. I bent the eye bolt on the wood duck so the eye would stick out
 

Attachments

  • IMG_3408.jpeg
    IMG_3408.jpeg
    254.6 KB · Views: 5
  • IMG_3520.jpeg
    IMG_3520.jpeg
    160.8 KB · Views: 5
I am probably wrong in using most of this haha… but

The epoxy is just 2 part JB weld I got from tractor supply. I’m not sure how it will hold up with water usage but I cover any exposed joints (where the keel meets the body, and where the head meets the neck) with apoxie sculpt to limit any water leaking in under the restle coat. I’ll put a picture

The eye bolt is the only thing besides epoxy holding the keel onto the decoy but I have the eye bolt probably 1.5”-2” epoxied into the head

This canvasback is only my fifth decoy. I started trying this after the ‘23-‘24 season.
I have rudimentarily tried to stress test them by throwing a wood duck at the ground many times in which it held up, but one drop onto the concrete of my garage cracked the restle coat. So I can’t guarantee the long term durability but I’m hopeful

https://www.menards.com/main/buildi...e-decking/1122771/p-1444441495888-c-13471.htm

This is the deck board I used. It’s real cheap and cuts like butter with a sharp plane

Also here’s a picture of a wood duck I did. I used a taller keel that stuck out of the body 2” but since then switched to having 1” stick out. I bent the eye bolt on the wood duck so the eye would stick out
Love to see carved foam!!! Curious on restle coat. So I’m casting foam, as you can see in my pics above, and I’m just doing 2 part flocking with rustoleum paint. If mine don’t hold up, I’ll likely go to restle coat as well. My mentor does carved foam like you and he burlaps, apoxie sculpts some areas and then double flocks. When the flocking is all done, it feels like sandpaper. I’m wondering how mine will hold up as well. I just started making decoys in February, so I’m very new to the game as well. Thanks for the link, I may just try some of those boards as well. I’ve also thought about making a keel out of onyx but I cannot find a keel im just in love with. I do really like what you’ve done and may steal some ideas off you here.
 
OK, this one is not even remotely close to being waterfowl related. LOL
My nephew's girlfriend recently lost her 17 year old cat. It's got to be tough to have a pet pass that was around from grade school to graduating from college.
I hear that Lucky was a good cat. He was a good one to be my first feline...they are definitely different to paint than dogs. 9x12 acrylics on canvas.
 

Attachments

  • 20240515_195918.jpg
    20240515_195918.jpg
    338.9 KB · Views: 4
Love to see carved foam!!! Curious on restle coat. So I’m casting foam, as you can see in my pics above, and I’m just doing 2 part flocking with rustoleum paint. If mine don’t hold up, I’ll likely go to restle coat as well. My mentor does carved foam like you and he burlaps, apoxie sculpts some areas and then double flocks. When the flocking is all done, it feels like sandpaper. I’m wondering how mine will hold up as well. I just started making decoys in February, so I’m very new to the game as well. Thanks for the link, I may just try some of those boards as well. I’ve also thought about making a keel out of onyx but I cannot find a keel im just in love with. I do really like what you’ve done and may steal some ideas off you here
Love to see carved foam!!! Curious on restle coat. So I’m casting foam, as you can see in my pics above, and I’m just doing 2 part flocking with rustoleum paint. If mine don’t hold up, I’ll likely go to restle coat as well. My mentor does carved foam like you and he burlaps, apoxie sculpts some areas and then double flocks. When the flocking is all done, it feels like sandpaper. I’m wondering how mine will hold up as well. I just started making decoys in February, so I’m very new to the game as well. Thanks for the link, I may just try some of those boards as well. I’ve also thought about making a keel out of onyx but I cannot find a keel im just in love with. I do really like what you’ve done and may steal some ideas off you hereb
Best of luck man!

Renowned decoy collector Joel Barber wrote in his seminal book Wild Fowl Decoys (1934) “Of all birds susceptible to decoys, I am, perhaps, the most susceptible bird of all.”
 
Don't know how much time I'll get in on painting for the rest of the month, as we have some travelling planned. But I have a gunning Pintail drake and a Chiloe wigeon carved and sitting in the painting studio - the Chiloe on a whim. Haven't done one of them since doing a frond version for John Hitchcock some years ago.
IMGP0186.JPG
IMGP0187.JPG

Earlier in the month I had a piece from my "After the Hunt" series of tableaus juried into a gallery show here in Cincy. Feel good about that as over 300 works were submitted for consideration, and only 90 chosen for inclusion. The show administrator expressed interest in a separate gallery showing of the entire "After the Hunt" collection in the fall. Will be a good opportunity to get the art & craft of the decoy in front of the general public.
IMG_20240502_120105350.jpg
IMGP6545 (2).JPG
 
lol what does this mean? Too new to this game still, only been decoy making for 4 months now. Bare with the lack of knowledge.
simple. The -raised primary thing is totally unnecessary on a gunning decoy. It can be easier accomplished with a simple application of paint. Less cumbersome in appearance, but that's just 49 years of making hunting decoys speaking Less of a problem, also!!!
 
simple. The -raised primary thing is totally unnecessary on a gunning decoy. It can be easier accomplished with a simple application of paint. Less cumbersome in appearance, but that's just 49 years of making hunting decoys speaking Less of a problem, also!!!
I am adding onyx pieces to be different and because I am learning to make custom molds. There's bigger projects in the future for this. That little raised primary thing (mallard curl tail feather is what it's supposed to mimic), actually sticks out just past the tail. Drop it in a slotted back and it takes the initial impact and not the foam tail. But don't worry, bet you think that's ridiculous as well. So, probably sometime this weekend, I'll be posting how I make onyx tails to replace the foam tails to toughen up these gunners a bit more. Foam hunts good but it has its weak points, so I am trying to toughen them up a bit. Believe me, I am starting small and eventually this mold thing will be much bigger projects.
Necessary? Prob not, but I can cast a tail in about 10 min. I can make a pile of these and be ready to go into decoys the next day.
Also, I recognized how unnecessary a curl tail feather is and mentioned it in my first post. Must of missed it, but that's ok, its right here for you to read again. I appreciate your 49 years of experience, but I'll keep to making my hunting decoys the way I like. Who knows, maybe I'll make a custom box to put on the back of one to show what it would be like to have a decoy with a radio tracker backpack...... kind of like these decoy companies that put neck collars and leg bands on their decoys. Again, unnecessary for sure but would it be fun? I kind of think so.

George, where are some pics of your gunners though? Would love to see some of what you have to offer. Out of 10 pages of posts, there's not a whole lot of posts of your decoys. I know D. Hinton posted some of your birds on your bench. Noticed you took the time to paint in feather splits, and really wondering how necessary that is for decoys. Just curious how many more ducks you've killed over them by adding in that little extra effort. They looked REALLY good though, so kudos to the one picture of your work that I have seen. 4 months compared to 49 years, I would think you could come up with a better way to come across than a cryptic message multiple members didn't understand and then to come back and tell a newbie how unnecessary things are on their work.

Sir, try again please. I think you are probably a wealth of knowledge. Don't try and be an internet bully, it's not a good look. Bet we could all learn from you if you allowed for better communication and guidance.
 
Bob

WOW! Hey, I recognize "The Warden" print on your wall. The artists escapes me at the moment.
Eric,
The late, great Billy Koelpin - painter & sculptor. Didn't he do the bronze casting of the hunter & boat in the DHBP logo ?
Those paintings left to right are " The Poacher" ; Joe Wooster, depicted during the annual Wood- duck opener up at his place, and "The "Warden." Felt it was appropriate to stick Wooster's pic between the two. :)
 
Made some drop in bills for the molds out of onyx. Will make up a mold to cast straight onyx. Also got the tail insert done for the decoys. Think between having bills and tails made out of onyx, should really make the decoy a ton stronger.
 

Attachments

  • IMG_0816.jpeg
    IMG_0816.jpeg
    185 KB · Views: 17
  • IMG_0818.jpeg
    IMG_0818.jpeg
    157.1 KB · Views: 17
  • IMG_0819.jpeg
    IMG_0819.jpeg
    149.9 KB · Views: 16
  • IMG_0823.jpeg
    IMG_0823.jpeg
    141.1 KB · Views: 16
  • IMG_0824.jpeg
    IMG_0824.jpeg
    138.4 KB · Views: 17
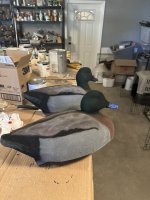
Had these molds laying around that i was using for fitting and drilling while playing with onyx. Decided to have fun with these and yes I’ll hunt them. Have killed 3 pin x hybrid in my time as a waterfowler. Hybrids hold more weight in my heart than any band on my lanyard. With that said these were kind of fun to make. They need about an hour of airbrush touch up. I’ll probably get to that tomorrow and I’ll and glue in the onyx pin/curl feather.
 

Attachments

  • IMG_0846.jpeg
    IMG_0846.jpeg
    181.4 KB · Views: 18
  • IMG_0845.jpeg
    IMG_0845.jpeg
    153.1 KB · Views: 17
  • IMG_0844.jpeg
    IMG_0844.jpeg
    185.3 KB · Views: 19
  • IMG_0843.jpeg
    IMG_0843.jpeg
    144.1 KB · Views: 19
I am adding onyx pieces to be different and because I am learning to make custom molds. There's bigger projects in the future for this. That little raised primary thing (mallard curl tail feather is what it's supposed to mimic), actually sticks out just past the tail. Drop it in a slotted back and it takes the initial impact and not the foam tail. But don't worry, bet you think that's ridiculous as well. So, probably sometime this weekend, I'll be posting how I make onyx tails to replace the foam tails to toughen up these gunners a bit more. Foam hunts good but it has its weak points, so I am trying to toughen them up a bit. Believe me, I am starting small and eventually this mold thing will be much bigger projects.

Also, I recognized how unnecessary a curl tail feather is and mentioned it in my first post. Must of missed it, but that's ok, its right here for you to read again. I appreciate your 49 years of experience, but I'll keep to making my hunting decoys the way I like. Who knows, maybe I'll make a custom box to put on the back of one to show what it would be like to have a decoy with a radio tracker backpack...... kind of like these decoy companies that put neck collars and leg bands on their decoys. Again, unnecessary for sure but would it be fun? I kind of think so.

George, where are some pics of your gunners though? Would love to see some of what you have to offer. Out of 10 pages of posts, there's not a whole lot of posts of your decoys. I know D. Hinton posted some of your birds on your bench. Noticed you took the time to paint in feather splits, and really wondering how necessary that is for decoys. Just curious how many more ducks you've killed over them by adding in that little extra effort. They looked REALLY good though, so kudos to the one picture of your work that I have seen. 4 months compared to 49 years, I would think you could come up with a better way to come across than a cryptic message multiple members didn't understand and then to come back and tell a newbie how unnecessary things are on their work.

Sir, try again please. I think you are probably a wealth of knowledge. Don't try and be an internet bully, it's not a good look. Bet we could all learn from you if you allowed for better communication and guidance.
Nor splits. I use a small fan and jutr mark to break up what i observed as doo solid feather indications. Usually done by adding a bit of white to the existing mix, just to create a break.. Note that all are handled.. Started this for my stuff, liked it and after i found it took less than ten minutes for a large puddler, it just stuck Splits are random check deco The raw umber wash almost causes the marks to disappear at twenty plus yards. imo, gives the flatness some movement. I do post ocasionally..Steve Sanford Does post frequently for me. Thanks, Steve!! William, i have found that it doesn't increase what i take home, but we seem to get more looks.
Just looking for ways for you guys to simplify without taking excessive time making tools.
Just coming from a different philosophical bent. Ignore me.
 
A new lathe sort of fell in my lap. A co-worker who also into woodworking and vintage machinery bought a wrecked Oliver 159 pattern makers lathe a couple years back. FYI, a pattern makers lathe is a wood lathe with a hand-feed carriage and compound slide found on a metal lathe. You can turn to a very high precision since tooling is fixed rather than hand-held. The head was trashed and he thought he could repair it. In the end it was too far gone so he wound up buying a much bigger Oliver 20 pattern makers lathe. He called me knowing I had a couple Oliver 159s and thought I might be interested in his for a parts machine. A few days later it was in my shop. One of the really nice things about an Oliver 159 is how modular they are. So the plan was obvious, combine one of my lathes with his pattern makers lathe. I spent the last week disassembling, stripping, cleaning, priming and painting parts. All that is left is re-assembly.

159PatternMakers.jpg

159PatternMakersParts.jpg

IMG_6370.JPG

IMG_6371.JPG
 
Back
Top