I haven't ever done a lot of buffleheads, but since we added them to our line of decoys I decided I better figure that one out.
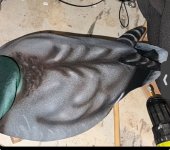
I do my initial flocking layer from head to tail with waste flock that I recover from a few sessions of flocking. It saves me some money and lessens the amount of loss I get from the process. This first photo is how I do the second coat on a drake. The only thing that is beyond routine is how I do the tail area. I do the the back, head, and tail/femoral tract with black right up to the end of the flank. The second flocking is light grey over grey rustoleum on the flanks and chest. At that point you have everything with a second flocking, but you have a black tail and rump and a black head. White/white is impossible to get without hand painting white over those areas. When I paint white over the flank, chest and now the tail and rump I get a fairly white coverage on the flank and chest, but the white paint over the black flocking ond the tail leaves it more light gray in contrast to the white/white of the chest. It's a pretty reasonable base color to airbrush over for the light grey tail section.

Now I've got to paint white over that head patch too and it's going to be light grey when it dries when painting directly over black flocking. This is a good time to do the color on the head. I can paint straight through the white patch without concern. It takes a few passes to see any color and you've got to give it an hour or more to let the paint tack up or you won't get it to brighten.

Let the airbrush dry overnight before painting white over it again or you will have a kaleidoscope of pastel colors show up in that white patch.

On the hen, once again I flocked on the first coat with waste flocking. The second coat is done by painting black over the back right to the tail tip, this time excluding the femoral tract, then painting grey over the chest and flank. I do a tiny bit of blend between the black and grey areas before flocking goose grey over the entire area, that gives a nice seamless transition between to contrasting colors. I get the grey I want on the flank and the dark grey on the back. Give it an overnight and come back and do black over black flocking on the head. I'm sure these would do great on the river regardless of any airbrush, but where would the fun be in that.

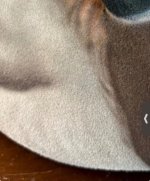
I call this piece of cardboard my catchment. I was just losing so much flocking that I wanted a way to recover it better. The problem is there are a variety of colors in the mix after a session with bisque tan, light grey, dark grey, brown, black and redhead red. It's really not a suitable color for anything, however plenty good for a first coat. I flock hundreds of decoys every year and this really helps to recover waste flock. I do put the lid from the tub directly behind it and can put what falls on the lid right back in the original tub. This is my carving/airbrush/flocking booth with an exhaust in the back. When I'm carving or painting I just put the cardboard on the side of the booth.
you may notice the pair of tweezers on the lower right corner. I use it to pick hairs off when I'm flocking decoys,
I have a Nova Scotia Toller, nuff said


")


