Aussie Cackler 14 build

Matthias

New member
G’day, I’m Matthias, live in Sydney Australia and I’m building the Devlin designed Cackler 14.

Backstory
Why am I building a duck boat? Briefly: used to live in Mildura, which is roughly halfway down the Murray River, Australia’s longest river and wanted a custom camping and river exploring boat. Devlin’s Honker 18 seemed like the ticket so I bought the plans and got ready to build. Life changed, moved to Sydney, build plans and desire ceased. Fast forward to January 2025 when with a group of mates I signed up for an event called The Tinny Rally. I don’t own a boat so instead of buying one thought it would be cool to build one instead and revive the Honker build dream. But Honker’s size is a tad large for the Rally, so decided to build its smaller sibling instead.

I’m building the boat at work (small signage and display business) which is good because there are heaps of tools, but also bad because our factory is tiny and there is no dedicated space available to build, so sometimes the boat hangs from the ceiling, sometimes it’s on trestles and sometimes it’s just lying on the ground.
I did contemplate buying a CNC cut aluminium boat kit and welding that, but even though I’m not a woodworker a plywood build seemed easier and more fun. So here we are…

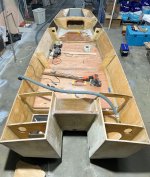
The pic below is the current build state, but I’ll post retrospective pics so you can see how I got to this point.
 

Attachments

  • IMG_8577.jpeg
    IMG_8577.jpeg
    174.7 KB · Views: 40
  • 0E6FA5BC-B59F-4873-9C83-E6581D60A9BA.jpeg
    0E6FA5BC-B59F-4873-9C83-E6581D60A9BA.jpeg
    533.6 KB · Views: 40
Last edited:
Mathias,
Glad to make your acquaintance. I am also considering the Cackler as a general fishing and duck hunting boat. The Cackler, for some reason, just speaks to me. Number one, I'm not getting any younger so another layout boat for hunting doesn't seem reasonable. Number two, I really miss my fishing boat after selling it this summer. Some people think the Cackler is a little cramped for three hunters and a dog but I figured if I went with a traditional transom it would free up some space and eliminate any outboard fitment issues.
I saw your original question on Henry's thread and just have to ask why wouldn't you glass the floor in? To my way of thinking you have nothing to lose and everything to gain. Epoxy is strongest when used as a composite. Looking forward to following your thread with great anticipation.
RM
 
I saw your original question on Henry's thread and just have to ask why wouldn't you glass the floor in? To my way of thinking you have nothing to lose and everything to gain
RM - interested in your thoughts on this, as I've been leaning otherwise.

My thinking is first influenced by the fact that bonding the floor to the hull is optional. I'm bonding mine since it does add some strength and rigidity to the boat. Second, given tapers on the outer edges, I (and it sounds like Matthias, as well) will have 4-6 inches of sole in direct contact with the hull bottom, with thickened epoxy in between and a fillet and coat of epoxy above. Do you think tape will add measurabley to the strength of the wood/epoxy/wood/epoxy scarf-like joint?

The downside of glassing the joints, to me, is just the time and material required, and the weight of tape plus a few extra coats of epoxy to wet and fill it. Not major costs, obviously, but it seems like the benefit would be minimal. I'm open to having my mind changed.
Henry and Mathias,
Not bonding the sole to the hull is certainly optional but I am not sure it is the best practice. I could be persuaded not to bond the sole on a human powered craft, but even the Devlin Poleboat which I built was stiffened to such a degree, I became an instant advocate. Glassing the sole/hull joint makes good sense to me when you consider the forces that a motorized boat hull will endure in rough seas. Those forces will be transfered upward from the hull to the sole. For that reason, I consider the sole a supporting member that should not only be bonded to the hull but also glassed in for additional reinforcement. Just my humble opinion, RM
 
Last edited:
Henry and Mathias,
Not bonding the sole to the hull is certainly optional but I am not sure it is the best practice. I could be persuaded not to bond the sole on a human powered craft, but even the Devlin Poleboat which I built was stiffened to such a degree, I became an instant advocate. Glassing the sole/hull joint makes good sense to me when you consider the forces that a motorized boat hull will endure in rough seas. Those forces will be transfered upward from the hull to the sole. For that reason, I consider the sole a supporting member that should not only be bonded to the hull but also glassed in for additional reinforcement. Just my humble opinion, RM
Hi RM and thanks for your input.

I asked the question because I don’t have the building experience or knowledge to make the right decision. Unfortunately the Cackler plans give no detail about sole treatment. But the Honker plans state that floor is removable and fastened to the keelson/stringers with screws and bedding compound which made me wonder if glass taping the port and starboard floor sheet edges is necessary, especially since I’ve epoxy glued all edges and onto keelsons/stringers. I’ve even added two extra stringers to the aft floor section because I didn’t want to ply to bow when walked on.

I’ll post some pictures tomorrow so you can see how I’ve modified my boat from Sam’s plans. I think the Cackler is decent enough in size for 2 people and a dog. Especially if you modify the rear transom section. I’ve opened up my boat more by narrowing the decks port and starboard and deleting half of the front deck. Tha front storage compartment is now open boat in my build.

PS. I do plan to glass tape all for and aft edges of the floor sections.
 

Attachments

  • IMG_0033.jpeg
    IMG_0033.jpeg
    302.6 KB · Views: 18
RM - interested in your thoughts on this, as I've been leaning otherwise.

My thinking is first influenced by the fact that bonding the floor to the hull is optional. I'm bonding mine since it does add some strength and rigidity to the boat. Second, given tapers on the outer edges, I (and it sounds like Matthias, as well) will have 4-6 inches of sole in direct contact with the hull bottom, with thickened epoxy in between and a fillet and coat of epoxy above. Do you think tape will add measurabley to the strength of the wood/epoxy/wood/epoxy scarf-like joint?

The downside of glassing the joints, to me, is just the time and material required, and the weight of tape plus a few extra coats of epoxy to wet and fill it. Not major costs, obviously, but it seems like the benefit would be minimal. I'm open to having my mind changed.
Yep Henry, that’s pretty much my thinking as well. And the thing is, that atm the sole/side edges are so sharp, straight and lean that it would be a shame to wreck them with a fillet and glass tape 😁
 
Matthias,
Sam Devlin's plans are never really clear and are open to alot of interpretation. If you look at your attached hull crossection you will see two triangles. A triangle is one of the strongest structural shapes, albeit in this case a scalene triangle. Its like a free gift, so yes, I'm glassing that floor in. I would wager a disproportionate number of boat repair theads have removable soles. That said, my theory is mine alone and I'm not going to be offended if everyone doesn't share it. You are correct about the amount of work it takes to make that tape line disappear. Maybe your idea is the best of both worlds. However you are persuaded, I say run with it! RM
 
Last edited:
Many years ago Sam came on the forum and presented a drawing of how he likes to see floorboards done. I have looked all over and can't find the picture. Can't say for sure but I recall he suggested bonding them on all sides and down the keel timber. My preference is just that with both sides glassed. 1/2" ply isn't the most rigid floor and could use some stiffening.
 
Last edited:
The Cackler, for some reason, just speaks to me. Number one, I'm not getting any younger so another layout boat for hunting doesn't seem reasonable. Number two, I really miss my fishing boat after selling it this summer. Some people think the Cackler is a little cramped for three hunters and a dog but I figured if I went with a traditional transom it would free up some space and eliminate any outboard fitment issues.
IMG_9214 2.jpg
About 4 months ago this is what the build looked like. I was content to build the boat as per the Devlin plans, but after attending the rally event that this boat was initially going to be built for, and spending 7 days in a similar sized open aluminium boat I knew I needed more open space and some different storage options.
The only changes I made to the original plans was enlarging the opening in bulkhead 1 to add a small locker amongst the flotation foam and for ease of building, joining the two knees together to form a more traditional bulkhead piece (bulkhead 3, highlighted green). The bridging piece that the straps are attached to would be cut out later.


IMG_5012.jpg
For dedicated storage I wanted an anchor well and a place up front for the battery, so I divided the bow flotation chamber into three. The Cackler's original storage chamber will now be open boat. The green highlight between the runners is earmarked for potential future under-floor storage, but for now it's sealed shut.


IMG_5035.jpg
Mock-up of the anchor well/battery area.


IMG_5031.jpg
In regard to the sole, to maximise flat floor area I've raised the the level of the floor and divided it into 3. The aft floor board now doesn't sit on the hull bottom sheet at the port and starboard edges (which I think it might have in the plans. They aren't too clear in that regard) so I've added two more stringers for better floorboard support. Research suggests about 12 inches of space between stringers for half inch plywood. If I followed the plans I would have about 18 inch gaps between three stringers.

I also enlarged to openings to the fuel tank chambers for easier access.


IMG_0082.jpg
By raising the floor I now have minimal hull sheet protruding the sole ( green circle)

I'm also making the port and starboard deck sides narrower. As you can see by the tape measure, the boat was designed with roughly 12 inch deck sides. I'll make them about eight inches wide outside the coaming. (green is what was chopped off)
 
Last edited:
Matthias,
Those modifications are great; we definitely think alike. One reason I really like the Cackler is that I want to keep the footprint small to make it easier to hide. With your modifications, you have the floor space of a much bigger boat; the best of both worlds. If you really wanted to go crazy, you could even go with the traditional transom, albeit a shame to rework the beautiful job that you have done on the motor well. Since you have raised the floor as high as you have, I wonder about the feasibility of a self bailing floor. I have always questioned sending waste water to a bilge beneath the sole. Of course for redundancy I would install a bilge pump but wouldn't it be nice if it was never needed? My minimal research on this site indicates that is where alot of rot originates, particularly in the transom. Let me know your thoughts. Absolutely beautiful job so far!
RM
 
Last edited:
If you really wanted to go crazy, you could even go with the traditional transom, albeit a shame to rework the beautiful job that you have done on the motor well. Since you have raised the floor as high as you have, I wonder about the feasibility of a self bailing floor. I have always questioned sending waste water to a bilge beneath the sole…
The boat is actually kinda half self bailing, and that was the plan all along. Initially I thought about using the compartments between the stringers as storage, possibly a fresh water tank, or foam filled buoyancy. But right now they are all air filled voids — that when the boat is assessed for its Australian Build Plate can hopefully be passed as buoyancy chambers. But I’m expecting to be told that I need to fill some with foam.

Anyway, I never had any intention to send water down into that area, it’s dry and perfectly sealed so why use it as a bilge. I have installed three decent sized drain holes in the cockpit so that any water in the boat can fairly quickly drain into the engine splash well and be pumped out from there. So I do have a tiny bilge of sorts, but really it’s just the splash well with a small bilge pump (which still needs to be plumbed and installed).

PS I like the transom/engine set up how it is. It gives the boat character and is something a bit out of the ordinary on Aussie waters.

 
Last edited:
Matthias,
Do you have an idea of what outboard you are using and how many horsepower? I have not ordered plans yet because I want to count the costs, so to speak, before I build. Not a fan of fourstroke outboards so I thought maybe a Tolson 30 hp short shaft. Only problem is it doesn't have electric trim as an option. Also, the plans you ordered from Sam Devlin, were there any issues like missing bulkhead dimensions for building upside down etc?
It's cool that Australia certifies hulls and I'm somewhat surprised that not all states do here. Sam is not a fan of pour in foam so I have been keeping an eye out for bulk foam used in flotation jackets.
Check out this video link below. One thing they fail to mention in the video but add in the comments is the addition of foam under the gunnels that made it turtle proof. My goal is to make a Cackler that is totally self bailing as I've been witness to too many missing butt plug sinkings and boats that nearly sank overnight because the bilge pump wasn't working.
RM
 
Last edited:
Matthias,
Do you have an idea of what outboard you are using and how many horsepower? I have not ordered plans yet because I want to count the costs, so to speak, before I build. Not a fan of fourstroke outboards so I thought maybe a Tolson 30 hp short shaft. Only problem is it doesn't have electric trim as an option. Also, the plans you ordered from Sam Devlin, were there any issues like missing bulkhead dimensions for building upside down etc?
It's cool that Australia certifies hulls and I'm somewhat surprised that not all states do here. Sam is not a fan of pour in foam so I have been keeping an eye out for bulk foam used in flotation jackets.
Check out this video link below. One thing they fail to mention in the video but add in the comments is the addition of foam under the gunnels that made it turtle proof. My goal is to make a Cackler that is totally self bailing as I've been witness to too many missing butt plug sinkings and boats that nearly sank overnight because the bilge pump wasn't working.
RM
Yes, I have the outboard already. I went with the Tohatsu 30hp 4-stroke. I added electric start and electric trim options. Even though it’s electric start, it still has the pull start which is good because I don’t ever have to worry about running my battery flat while camping. Weight-wise and for overall simplicity, I would have liked a 2-stroke, but due to strict emission standards introduced around 2018/19, you can’t buy new 2-strokes in Australia anymore. Of course there are heaps available second hand, but I wanted a new engine and I think I’ll enjoy the quiet running of a 4-stroke when I do long days at the tiller.

Initially I was going to order and cut blocks of white styrofoam to fit the flotation chambers, but the pouring foam seemed easier and saved bulky freight.
 
Last edited:
Back
Top