New boat building experience

Yes, PVA mold release is it. I forgot it when I ordered the glass supplies. My big complaint about US Composites is that the ordering system is stone age cumbersome. Been that way for years. My plan was to try the sheet plastic on a male mold anyway, so it worked out fine. So far I'm really encouraged by how easy progress has been, although there are more layers of glass required than I anticipated in order to stiffen the hull.
Yes, that's the stuff. Couldn't remember the name. It is definitely Stone Age technology. The last time I bought polyester resin supplies. I felt like I was back in the 1980s. Lol, but I got what I needed.
 
Yes, PVA mold release is it. I forgot it when I ordered the glass supplies. My big complaint about US Composites is that the ordering system is stone age cumbersome. Been that way for years. My plan was to try the sheet plastic on a male mold anyway, so it worked out fine. So far I'm really encouraged by how easy progress has been, although there are more layers of glass required than I anticipated in order to stiffen the hull.
SJ~

Indeed, the US Composites ordering process is a tad Old School by contemporary interwebs standards. However, I recall my early years ordering through Herter's (and Sears, Roebuck & Co, Montgomery Ward, et cetera).

sm Herters shipping info FULL.jpg

Lots of opportunity to practice arithmetic - long before pocket calculators (and 800 numbers and credit cards). Adding up all those ounces and checking the table for the Zone 6 prices.... The best part was getting the "refund" checks from Herter's for 39 cents (no longer a cents symbol on keyboards) and such. Personal checks were mailed off with 5 cent stamps and the order arrived promptly in about one month.


Herters shipping rates - INSET.jpg

All the best,

SJS Class of '53, Zone 6
 
I was reminded of Herter's when I wrote regarding ordering from US Composites. Them/Him, and to a lesser extent Cabela's in the late 70's - early 80's when you could drop a dime to order, and not long after get two/three day delivery. That was George Jetson stuff.

In fairness to US Composites, they have always had what I want and shipped it reasonably quickly. They also saved me from myself once, when I ordered thick epoxy resin, rather than thin resin as I had done many times previously. I got a call to confirm, and was happy to have the chance to change the order. Can't say that was their site's fault either, as I might have clicked on the wrong one anyway. I'll continue to buy from them as my go-to fiberglass supplier. Insofar as their system reminds me of old time catalog ordering, talking duck hunting off season is mostly a trip down memory lane anyway.

 
I was reminded of Herter's when I wrote regarding ordering from US Composites. Them/Him, and to a lesser extent Cabela's in the late 70's - early 80's when you could drop a dime to order, and not long after get two/three day delivery. That was George Jetson stuff.

In fairness to US Composites, they have always had what I want and shipped it reasonably quickly. They also saved me from myself once, when I ordered thick epoxy resin, rather than thin resin as I had done many times previously. I got a call to confirm, and was happy to have the chance to change the order. Can't say that was their site's fault either, as I might have clicked on the wrong one anyway. I'll continue to buy from them as my go-to fiberglass supplier. Insofar as their system reminds me of old time catalog ordering, talking duck hunting off season is mostly a trip down memory lane anyway.
SJ~

Hard to believe it was the Space Age that began in 1957.....

SJS
 
SJ--when the line at the shop door shortens, let us know. That thing would be perfect for some of my salt marsh spots. Or perhaps you could rent one of the Maine ones to me. Really only likely to use it from a week or so before Christmas through the end of the season. I'm mostly kidding, and have been acquired a lay out blind and am developing plans for that, but the comfort of a water proof version has my brain churning. Key question is whether it might need alteration to fit Sasquatch feet in size 16 wading boots.
 
SJ--when the line at the shop door shortens, let us know. That thing would be perfect for some of my salt marsh spots. Or perhaps you could rent one of the Maine ones to me. Really only likely to use it from a week or so before Christmas through the end of the season. I'm mostly kidding, and have been acquired a lay out blind and am developing plans for that, but the comfort of a water proof version has my brain churning. Key question is whether it might need alteration to fit Sasquatch feet in size 16 wading boots.
If I can pull off making four of them, I'd be happy to let you borrow one. It's always nice to get different perspectives on how a vessel performs. I absolutely intend to have one glued together this weekend. If it takes longer than that, I don't think I'll have time for four this year.

I doubt boot size will be a problem on these boxes, as there is no aft deck to deal with. The canvas and grass covers the entirety of the cockpit, my feet are 13s and had ample room in the original. The glass hull should also have an additional inch of depth since there aren't timbers on the floor.
 
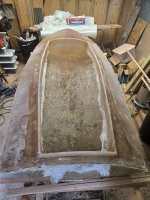
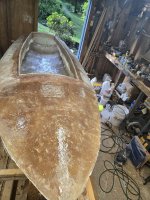
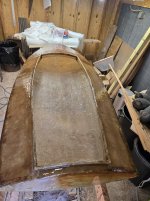
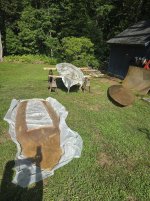
The first attempt at a deck was as anticipated. As easy as the bottom was to make with a sheet of plastic instead of mold release, the deck fought me at every turn. In short, I found the coaming impossible to glass using the plastic sheet. I tried several ways, just a mess that carried over into the deck proper. This resulted in some bubbles that I couldn't work out. I finally gave up and got a bottle of PVA and built the coaming as a separate assembly, basically the coaming with a 3 inch bib around it to tie into the deck, which I had already popped off. The hero tool in this boat building exercise is the cutoff wheel on the grinder, it cuts and smooths as needed. I did not take photos during construction as I was working outside and racing an incoming thunderstorm. Here's what the box looks like with the two halves rough trimmed.

20260625_185503.jpg

20260625_185522.jpg

The plan is to trim both halves to a best fit, glue them together with a thickened resin fillet inside, sand and fair the hull, then put one layer of cloth and tape around the entire hull. Hopefully this weekend.

This hull was a learning experience, I want to think I can build the next one more rapidly and efficiently. Efficiency will be necessary to keep the resin use down, I'm almost 7 gallons into this hull. That's far more than I anticipated. My next part will be another deck since I have that set up with wax and mold release right now. Then I need to order a bunch more resin for another hull. Another lesson is to break the coaming assembly free after one layer of glass. With square corners and vertical sides, the coaming assembly is very susceptible to getting stuck. Breaking it free from the mold release early minimizes the chance of having to cut it free as a result of the resin shrinking during cure.
 
SJ~

Your separate coaming mold approach makes good sense!

Just a few more thoughts from my Unsolicited Advice file.....

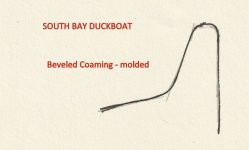
1. South Bay Duckboats have a beveled coaming - so that it'll pop right out of the female mold. They made release even easier by shaping the cockpit (in plan view) with rounded ends - so no hard corners.

South Bay Coaming.jpg

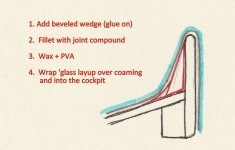
To copy that, you could add a temporary wedge (softwood, PVC, foam...) glued to the outside of your coaming. Then add a fillet with joint compound to avoid a hard bend.

Wedge, fillet and wrap.jpg

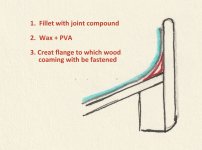
Another approach would be to mold just a flange to which wood coamings would later be fastened. (Corrected spelling for image below: 3. Create flange to which wood coaming will be fastened)

Fillet and flange.jpg

Happy molding!

SJS
 
Those are good solutions to the square edge. I knew I could place a fillet around the coaming edge to create a curve, rather than 90 degree, but didn't want to butcher the original boat. What created the most difficulty when removing the coaming assembly was the four, inside, 90 degree vertical corners, 2 fore, 2 aft. When the glass sets up it shrinks enough to make it a problem. That's no doubt why they put curves along the cockpit coaming for commercially molded boats, in addition to the tapered vertical sides.
 
The finish line is in sight. The last coat of resin has been applied. The final operation before painting is to trim the coaming bottom edge.

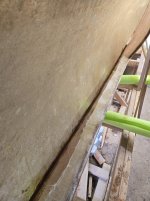
There is only one photo of actual construction. It's the boat on edge so the thickened resin fillet could be applied. It's much tighter than it looks, getting to the fillet required cutting a plastic squeegee into 1/2" strips, attached to the end of a stick for the most forward area. Next boat, I'll wait for help so a bead can be placed before the two halves mate. This was a miserable job that took me several hours Saturday, and there's globs on the hull that I couldn't retrieve.

20260627_085519.jpg

20260628_162235.jpg
 
Back
Top