New boat building experience

It's crazy here in the fact that we have an Amazon warehouse about 4 miles away. I can get so much overnight with free shipping on any order over $25. With that said, I have to drive either 1 hour to a brick and mortar store to actually see product or 3 hours to a Cabela's or Bass Pro. It's a catch 22 for sure.
Very similar to here. The kind of stuff I need (want :) ) is easily sourced in a day or two online, but it's a haul to handle most toys and gear before buying.
 
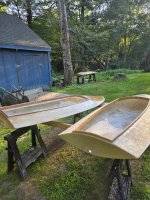
Slowly gaining on the goal of four fiberglass pond boxes. Four hulls are done, and three decks, with two complete boxes glued up (assembled). The third deck is curing right now, with luck the fourth deck will be done in a couple of days.

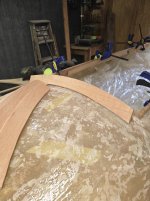
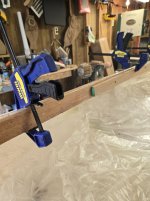
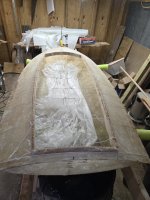
One detail I've pondered since day one has been how to reinforce the coaming. The coaming on hull #1 was filled with thickened resin to the depth of the deck (about an inch). I'm not satisfied with that. The original boat has an ash coaming 7/16 thick, but of course Ash has potential to rot. I ripped some Philippine mahogany to fill the void under the glass for the other vessels. The coaming side rails were 8/4 ripped vertically, the fore and aft cockpit coaming are 3/4 thickness planed to size. Thickened resin was applied to the top of the wood , the rest coated with resin, inserted and clamped to cure. After trimming, the exposed wood will be sealed with resin and encapsulated in glass. Here's a couple of photos.

20260718_165654.jpg

20260718_165614.jpg

I'm still in a learning curve, as this is my first time molding multiple boats out of fiberglass. I'm sure I'll look back and say, why did I do it that way? The answer will probably be that it's fun to tinker and learn by doing.
 
A skilled craftsman such as yourself would probably best be served by using your time to create a female plug and hire out the fiberglass portion to a shop with a chopper gun. Having said that, I have really enjoyed this thread.
RM
 
A skilled craftsman such as yourself would probably best be served by using your time to create a female plug and hire out the fiberglass portion to a shop with a chopper gun. Having said that, I have really enjoyed this thread.
RM
Glad you like it. If I was making a bunch to sell, that's what I'd do. Or buy my own chopper gun. I'm finding that four is all (or more than) I can handle as a summer project. By the time all the interior fittings and dodgers are complete it'll be fall.

I'll say that as I near the end of molding hulls, using a BBSB style craft as a male plug is quite simple and with reasonable care doesn't damage the original boat. I'm putting the skill level required as advanced beginner, the advanced part being a knowledge of working with glass. With one more deck to layup, hope I didn't speak too soon!
 
So ten days from my last update, I'm back to gluing hulls together. For the second time. As with most first time experiences, Murphy's Law is enforced with vigor.

It turns out that mold release PVA does not entirely dissolve when scrubbed with soap and water and hosed down repeatedly as described on the PVA container. OOPS! I filled one of the hulls with water to check for leaks around the joint prior to applying glass tape and POP! the entire hull came unglued. Every last bit of thickened resin fell off both surfaces, thanks to residual PVA. So I pulled the other two hulls apart (hull #1 had no PVA, molded on plastic sheets so it seems to be ok) and proceeded to sand the heck out of them. I guess it's better for the hull to pop in the yard rather than on the water. It turned out that the coamings came apart as well, back to square one.

The last few days have seen two hulls reassembled. First step was to glue the coaming together.

20260727_182226.jpg

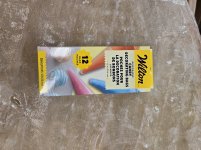
In the meantime, I decided to try cake frosting bags to apply the fillet of thickened resin to the joint. That worked like a champ in the tight space available.

20260727_182239.jpg


Given the clamshell hull cross section of a BBSB, a simple method of clamping is string tensioned around the hull while gluing. Far easier and more precise than mechanical clamps, which want to walk on the curved hull.


20260728_181808.jpg

I'll retest the joints with water again to be sure there's a solid bond. I'm reasonably confidant, it might be a throw up your hands moment if they aren't secure this time.
 
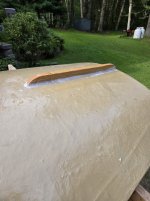
I've made good progress finishing the hulls, most annoyingly figuring out how to complete the coamings. No picture to share at the moment, but basically the fiberglass cast coaming was cut away and replaced with mahogany. A substantial fillet of thickened epoxy supports it against the deck, and the mahogany is then encapsulated in glass. I suspected this would be a problem going in, at least I can say I told you so. :D

I decided to tint the resin rather than paint later. I got a color called Camel Brown from a local shop, it appears reasonably close to dead grass to my eye so I think I'll continue with all four hulls. I've tinted resin before, my gripe is that it makes the cured resin difficult to sand- kind of medium soft plastic that clogs the sandpaper. I'll suffer through it.

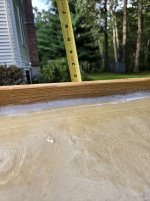
I bounced the idea of a skeg around in my head since I built the first pond box last year. That one did not have a skeg. We rowed it a bit, it takes discipline to maintain a line without a skeg in these short hulls. The boats are only nine feet so I chose 24" as a suitable length. There was some decent white oak laying around in the shed, which I planed to a proud 7/8" and ripped to 1-5/8". I chose not to taper the skegs as the hulls will be hand loaded in trucks and dragged across the marsh. Too much chance of a crack. They are fastened to the hulls entirely with thickened resin, and will then be encapsulated with cloth tape. As with everything on these builds, I'm experimenting. My gut says it will be durable, but I may chicken out and install a backer in the bilge, then drive a screw or two through the bottom. There' still time for field modification.
20260819_174020.jpg

20260819_174225.jpg

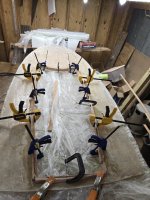
As mentioned previously, it's almost impossible to clamp effectively on the curved hulls without a bunch of blocks. I found that binding with string does a good job securing glued pieces. The plastic sheet is 100% effective at eliminating adhesion, either to the resin, the part, or the string. I wish I figured this out roughly 40 builds ago.
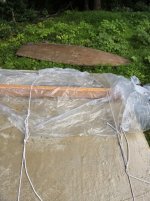

20260819_174302.jpg
 
I decided to tint the resin rather than paint later. I got a color called Camel Brown from a local shop, it appears reasonably close to dead grass to my eye so I think I'll continue with all four hulls. I've tinted resin before, my gripe is that it makes the cured resin difficult to sand- kind of medium soft plastic that clogs the sandpaper. I'll suffer through it.
Will tinting epoxy protect it from UV degradation as well? My plan for the $100 kayak I purchased this summer as well the canoe that I'm building is to use Wetlander, at the expense of extra weight.
RM
 
Will tinting epoxy protect it from UV degradation as well? My plan for the $100 kayak I purchased this summer as well the canoe that I'm building is to use Wetlander, at the expense of extra weight.
RM
re tinting. I do not know for sure. However, unless one were using graphite or carbon powder, I suspect that UV will do its thing on the surface. Two coats of duckboat paint is cheap insurance and Old Mister Sun.

And, dark colors in the sun are not kind to epoxy. Good to keep any vessel covered/stored.

All the best,

SJS
 
Progress continues...all four new hulls are glued up and have skegs attached. One hull needs to have a finish layer of cloth on the deck, then they all need sanding and a finish coat of resin. These three are the most complete.

20260826_175406.jpg


I'm still tending toward tinting the resin, I can always paint over it later.

The coaming finish continues to be a major source of frustration. If I ever mold glass hulls again, I'll omit the coamings in the mold and build them from wood afterward. I most certainly would be done by now if not for those damn coamings.

I decided to install drain plugs. A simple block of mahogany, predrilled to accept the plug, is epoxied to the transom. After the epoxy cures, the drill follows the hole to penetrate the hull. In the photo the tubes are inserted but not yet peened over and set in 5200. The epoxy is sloppy because I got sidetracked and forgot to clean it up before it set. Some sanding required. Do I need to say thickened epoxy goes everywhere and gets on everything? :rolleyes: It's a two man job to buck up the inside of the tube with a piece of railroad track and tap the brass over on the exterior. Hopefully my buddy will come over this weekend. Years ago I had a bolt setup with two flanges that allowed you to bend the tube by cranking down on the bolt, but it got lost. Gremlins.

20260826_175343.jpg

I hope to finish the hull work before Labor Day. Then the canvas work begins.
 
SJ

I'm very impressed with your design and build. Those would be welcome in anyone's fleet.
Thank you. I wish I could have mastered the finish process for this fleet. The feather edge and coaming present challenges in glass that working in wood makes simple. I'm sure the finish will be huntable, but not as clean as I would like. Maybe my friend the sander will work some of kinks out. There is a finite limit to how much more sanding I can tolerate, as I'm running out of duct tape to pull the glass fibers out of my skin. :)
 
SJ

You might mix micro-balloons in epoxy and build up the rough areas and then sand that down. Sanding micro-balloons is a lot faster and easier than sanding fiberglass. Less itchy too.
 
SJ

You might mix micro-balloons in epoxy and build up the rough areas and then sand that down. Sanding micro-balloons is a lot faster and easier than sanding fiberglass. Less itchy too.
I haven't used micro balloons. I've generally used cabosil for structural stuff and wood flour for fairing. I recall you guys saying previously that micro balloons are easier to sand than cabosil, I'll see if I can get some locally as time is short.
 
Good question, I don't know.
I recently bought a product from Raka. In Florida. They now sell a UV inhibited epoxy.

I used it on the decks of my skiff project and then coated with spar varnish. I think it should give the best overall protection against yellowing and degradation.

The boats look great! Nice and clean and simple lines. I think you've got a winner.
 
I recently bought a product from Raka. In Florida. They now sell a UV inhibited epoxy.

I used it on the decks of my skiff project and then coated with spar varnish. I think it should give the best overall protection against yellowing and degradation.

The boats look great! Nice and clean and simple lines. I think you've got a winner.
I'll have to look into that epoxy for my next build. Thanks for the kind words.
 
Looking really good! I'll second the build up and sand with an easier to sand material. If you can't find microballoons labeled as such wherever you can find WEST systems you can probably find their fairing mixture (which, I believe, is microballoons).
 
Back
Top