Sneakbox Renovation

Good morning, Jon~

Don't worry - I've got you on Speed Dial!

And, I feel the same way about mice. Killing is that last resort. And, since my shop is the ONLY rodent proof building on the farm - our house is circa 1825 with a stone foundation that was laid up dry - I have kept it mouse-free until February. After a long and comical battle - I just installed a metal "lip" across the threshold of my big double doors because mice - House Mice, not White-footed Mice - had chewed my pine flooring at the seams.

So, I was mouse-free for about 3 days - until I hauled the Sneakbox in. I have seen at least one stowaway - a charming White-footed Mouse - with those big eyes and ears and that fawn-colored coat. Some peanut butter and I will commence a live-trapping campaign as soon as I get home.....

All the best,

SJS
 
Good morning, Will~

PLUG - I do plug my drain from outside - for several reasons.

1 - It's hard to get to from inside - being beneath the stern deck and behind the gas tank.

2 - I use it every hunt to drain the "nuisance water" that inevitably comes aboard with decoys and waders, etc. My routine is to pull the plug while the boat is on the trailer but still on the ramp so that water flows rapidly. (I seldom hunt crowded ramps so I am not holding others up.) Then, I reinstall the plug before I leave the ramp so it is ready for the next hunt.

3 - I have never had a plug pull out under way. I suspect the presence of the skeg helps in that regard. If I did lose one, I would hope the lanyard would keep her attached and I could reinstall while afloat if needed. If not, I keep a spare in my tool kit.

DODGER - I typically hunt low cover - and grew up in grassboats, laying on my back to hide. If I hunted some of the tall cover I see in others' photos from other areas, I might try a different approach - and would thatch up the dodger.

All the best,

SJS
 
Good morning, Bill~

I have not yet decided what wood to use for my new rails - but probably Phillipine Mahogany. Since it is used for decking, I can get it at my local lumber yard in long, clear lengths. It is moderately rot-resistant - and will enjoy better protection from the elements when stored - especially once I build my boat shed......

All the best,

SJS
 
Good morning, Craig~

Once I strip off the canvas, I will take some photos of the decks. I suspect the shape of the molded cockpit "coaming" could help in identification. Frankly, it was not well-built. The hull and decks are 'glass with wooden framing - typical of the time. The 3 hull stringers were 'glassed in with woven roving - and are only "approximately centered. There is some framing under the decks and flotation foam was sprayed there as well.

All the best,

SJS
 
Steve, nice to see how all the "accessory" pieces come together in one tight little package! I still have a couple of pairs of nicely-turned ash marsh stakes to go along with a pair of handmade ten foot push poles picked up from the South Bay builders years ago. (In storage, mostly.) Still, when we went up to Jersey to hunt brant with John Livoti, Dave Diefenderfer's rebar versions did really well punching through frozen ground. There is always something new to learn while admiring the original ways of doing things...good luck on this project and keep those pictures and technical notes coming! Best, Rufus
 
What a great project and education for all of us! I have a question on the canvas lap cover that I have been wrestling with. If I cut the canvas as wide as the cockpit, I foresee the funneling of more water than desired into the boat. Not that duck hunting in the rain is a dry sport by any stretch, but I am looking to minimize what gets in. Have you considered options in this vein? Thanks for your thoughts!!
 
Scott, I addressed that issue of water funneling in by doing similar to
Dave Clark. I have fiberglass poles sewn into mine. It overlaps the coaming a few inches on both sides. It is rigid enough that my shells, binos, and shotgun lay on top. This off season, I am added another couple feet to mine. I plan to snap it to the rear deck so that it does not shift so much when I push it down to tend the rig. I will extend it so that it covers the entire cockpit so I can keep all the water out if I leave the boat sitting in the rain. I often use the BBSB as a retriever if we hunt a larger boat, or a fixed blind as it is quicker to get moving.
 
Good morning, Scott~

As per Dave's response, you could certainly make the lap cover wider than the cockpit. And, the lower edge of mine is snapped to the aft coaming so the cover is fairly taut. I commonly set binoculars - and the butt of the Model 12 - on the cover.

Note how the thatch on the cover intermingles with the thatch on the decks. Thinking back, I cannot recall gunning in such heavy downpours that I was concerned about water pooling on the cover. I like to think the gunning was so good that I was frequently up and retrieving all of my downed birds!

Sneakbox%20-%20SJS%20on%20Thatch%20ca%201990%20-%20shortened_zpsgerefky4.jpg


All the best,

SJS
 
Steve,
Nice work as always. Looking forward to seeing it come together. What type of wood/plywood will you be using for the knees/supports and the decking?
 
Good morning, Tom~

I will be using 1/2-inch AC plywood for the bulkheads and knees and 1/4-inch for the decking. Everything will get well-sealed with epoxy - prior to installation. I just inspected the knees (1/2 inch AC) I installed almost 30 years ago yesterday - still in excellent shape.

I use AC - instead of "boat plywood" like marine doug fir or okoume or meranti - for a number of practical reasons:

1) Structurally, AC is "close enough" for my purposes. My local lumber yard (family -owned, not big box) always has nice plywood and any voids in the interior plies are minimal. IF I were building a hull or stitch-n-glue method, I would definitely use one of the marine plywoods.

2) Since I live in dairy country, boat lumber is hard to get. I can order fir marine ply - but the price is at least 3X AC. If I needed a bunch, I would take my flatbed trailer on one of my trips to Long Island and haul a supply north.

3) As mentioned, price is consideration.

All the best,

SJS


I removed the decks yesterday. Now I just need to scoop out several cubic feet of flotation foam and clean up the 4 existing knees - then I can begin the design for the new layout.
 
Thanks Steve. I'll be keeping a close eye on this thread as I have a Sneakbox hull that needs a deck and supports. I'm still contemplating whether to have an all glass top deck made but leaves little room for "customization". I too have price as a consideration and did not want to go all out for marine ply if not necessary. Thanks for the info.
 
Good morning, Craig - and other Jersey Sneakbox Guys~

This next batch of photos shows the deck in its original, uncluttered condition. I am hoping that might be key in identifying the maker. I did discover yesterday that the stringers had been formed (with woven roving) over a dense yellow (closed-cell urethane?) foam - and not over wood as I had thought. Also, the same foam filled the molded cockpit coaming and was sprayed beneath the decks for a bit of flotation. The original color of the hull was dark Olive Drab gelcoat.

This next episode could be titled Documentation, Demolition & Design. It's mostly demolition but I need to measure and document before the information is lost in the demolition process - and I am designing (in my head) the whole time I am taking the boat apart. It was a great feeling to finally see the entire hull interior. When I first got the boat, the deck was semi-detached from the hull, but I never had it off completely and just put it back together.

Here are some details of the Spray Dodger. The bow is conduit. The strut is sized so that it fits snugly into its chock when I lift it - using the hole in the strut for my index finger - into place. I used wood screws and finish washers to hold the lower edge in place - the cheapest solution - compared with snaps or turnbuttons, etc.


1%20-%20Dodger%20pocket_zpsko2rkuqw.jpg


2%20Dodger%20chock_zpscpjbfz9i.jpg


2b%20Strut%20chock_zpsovvcauve.jpg


3%20Screws%20amp%20finish%20washers_zpsyyos2vxw.jpg


The lap cover was held with 5 snaps across the outside of the aft coaming.


4%20Aft%20coaming%20snaps_zpsflsbspky.jpg


More dimensions - to help with design. I plan to "move" the cockpit 6 or 8 inches forward - to provide adequate space for my 3-gallon tank AND to increase volume for flotation tanks.


5%20Stern%20deck%20length_zpstmdqzak4.jpg


6%20Foredeck%20lengths_zpsf3h9xmwy.jpg


7%20Cockpit%20length_zps3eidpef9.jpg


8%20Lap%20cover%20length_zpshcdufbxn.jpg


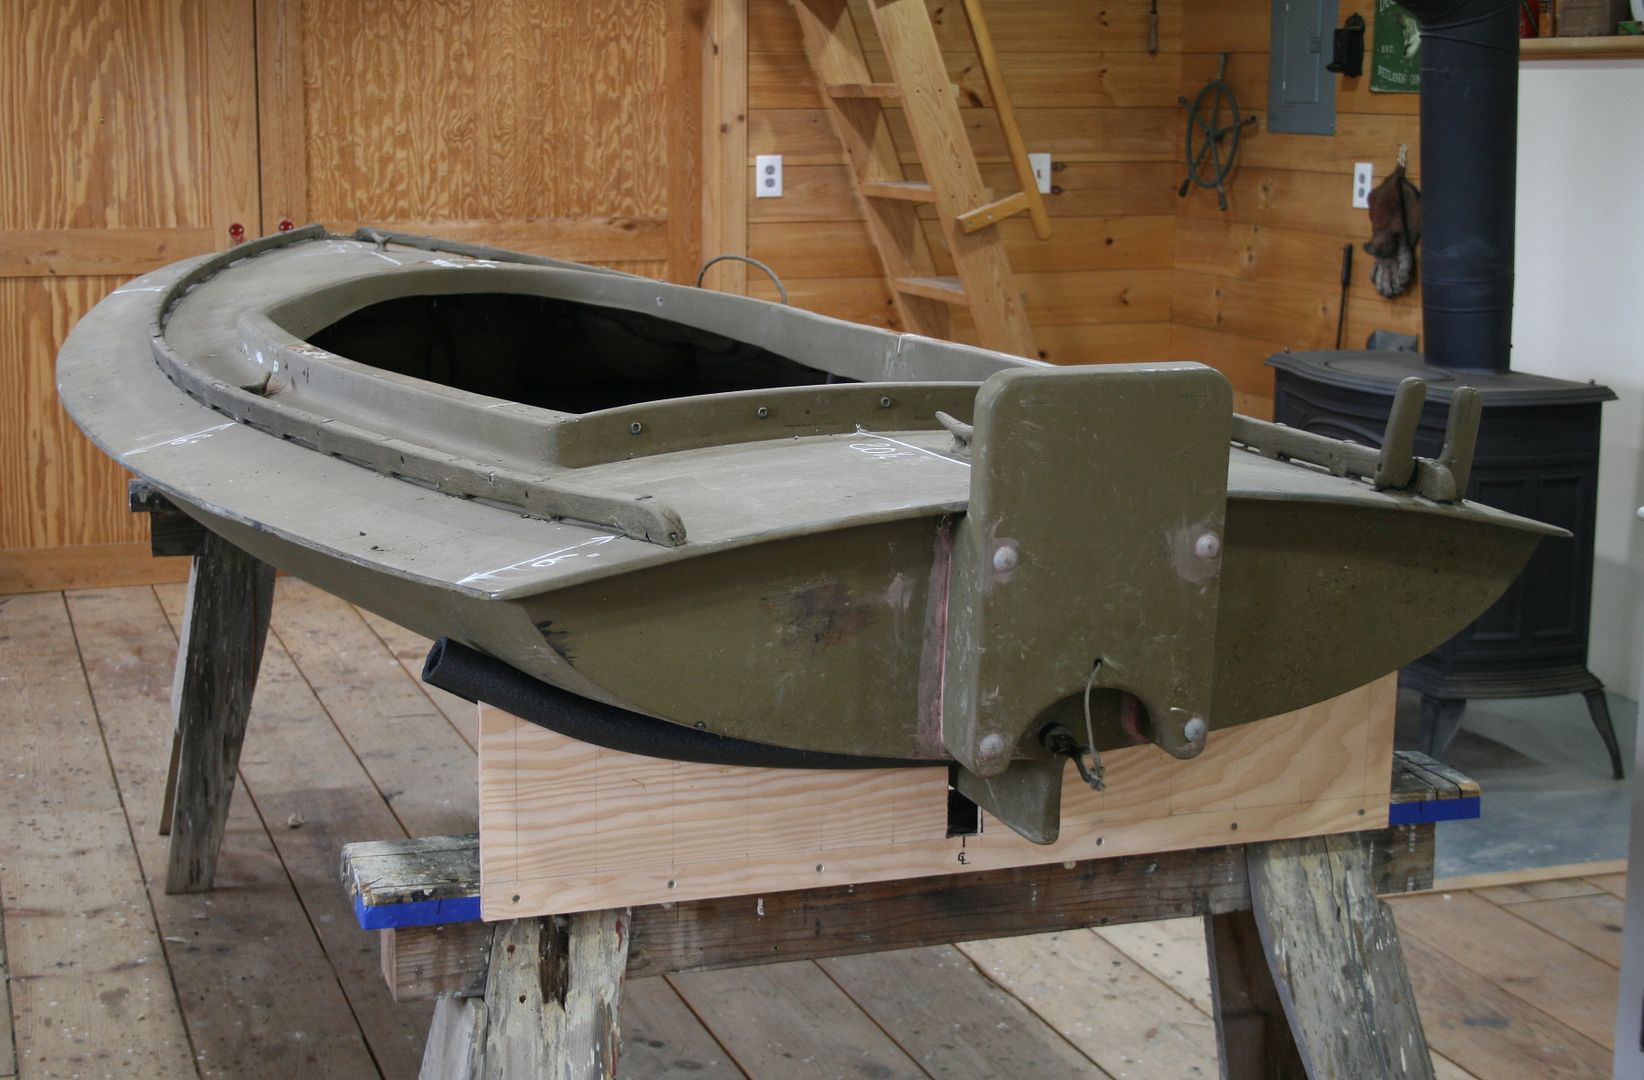
I will want the hull dead level - athwartships - during the design and re-construction processes. So, I am making chocks - to be screwed to the sawhorses - that are scribed to the hull sections. I am presuming that the cockpit is level with the top of the coamings. This is not true up forward because I know it twists - down to starboard. The twist is why I start with the aft chock.

The blocking is temporary - to keep the hull level until I get all of my hull section elevations.

9%20Leveling%20stern_zpsiekx4rk6.jpg


The masking tape - blue only because I am out of white - is marked every 3 inches. Measurements use the traditional system: the 4 is inches and the 5 is eighth-inches (= 4 5/8")


10%203-inch%20elevations_zpspdjrvjxr.jpg


It is important to use a square - and measure at the inside corner of the rule.


10%20Every%203%20inches_zps8jew6c8v.jpg


11%20Both%20halves_zps9y5ait7z.jpg


The measurements are transferred to plywood - then 4d finishing nails are driven at each point along the curve. A length of 1/8-inch aluminum bends to this contour.


12%20Connect%20the%20dots_zpsob0vagtf.jpg


The notch is cut for the skeg - and pipe insulation is used for padding.

13%20%20Keel%20notch%20and%20padding_zpsvi0gn1pp.jpg


I also marked the hull - to show where along its length this chock is intended to fit.

14%20Level_zpst659wdke.jpg


Just more documentation for design. I am hoping I will not have to remove the anchor chock. I think I can just move the whole set of 3 floorboards forward along with the cockpit.


2c%20Anchor%20chocks_zpsqjajxxwc.jpg


The angle of the backrest (neck rest?) is critical. I want to be able to see the horizon/water without having to crane my neck. This works for me.


2d%20Backrest%20angle%20-%2050%20degrees_zps4b5ipsiq.jpg


These next views should help identify the boat. The molded coamings - especially with the rounded opening and pointed forward coaming strike me as unusual - if not unique.


18%20ID%20-%20foredeck_zpsdf16rfbe.jpg


19%20ID%20sterndeck_zpsywycisop.jpg


20%20ID%20Decks%20from%20astern_zps3utpjw6v.jpg


21%20ID%20Astern%20port_zpshpytmrbg.jpg


23%20ID%20from%20bow_zps58wlovhb.jpg


A metal-cutting blade in the Sawzall made short work of removing the 1/4-inch carriage bolts that held the White Oak thatch rails. I am saving the rails to help me design the new ones AND to make sure I locate my new bulkheads so that they do not interfere with fastening the new rails.


23b%20Cutting%20carriage%20bolts_zpsjh9yiqby.jpg


This - without my nosepiece and motor board - should be what she looked like when originally built - with a dark Olive Drab gelcoat.


24%20Bow%20on_zpst85cyxt6.jpg


To remove the decks, I marked 2-1/2 inches in from each edge. I will be using the resulting "lip" as the inwale - for attaching the new decks.


25%20Measuring_zpss1virm4u.jpg


26%20Marking_zpsuowynvuj.jpg


I set the Skilsaw on "shallow drive" - with the blade protruding about 1/4 inch.


27%20Skilsaw_zps5rwrd4cf.jpg


I need to cut these smaller to take them to the transfer station later this morning.....


44_zpsjhlflsjb.jpg


This is the first time I can get at the inside of the stern. When I installed the new motor board several years ago, the 'glass-encased plywood "reinforcement" compressed beneath the nuts and washers. Now I can do it the right way.


28%20Aft_zpsoepvg05h.jpg


The shelves are still in fine shape. The holes keep them from pooling any water that might finds its way in.


29%20Shelves_zpsxp0gy6gk.jpg


The foam was intact - and showed moisture only around the edges - probably unavoidable condensate.


30%20Foam_zpswwbj2ecb.jpg


Note how crooked (off-center) is the impression left by the "king plank" (stiffener down center of deck). The hull stringers were similarly out of kilter.


31%20Off-center_zpsdck1fvio.jpg


The right tools for the job....

40_zpsvmiqdz9u.jpg


Still lots of grinding needed to most of the hull interior - whatever will get new epoxy or paint.


41_zpsue06tphd.jpg


Just checking dimensions.


42_zpskhtbyjh2.jpg


All the old plywood will come out before new reinforcement goes in.


43_zpsekosm79a.jpg


The knees are good - but will need "filler blocks" to fit to the higher crown of the new decking. The oblong hole in the forward knees allows for the storage of my Pickup Stick - and even my Model 12 in its light sleeve - on the shelves.


45_zpsaon4adly.jpg


NEXT STEPS: Make the forward chock to level the hull, then grind, then design....

All the best,

SJS

 
That's a really interesting hull Steve. I've spoken to a few folks and none of us have been able to figure out its origin yet.

I definitely approve of moving the cockpit up to give a larger rear deck area. I prefer to have the smallest cockpit that's still comfortable on my sneakbox, but that's just me.
 
Fantastic Job Steve! I love it. I think I remember reading a few years back that ping pong balls could be used for floatation. Is that something you could use up under the deck of the bow?

Best,
Steve
 
Back
Top