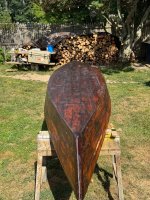
Newest double ender

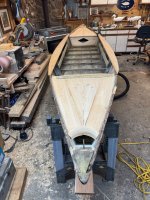
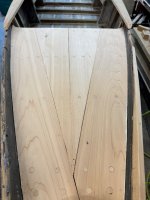
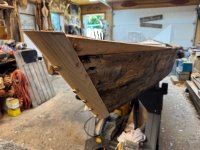
Haven't had a chance to update, but lots of work has been accomplished. The Front stem has been replaced, new for and aft decks were cut, fit, and secured. The side decks also replaced and fastened.

The inside has been sealed and painted (other than the decks.)

I will flip the boat this weekend and then the real work (filling faring sanding) begins.
 

Attachments

  • IMG_9338.jpeg
    IMG_9338.jpeg
    356.2 KB · Views: 42
  • IMG_9285.jpeg
    IMG_9285.jpeg
    323.4 KB · Views: 42
  • IMG_9286.jpeg
    IMG_9286.jpeg
    601.2 KB · Views: 42
Haven't had a chance to update, but lots of work has been accomplished. The Front stem has been replaced, new for and aft decks were cut, fit, and secured. The side decks also replaced and fastened.

The inside has been sealed and painted (other than the decks.)

I will flip the boat this weekend and then the real work (filling faring sanding) begins.
Nice clear cedar on that deck.
 
Stunning work, Jode, and in Maine we'd call that boat wicked cunnin'. My ability to slum for rails in a misused sculler or a big canoe is intact, but now I have more boat envy.
Thanks Jeff! I want to get up to merrymeeting one season. A friend up there has been trying to make it happen.

Love that saying!
 
Are the bottom planks salvageable? I can't tell if there's rot along the chine. You did a nice job on the interior. (y)
I believe all the bottom planks are salvageable. There's some missing wood along one of the chines where nails have split it out.

I should be able to repair that area without having to replace the plank. But I'll know better once I take the belt sander to it and see if there's any punky spots.
 
Being that it was previously glassed, I will re-glass it using cloth and epoxy.

The planks have shrunken to such a point I don't believe chinking would suffice
Jodi,
Penetrating Epoxy is kind of a controversial topic but in this type of application may be useful for wood that is less than perfect. Of course you would still glass it once the solvents have evaporated. Might be worth checking out.
RM
 
Friday update, inside is sealed up, got her flipped last night and starting on the exterior.
Jode~

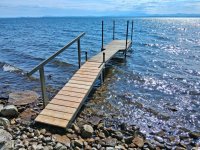
Your photo made me smile - because of the trio of cordless drills. I just bought my 5th 20v DeWalt. We went up to our Lake Champlain camp a few days ago for a bunch of chores, one of which was building (assembling, really) a new ramp to our seasonal dock.

sm 2 New Ramp FULL - 17 June 2026.jpg

I had made all the parts here at the farm and carried them all down to the beach for assembly. I had packed 4 fully-charged batteries, the chargers, all the fasteners and bits - but left all of my 4 cordless drills behind.

Rather than buy yet another 100-foot extension cord, I took advantage of a Father's Day sale at Lowe's and bought a 5th drill. The assembly went as planned and all is much safer now.

Going forward, I will keep one set (drill+battery+charger) at the Lake and another at my Mom's on Long Island. This traveling with tools is just too much for This Old Man....

Question: We have discussed this topic previously: How did you seal the interior? - and did you fill the seams?

All the best,

SJS
 
Jodi,
Penetrating Epoxy is kind of a controversial topic but in this type of application may be useful for wood that is less than perfect. Of course you would still glass it once the solvents have evaporated. Might be worth checking out.
RM
The planks are dry, but they're not rotted. I will remove the 1/8th inch surface layer and try to get down to some more sound wood. I will give it a pre-coat of thin epoxy before I do my glassing coat.
 
Jode~

Your photo made me smile - because of the trio of cordless drills. I just bought my 5th 20v DeWalt. We went up to our Lake Champlain camp a few days ago for a bunch of chores, one of which was building (assembling, really) a new ramp to our seasonal dock.

View attachment 76974

I had made all the parts here at the farm and carried them all down to the beach for assembly. I had packed 4 fully-charged batteries, the chargers, all the fasteners and bits - but left all of my 4 cordless drills behind.

Rather than buy yet another 100-foot extension cord, I took advantage of a Father's Day sale at Lowe's and bought a 5th drill. The assembly went as planned and all is much safer now.

Going forward, I will keep one set (drill+battery+charger) at the Lake and another at my Mom's on Long Island. This traveling with tools is just too much for This Old Man....

Question: We have discussed this topic previously: How did you seal the interior? - and did you fill the seams?

All the best,

SJS
One can never have too many drills! The 18 V versions are great. I use them often for days at a time down on my Marsh cabin and they work well.

I've had good luck on the advice of Bobby Keeney using Sika flex brand flexible sealant.

It dries in about a day. I buy the version that retains about 40% flexibility when cured. I believe its standard application is for filling gaps in concrete.

I believe it's standard application is for filling gaps in concrete. I just fill on the inside about a quarter inch.

It is flexible enough to give the planks some movement, waterproof them, and then allow my thickened epoxy to fill the gaps on the outside before I fiberglass.

I used it on my Bianco scull restoration and it seems to have held up well in the several years since it has been done.

It is not my first choice, but being this boat has been fiberglassed before, it is an area that needs to be addressed. This seems to be the best way I have found so far.
 
Jode~

Your photo made me smile - because of the trio of cordless drills. I just bought my 5th 20v DeWalt. We went up to our Lake Champlain camp a few days ago for a bunch of chores, one of which was building (assembling, really) a new ramp to our seasonal dock.

View attachment 76974

I had made all the parts here at the farm and carried them all down to the beach for assembly. I had packed 4 fully-charged batteries, the chargers, all the fasteners and bits - but left all of my 4 cordless drills behind.

Rather than buy yet another 100-foot extension cord, I took advantage of a Father's Day sale at Lowe's and bought a 5th drill. The assembly went as planned and all is much safer now.

Going forward, I will keep one set (drill+battery+charger) at the Lake and another at my Mom's on Long Island. This traveling with tools is just too much for This Old Man....

Question: We have discussed this topic previously: How did you seal the interior? - and did you fill the seams?

All the best,

SJS
After filling the gaps in the interior, so Farr has received one coat of duck Boat Marsh Green.

I contemplated just using coats of Thịnene coats of boiled linseed oil as I have done on my other skiff. But the multicolored paint and the very dry planking necessitated paint in my opinion. I will give it another coat of duck boat green once the outside is completed.

My reasoning for doing a little bit of work on the inside first is that the plank seams need to be addressed before you can glass. Otherwise you have a Runny sticky mess of resin dripping through the cracks.

I have used painters tape previously to try and address this issue, but it never seems to be 100% and then you are left cleaning the residue from the tape before you finish the insides.
 
I have used painters tape previously to try and address this issue, but it never seems to be 100% and then you are left cleaning the residue from the tape before you finish the insides.
I've had good experience using clear packing tape for such - pulls off cleanly and doesn't seem to leave much, if any, residue.
 
Jose, forgive my ignorance, but is the Countyline stock tank seen on top of the wood stove used just as a float testing venue for your decoys or does it have other uses?
Love the restoration update,
 
A big thanks to Sharp eyed Bobby Keeney for the lead on my latest resto candidate.

An early Alvin Beal ( Canton NJ) rail skiff. All mahogany and white cedar. She needs some TLC but should be a nice worker in the rice.

All mahogany and white cedar construction. She was found by the seller behind a barn only 2 miles from where she was originally built in Beals shop. I'm planning on having her in shape for Septembers Tuckerton show.
Father's Day update

Pic one.

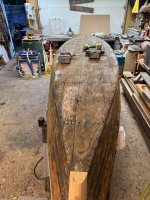
I Moved the skiff outside and went to town with the belt sander and grinder. Took it down to fresh wood.


Pic two
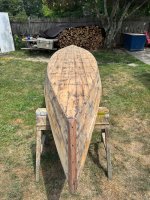
I Cleaned off the dust, then I Gave it precoat of non-blushing epoxy.

This helps prepare the surface for proper bonding of the thickened epoxy fill coats.

Then filled all imperfections and 1000 nail holes with the epoxy putty mix. She's getting there!
 

Attachments

  • IMG_9415.jpeg
    IMG_9415.jpeg
    815.9 KB · Views: 25
  • IMG_9416.jpeg
    IMG_9416.jpeg
    794.8 KB · Views: 25
Father's Day update

Pic one.

I Moved the skiff outside and went to town with the belt sander and grinder. Took it down to fresh wood.


Pic two
I Cleaned off the dust, then I Gave it precoat of non-blushing epoxy.

This helps prepare the surface for proper bonding of the thickened epoxy fill coats.

Then filled all imperfections and 1000 nail holes with the epoxy putty mix. She's getting there!
Jode~

Wonderful progress - congratulations!

And Happy Fathers Day!

SJS
 
Back
Top