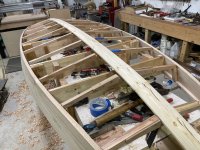
After the holidays, I was back working on the boat. Working from the stern forward I installed the remaining ribs. When installing the ribs the rib risers need to be cut to the curve of the hull so the ribs sit square to the hull. If I were to build the boat again lofting the lines and taking off the tapers and widths of the ribs would be a good aid.
I used a tick stick and a scrap block of rib material to get the rib riser height at each staition.
I made a mistake when I went to trim the keelson to length and cut the keelson too short. I prepared and made up a new keelson plank.
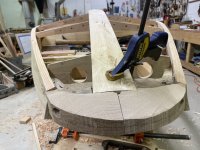
Using chisels I next cut the mortise into the bow block for the keelson to fit into.
Once the keelson was fitted into the mortise I then marked the length at the transom and cut the keelson too length.
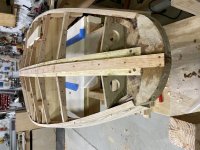
Next I marked the keelson for the rib locations. I used a level making sure the ribs were plumb and predrilled for #8x 3/4 screws.
I then primed the keelson witb epoxy and installed it. I mixed epoxy with wood flour to make a bedding compound.
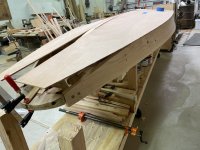
The next step was installing the center of the bottom. This is a 1/4” by 1 1/2” wide strip. I planned down the keelson I cut too short to 1/4” and ripped to width. I made up an additional piece to get the 12’ length. I polanned a 12:1 taper on each piece. The center strip was then glued into place. The plans call for #6 x 3/4” screws. I opted to pre-drill and use 3/4” ring shank bronze nails instead. I sank the heads slightly below the surface.
The Widgeon plans call for bottom to be cut out of 12’ long plywood. I am using 8’ sheets. I marked and rough cut out the bow section and a 4’ 6” section for the stern section. I rough ground a 12:1 taper and glue the panels together to get the 12’ length. I put fiberglass tape on the inside of the panel since the outside is getting covered in fiberglass.
I used a tick stick and a scrap block of rib material to get the rib riser height at each staition.
I made a mistake when I went to trim the keelson to length and cut the keelson too short. I prepared and made up a new keelson plank.
Using chisels I next cut the mortise into the bow block for the keelson to fit into.
Once the keelson was fitted into the mortise I then marked the length at the transom and cut the keelson too length.
Next I marked the keelson for the rib locations. I used a level making sure the ribs were plumb and predrilled for #8x 3/4 screws.
I then primed the keelson witb epoxy and installed it. I mixed epoxy with wood flour to make a bedding compound.
The next step was installing the center of the bottom. This is a 1/4” by 1 1/2” wide strip. I planned down the keelson I cut too short to 1/4” and ripped to width. I made up an additional piece to get the 12’ length. I polanned a 12:1 taper on each piece. The center strip was then glued into place. The plans call for #6 x 3/4” screws. I opted to pre-drill and use 3/4” ring shank bronze nails instead. I sank the heads slightly below the surface.
The Widgeon plans call for bottom to be cut out of 12’ long plywood. I am using 8’ sheets. I marked and rough cut out the bow section and a 4’ 6” section for the stern section. I rough ground a 12:1 taper and glue the panels together to get the 12’ length. I put fiberglass tape on the inside of the panel since the outside is getting covered in fiberglass.