Hit the design right on the head then! " The snow goose, the bird that goes full throttle, no porpoising, and wheelies for life... Max speed of 20 mph, even with a 150hp hanging off the back! As frustrating as hunting the species! Specially made just for you!"I thought about claiming it was a design change to address porpoising.
Fortunately, it is quite minor, and really only exists at the keel and within an inch or two either side. Frankly, by the time I get it glassed and a keel on it 90%of the problem would likely be covered and solved... but it should be pretty simple to get it right with filler, a long straight-edge, and some longboat sanding. I also have a little to do just in front of the scarf joints in the bottom section - it looks like I was a touch heavy with the sanding there while I still had the panels flat.
You are using an out of date browser. It may not display this or other websites correctly.
You should upgrade or use an alternative browser.
You should upgrade or use an alternative browser.
2025 Devlin Snow Goose Thread
- Thread starter HenryHawthorne
- Start date

RM Anderson
Well-known member
Henry,
Yes, you could fair the area you are concerned about but you may want to wait and do your fairing after glassing. Microballoons are not a structural filler material and wood flour/epoxy is a bitch to sand. Richard
Yes, you could fair the area you are concerned about but you may want to wait and do your fairing after glassing. Microballoons are not a structural filler material and wood flour/epoxy is a bitch to sand. Richard
Got her outside to do some light sanding and rounding of the edges in prep for next steps. Only the front edges from front transom to hull pieces left to do, but had to stop.
View attachment 65468
View attachment 65469
View attachment 65470
Tod's eagle eye picked out in previous picture the slight hook I have in the rear planing section, so I have a little building up to do there as well as some light fairing in other areas before I can get tape on. I also need to move my table saw over to the shop so I can get the keel cut and dry fitted before taping over that seam and losing center references.
That is a very clean build, very nice. It looks fantastic.
Thanks Richard. I've been weighing the alternatives. One is to build up slowly with glass... a small strip in the center then a bit longer, wider piece, then fair. The other is to build up (but intentionally leave low) with a higher density wood flour mix, adding a more sandable thin layer when the first is just tacky. I believe the hollow is small enough that fairing then glass would likely be sufficient, but I think these are simple enough alternatives that there is no reason to take any chances. But open to other ideas/recommendations.Henry,
Yes, you could fair the area you are concerned about but you may want to wait and do your fairing after glassing. Microballoons are not a structural filler material and wood flour/epoxy is a bitch to sand. Richard
Thanks Tod!That is a very clean build, very nice. It looks fantastic.
Thanks Richard. I've been weighing the alternatives. One is to build up slowly with glass... a small strip in the center then a bit longer, wider piece, then fair. The other is to build up (but intentionally leave low) with a higher density wood flour mix, adding a more sandable thin layer when the first is just tacky. I believe the hollow is small enough that fairing then glass would likely be sufficient, but I think these are simple enough alternatives that there is no reason to take any chances. But open to other ideas/recommendations.
I wouldn't sweat it too much. I'd probably do a mix of maple flour and microballoons just because I like the way it behaves, I can move it around really cleanly, much better than plain microballoons, but that is probably just me. It also sands pretty well and is pretty strong. Maybe tape the keel and chines and then fair everything and then glass.
Thanks. While I'm getting advice... regarding getting the keel centered and straight, my plan is to drill about 12" on center down the center line while I have good reference points - and to cut a centered kerf down the hull side of the keel board once I get it ripped (as a screw guide). I'll dry fit and use the installed keel(screwed from underneath) to measure and mark center lines for the strakes... then dry fit them similarly. Mark all for final length, then remove and set aside. Once glassing and fairing are complete, reinstall with thickened epoxy (screws/washers from underneath for clamping pressure). I'll ultimately remove the screws and fill those holes before adding fillets (once upright). Is there a better way?
I'm also tempted to shape the hull-side of the keel a bit to reduce the amount of thickened epoxy needed for gap-filling. Worthwhile, or waste of time?
I'm also tempted to shape the hull-side of the keel a bit to reduce the amount of thickened epoxy needed for gap-filling. Worthwhile, or waste of time?
RM Anderson
Well-known member
I can't give you any advice as I have only used UHMW strips and the jury is still out on that one. Richard
Thanks. While I'm getting advice... regarding getting the keel centered and straight, my plan is to drill about 12" on center down the center line while I have good reference points - and to cut a centered kerf down the hull side of the keel board once I get it ripped (as a screw guide). I'll dry fit and use the installed keel(screwed from underneath) to measure and mark center lines for the strakes... then dry fit them similarly. Mark all for final length, then remove and set aside. Once glassing and fairing are complete, reinstall with thickened epoxy (screws/washers from underneath for clamping pressure). I'll ultimately remove the screws and fill those holes before adding fillets (once upright). Is there a better way?
I'm also tempted to shape the hull-side of the keel a bit to reduce the amount of thickened epoxy needed for gap-filling. Worthwhile, or waste of time?
A fair number of people over the years have used straps to hold the keels/strakes on (it helps if the material is a little long to give some purchase to wrestle them). People use a stick projecting up from the strake to generate force at each point using the straps. I, however, screwed mine on and left the screws in. To do it again, I may go fastener-less. My keel and strakes are a lot larger than most (keel is 3"+ wide) and I did remove material on the back with the tablesaw (a "V") to do as you describe to help it fit and index on the keel. If yours are narrower, you can flatten the keel where they sit for most of the material width and that will shrink the gap.
Got my keel, strakes, and sheer clamps ripped today, then spent a bit of time futzing with ideas for a scarfing jig for the table saw. Hopefully I'll get bits scarfed and glued tomorrow.
Good mail day today - cleats from @TA Smith (Thanks!!) as well as the following:

I'd pretty much decided to go with Tod's interceptor plate idea, but came across these old Step-n-trim tabs for about what SS bar stock would have cost me - and no machining to do! Plus an emergency step for getting in. I have a ultrasonic cleaner I use for cleaning old car parts, should make quick work of cleanup.
Good mail day today - cleats from @TA Smith (Thanks!!) as well as the following:
I'd pretty much decided to go with Tod's interceptor plate idea, but came across these old Step-n-trim tabs for about what SS bar stock would have cost me - and no machining to do! Plus an emergency step for getting in. I have a ultrasonic cleaner I use for cleaning old car parts, should make quick work of cleanup.
Got my keel, strakes, and sheer clamps ripped today, then spent a bit of time futzing with ideas for a scarfing jig for the table saw. Hopefully I'll get bits scarfed and glued tomorrow.
Good mail day today - cleats from @TA Smith (Thanks!!) as well as the following:
View attachment 65531
I'd pretty much decided to go with Tod's interceptor plate idea, but came across these old Step-n-trim tabs for about what SS bar stock would have cost me - and no machining to do! Plus an emergency step for getting in. I have a ultrasonic cleaner I use for cleaning old car parts, should make quick work of cleanup.
Those look great. I'd go with those without a second thought if I knew they existed.
I was just thinking I could really use those for my boat, getting back in over the stern gets a little harder every year!Those look great. I'd go with those without a second thought if I knew they existed.
Unfortunately they haven't been made for years, but they periodically pop up on ebay or the various boating forums.I was just thinking I could really use those for my boat, getting back in over the stern gets a little harder every year!
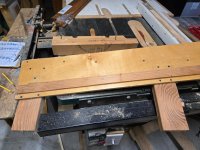
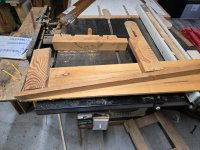
Here's the scarfing jig I ended up with for dimensional lumber (up to about 3"). It is 12:1.

I can't take credit for it, after messing with ideas yesterday I knew what I wanted to do with my sled and thought I wanted hold-downs, but hadn't figured out my clamping plan. Came across some plans last night on Fine Woodworking that fit the bill perfectly. The fence is screwed to the sled at the desired angle, with bolts running up from its bottom (in my case, the bolts are buried between the fence and the sled). A piece of scrap the same height as the piece being scarfed is set (loosely) along the back of the fence. Hold-down blocks sit on top of that scrap and the piece being scarfed. That pressure holds the piece being cut square to the sled and fence. The only really limitation is height... this works up to the max height if your table saw blade, less the sled thickness.
I can't take credit for it, after messing with ideas yesterday I knew what I wanted to do with my sled and thought I wanted hold-downs, but hadn't figured out my clamping plan. Came across some plans last night on Fine Woodworking that fit the bill perfectly. The fence is screwed to the sled at the desired angle, with bolts running up from its bottom (in my case, the bolts are buried between the fence and the sled). A piece of scrap the same height as the piece being scarfed is set (loosely) along the back of the fence. Hold-down blocks sit on top of that scrap and the piece being scarfed. That pressure holds the piece being cut square to the sled and fence. The only really limitation is height... this works up to the max height if your table saw blade, less the sled thickness.
Here's the scarfing jig I ended up with for dimensional lumber (up to about 3"). It is 12:1.
View attachment 65558
I can't take credit for it, after messing with ideas yesterday I knew what I wanted to do with my sled and thought I wanted hold-downs, but hadn't figured out my clamping plan. Came across some plans last night on Fine Woodworking that fit the bill perfectly. The fence is screwed to the sled at the desired angle, with bolts running up from its bottom (in my case, the bolts are buried between the fence and the sled). A piece of scrap the same height as the piece being scarfed is set (loosely) along the back of the fence. Hold-down blocks sit on top of that scrap and the piece being scarfed. That pressure holds the piece being cut square to the sled and fence. The only really limitation is height... this works up to the max height if your table saw blade, less the sled thickness.
Jig schmig.
") I like posting this up every so often....
I like posting this up every so often....


Neal Haarberg
Active member
First of all, Tod, that's nuts. I made a couple jigs for my circular saw to do scarfs. The one in back of the picture is for plywood. It screws to the circular saw base (table) and acts a fence so I can run it along the edge. Of course it does not have the depth to go all the way through over 1/4" ply but I can remove the bulk of the material with it. The jig in front acts like a track saw. I clamp the board to be scarfed to the bottom of it to the angled piece flip it over and clamp it to a saw horse at the 2x4's then I just run the circular saw along the top to make the cut. I use a second saw horse to support the long piece being scarfed.
Attachments
First of all, Tod, that's nuts.
I gave up suggesting it, since no one ever follows that suggestion.
Really an easy way to do it and no drama at all.I knew I liked you for some reason - you've got some southern redneck in you for sure!!Jig schmig.
View attachment 65561
View attachment 65562
View attachment 65563
View attachment 65564
I mean.... this doesnt look terrible. I dont know what any of this is, or how much area is done here, or why this step is needed to make a boat but I am assuming you made the tallest cut, moved the blade down, moved the board over a bit, turned saw on and repeated opposite direction to get next step down and repeated 27 times (it looks like), creating a ladder step down effect? Thats how Im interpreting these pictures right? I think this is exactly how I would do this. My only worry would be sliding the board back and forth so many times, getting thinner and thinner and it wanting to crumble from the weight. how thick was the sheet of wood? 3/4" and how much do you move the blade when making the next cut?Jig schmig.
View attachment 65561
View attachment 65562
View attachment 65563
View attachment 65564